An external system refers to a group of settings and configurations that are required to perform tests. A single external system can be configured to work with multiple Projects or Environments.
The External Systems module provides a centralized overview of all the configured components used for test automation. This includes information about the external system itself and details about the projects and environments it is configured to work with. From this module, you can create a new configuration or add an existing one to an external system.
To access the External Systems module, navigate to Administration > External Systems.
Create an External System
Navigate to Administration > External Systems.
Click the Create button.
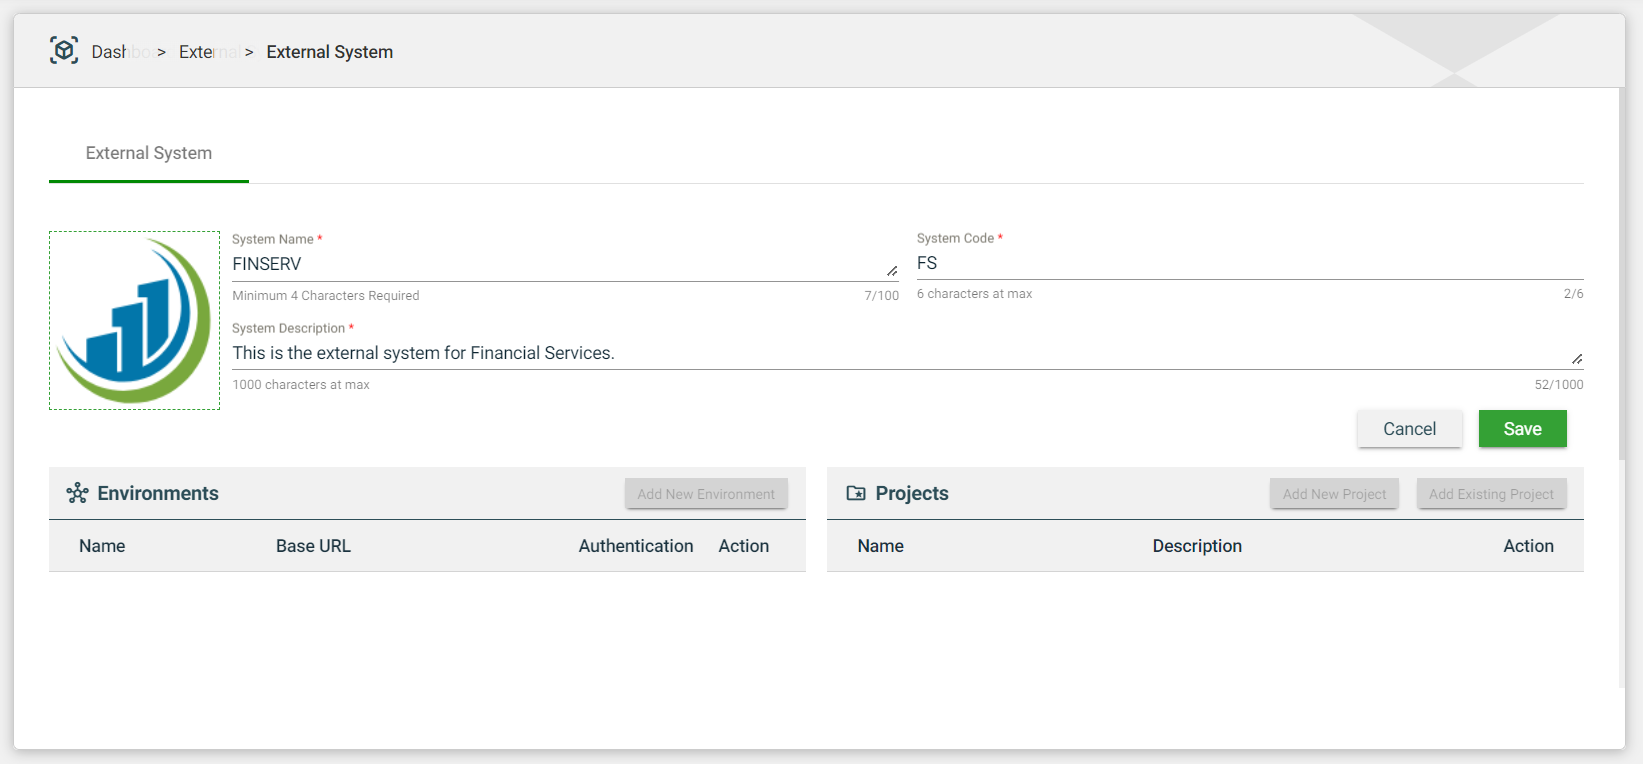
Fill in the required fields.
Field
Description
Upload Logo Here
Logo of the external system.
Mandatory: No
System Name
Name of the external system.
Mandatory: Yes
External System Code
Unique identifier assigned to an external system.
The External System Code is displayed exclusively in Card View on the External Systems page.
Mandatory: Yes
Description
Describes the external system.
Mandatory: Yes
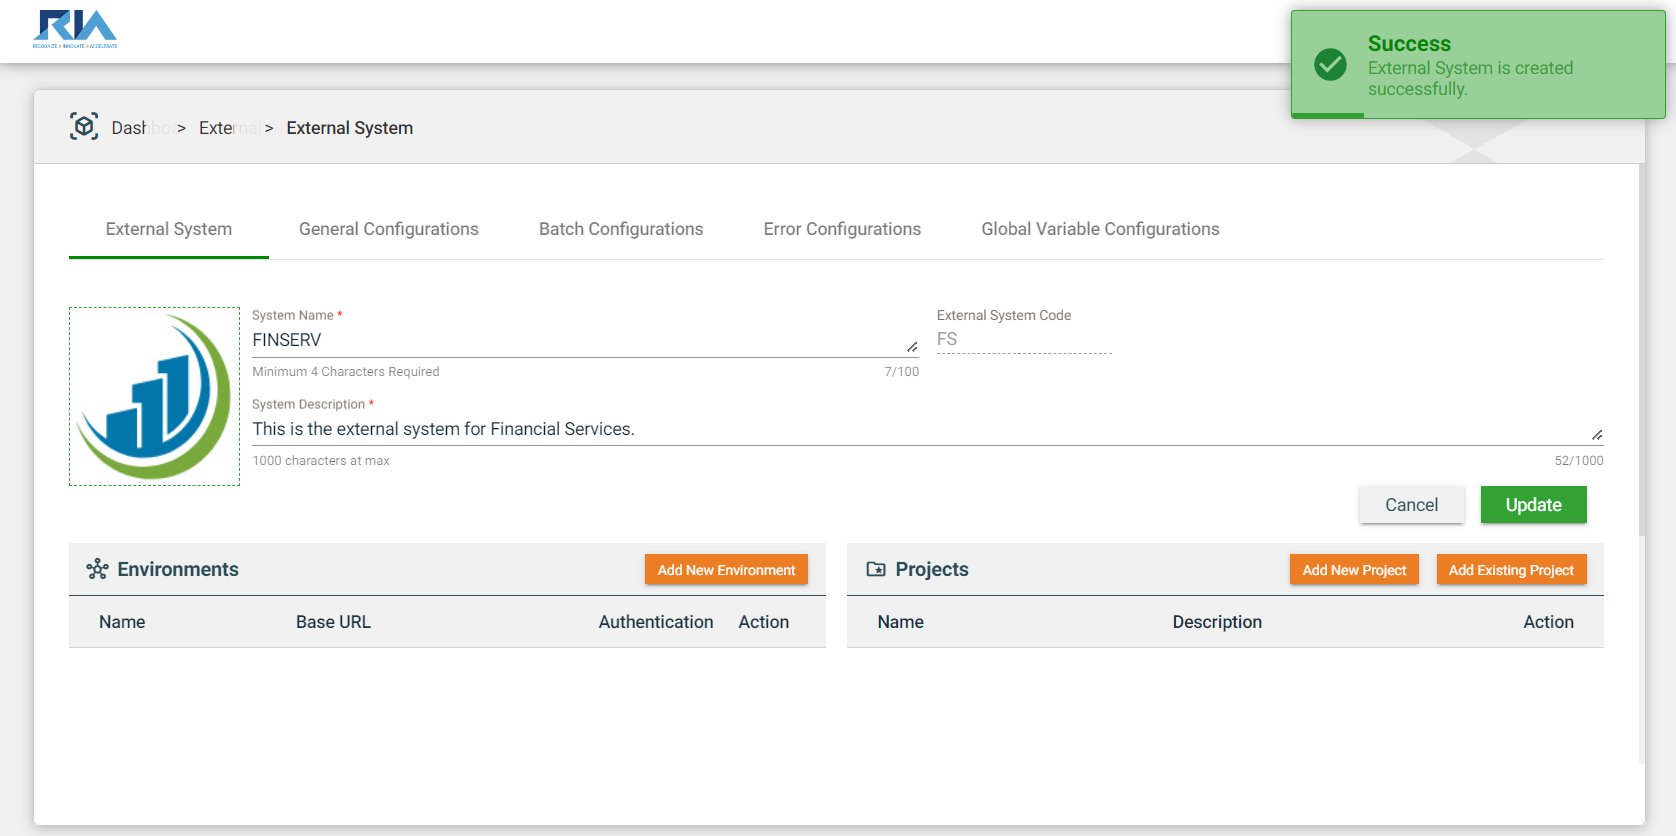
Click Save.
After creating a new external system, the system will automatically generate the following new configurations.
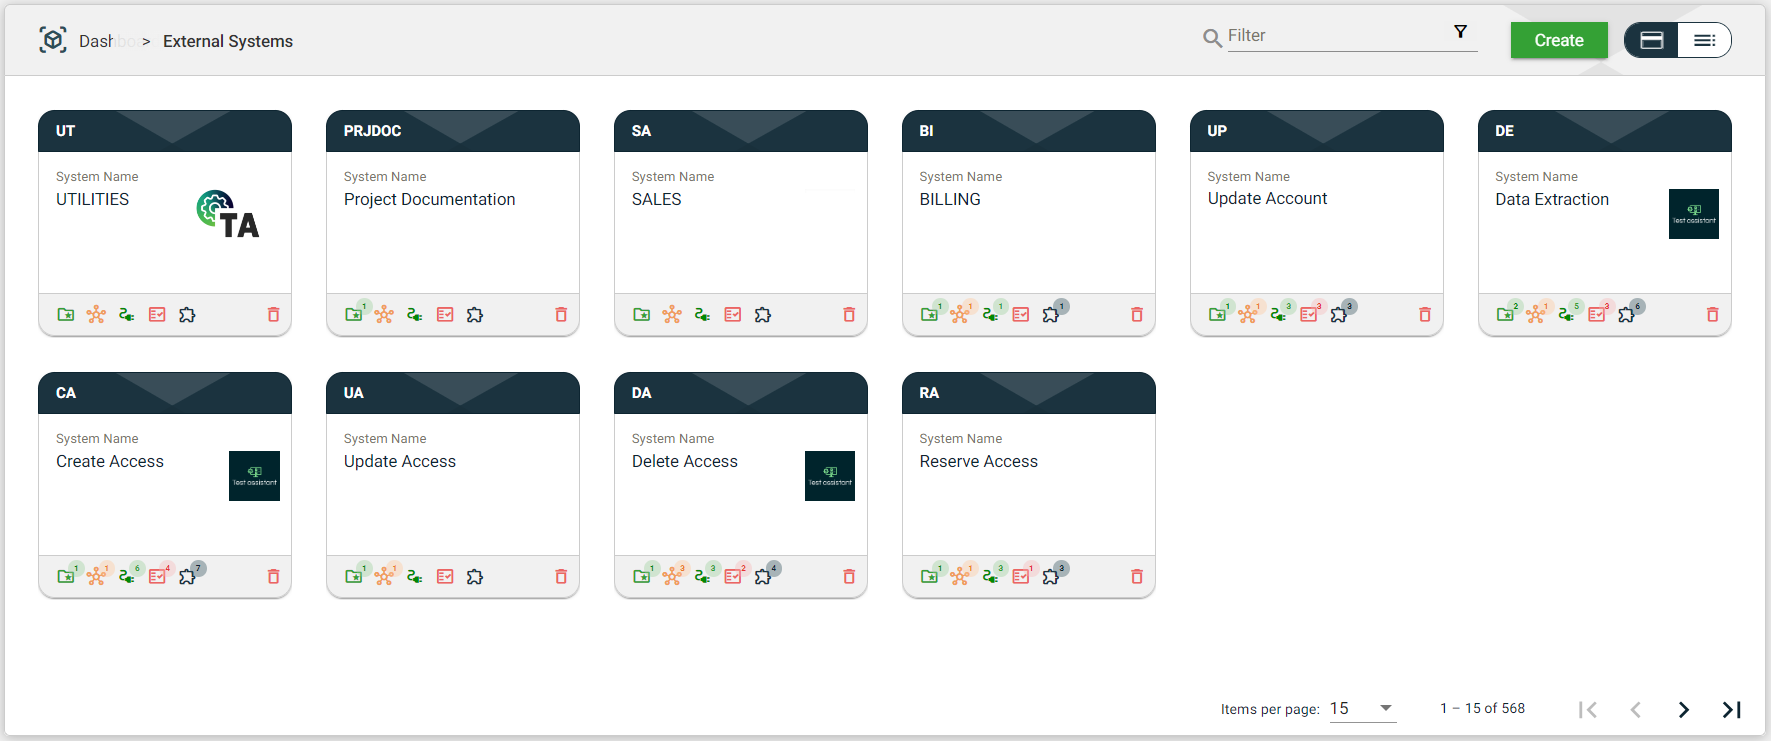
The card view presents all External Systems as cards, with the External System Code on the card header. The card displays the System Name and its logo. The card footer shows the count of configured items and a delete icon.
Icon
Name
Description
Projects
Displays the number of configured projects.
If you click on the icon, you will be taken to the Projects module, where you can see a list of all the configured projects in the external system.
If no project has been configured, a pop-up will appear, asking you to create a new project for the selected external system. If you click on the Yes button, you will be redirected to a page to create a new project. If you click No, you will be taken back to the External Systems view.
Environments
Displays the number of configured environments.
If you click on the icon, you will be taken to the Environments module, where you can see a list of all the configured environments in the external system.
If no environment has been configured, a pop-up will appear, asking you to create a new environment for the selected external system. If you click on Yes, you will be redirected to a page to create a new environment. If you click No, you will be taken back to the External Systems view.
Services
Displays the number of configured services.
If you click on the icon, you will be taken to the Services module, where you can see a list of all the configured services in the external system.
If no service has been configured, a pop-up will appear, asking you to create a new service for the selected external system. If you click on Yes, you will be redirected to a page to create a new service. If you click No, you will be taken back to the External Systems view.
Validation Services
Displays the number of configured validation services.
If you click on the icon, you will be taken to the Validation Services module, where you can see a list of all the configured validation services in the external system.
If no validation service has been configured, a pop-up will appear, asking you to create a new validation service for the selected external system. If you click Yes, you will be redirected to a page to create a new validation service. If you click No, you will be taken back to the External Systems view.
Steps
Displays the number of steps configured.
If you click on the icon, you will be taken to the Steps module, where you can see a list of all the configured steps in the external system.
If no validation service has been configured, a pop-up will appear, asking you to create a new step for the selected external system. If you click Yes, you will be redirected to a page to create a new step. If you click No, you will be taken back to the External Systems view.
Delete
Deletes the external sytem.
List View
The list view displays all external systems in a table format. Similar to the card view, it includes the logo, External System Name, counts of the configured items, and a icon. The description of each external system is also displayed in the list view.
The functions of the icons on the Card View are also available in the List View by clicking on the respective column value.
Filter
The card and list views include a Filter by System Name feature that allows you to filter the list of external systems by providing a keyword or the full name of the external system. Only the external systems that match the provided keyword or name will be displayed in the view.
1 - Configurations
The following configurations are only displayed for existing external systems or after creating a new one.
The following configuration tabs are not displayed when a create new external system window is displayed.
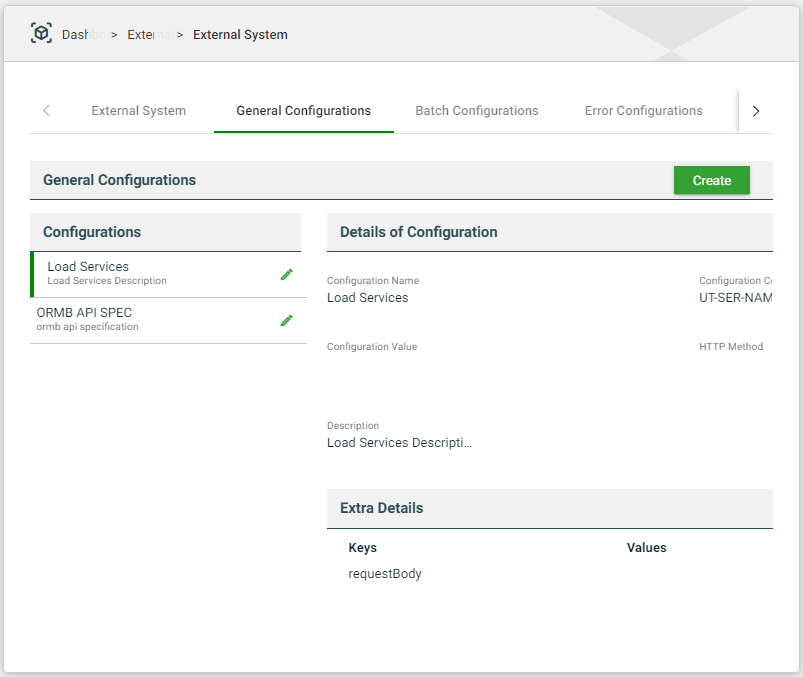
General Configurations
General configurations are configurations defining the methods in fetching services from your server for creating Services.
When an external system is created, the following general configurations are automatically created:
Load Services — used to fetch REST Catalog services.
ORMB API SPEC — used to fetch services specific to ORMB API requests.
Create a general configuration
You can also create a new general configuration by following these steps:
Navigate to Administration > External Systems.
Select an existing external system from the list.
Click General Configurations > Create.
Fill in the required fields.
Field
Description
Configuration Name
Name of the general configuration.
Mandatory: Yes
Configuration Code
Unique identifier assigned to a general configuration.
Mandatory: Yes
Configuration Value
Value of the general configuration.
Mandatory: Yes
HTTP Method
Specifies the action to be performed by the external system to your server. The following are the possible values:
POST
DELETE
GET
PATCH
PUT
Mandatory: Yes
Configuration Description
Description of the general configuration.
Mandatory: Yes
Extra Details
Defines additional details for the general configuration in key-value pairs format.
Mandatory: No
Click Save.
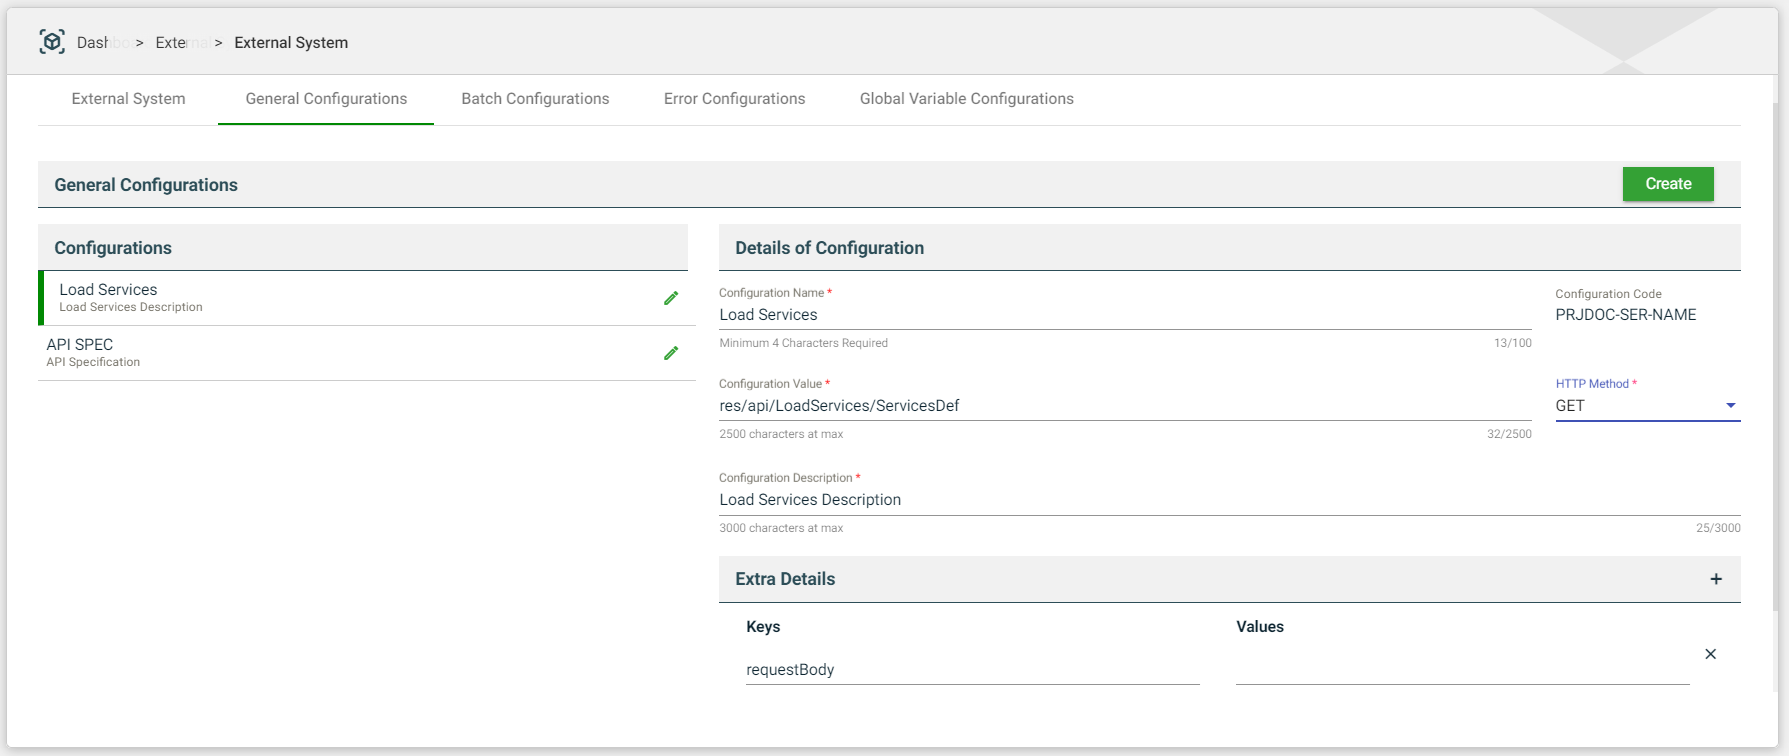
Modify a general configuration
To modify a general configuration, select the desired configuration, then click the Edit icon.
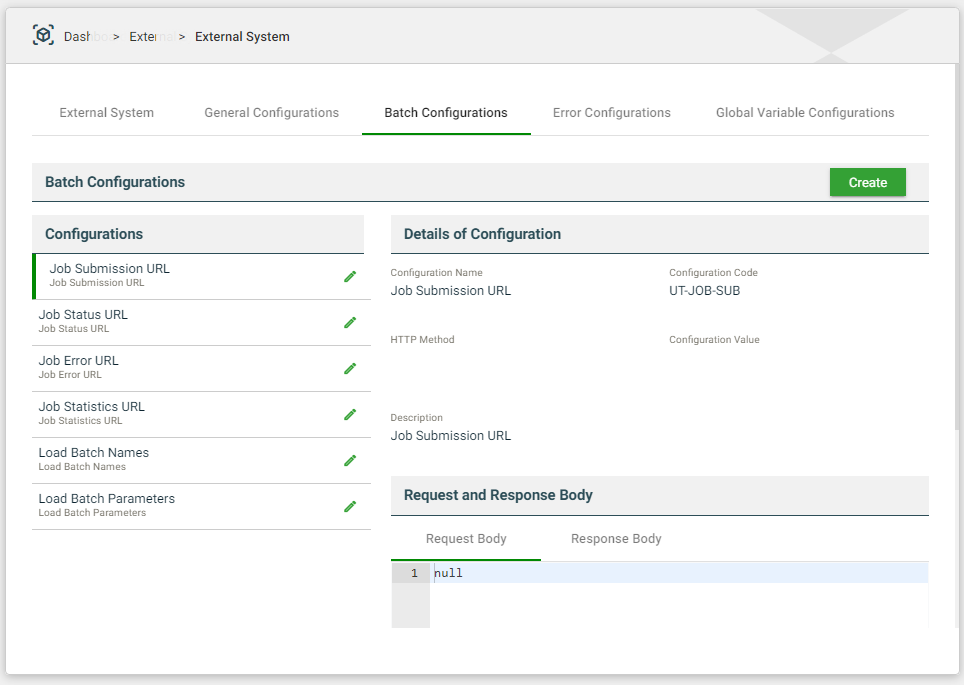
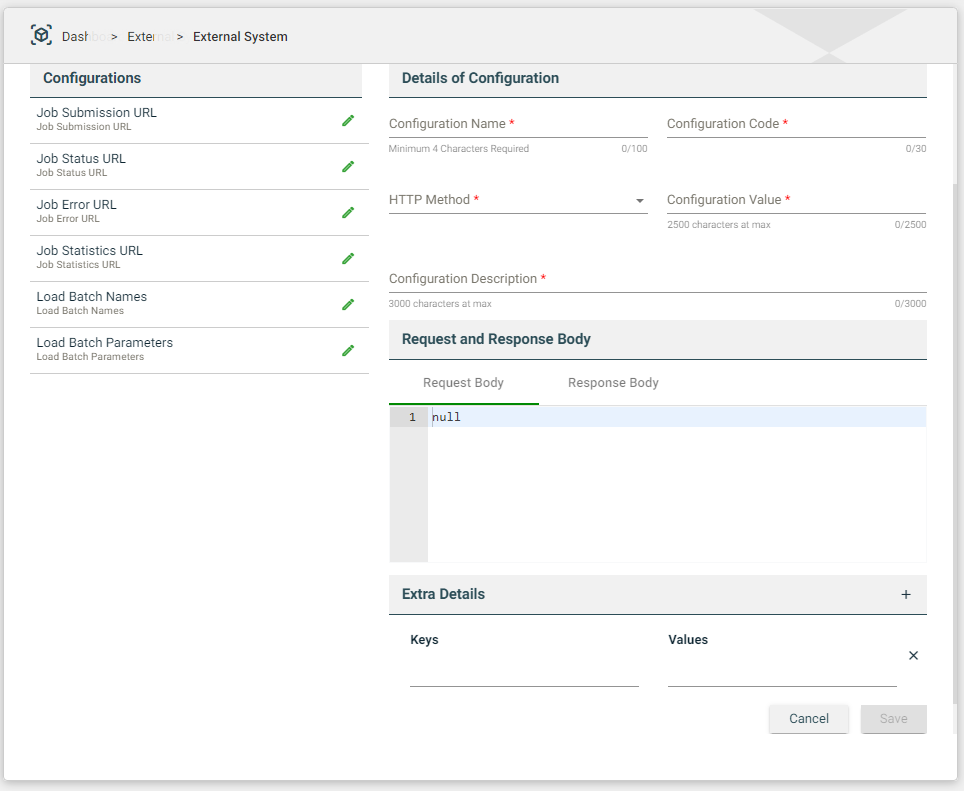
Batch Configurations
When an external system is created, the following batch configurations are automatically created:
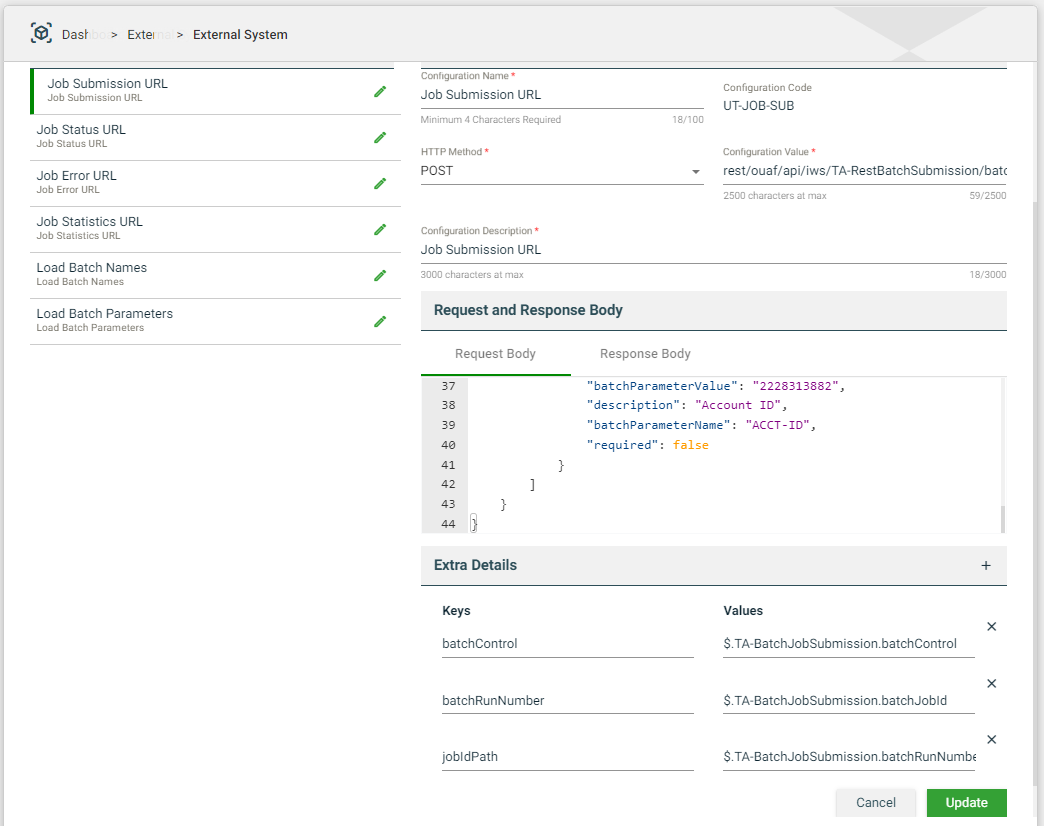
Defines the configuration used to submit a batch. The Data Set is used as the request body for the POST request, and in response, a batchJobId is retrieved after a successful batch job submission. This batchJobId is used for further test execution.
See below for an example of the request body, response body, and extra details.
Ensure that you have verified the JSON script in Postman before adding it to your Test Assistant configuration. See Verify JSON script in Postman.
{"TA-BatchJobSubmission":{"batchControl":"BILLING","processDate":"2020-05-01","batchJobParameter":[{"sequence":"10","isRequired":"false","description":"Override Maximum Number of Errors","batchParameterName":"MAX-ERRORS","required":false},{"sequence":"20","isRequired":"false","description":"Division","batchParameterName":"CIS-DIVISION","required":false},{"sequence":"30","isRequired":"false","description":"Thread Pool Name","batchParameterName":"DIST-THD-POOL","required":false},{"sequence":"40","isRequired":"false","description":"Bill Cycle","batchParameterName":"BILL-CYC-CD","required":false},{"sequence":"50","isRequired":"false","batchParameterValue":"2228313882","description":"Account ID","batchParameterName":"ACCT-ID","required":false}]}}
{"TA-BatchJobSubmission":{"batchJobId":"99494498539339","batchControl":"BILLING","user":"SYSUSER","language":"ENG","batchStartDateTime":"2023-02-27T10:13:36Z","batchRunNumber":"49","batchRerunNumber":"0","threadCount":"0","batchThreadNumber":"0","processDate":"2020-05-01","maximumCommitRecords":"0","maximumTimeoutMinutes":"0","isTracingProgramStart":"false","isTracingProgramEnd":"false","isTracingSQL":"false","isTracingStandardOut":"false","description":"Billing","programName":"CIPBBILB","userInfo":"System, English","batchJobParameter":[{"sequence":"10","batchParameterName":"MAX-ERRORS","isRequired":"false","description":"Override Maximum Number of Errors"},{"sequence":"20","batchParameterName":"CIS-DIVISION","isRequired":"false","description":"Division"},{"sequence":"30","batchParameterName":"DIST-THD-POOL","isRequired":"false","description":"Thread Pool Name"},{"sequence":"40","batchParameterName":"BILL-CYC-CD","isRequired":"false","description":"Bill Cycle"},{"sequence":"50","batchParameterName":"ACCT-ID","batchParameterValue":"2228313882","isRequired":"false","description":"Account ID"}]}}
Keys
Values
jobIdPath
$.TA-BatchJobSubmission.batchJobId
batchControl
$.TA-BatchJobSubmission.batchControl
batchRunNumber
$.TA-BatchJobSubmission.batchRunNumber
Job Status URL
Defines the configuration used to get the status of a submitted batch. The batchJobId from Job Submission URL configuration is used to retrieve a response on whether the batch job status ran successfully.
The nodes in this configuration are used to store the following batch run information:
batchJobStatus — status of the batch run. The possible values are ST, IP, PD, or ED.
throttleTime — number of minutes the batch run is in a PD or IP state before it automatically stops.
batchJobId
batchRunNumber
See below for an example of the request body, response body, and extra details.
Ensure that you have verified the JSON script in Postman before adding it to your Test Assistant configuration. See Verify JSON script in Postman.
Defines the configuration used to get the overall statistics of the submitted batch. The statistics can either be completed or error. If it is error, the TotalError node will have a value that will be used in the next service to get the error details. The batchRunNumber from Job Status URL and the batchNbr from Job Error URL are used in the POST request to get the following nodes in the Response Body.
See below for an example of the request body, response body, and extra details.
Ensure that you have verified the JSON script in Postman before adding it to your Test Assistant configuration. See Verify JSON script in Postman.
Unique identifier assigned to a batch configuration.
Mandatory: Yes
Configuration Value
Value of the batch configuration.
Mandatory: Yes
HTTP Method
Specifies the action to be performed by the external system to your server. The following are the possible values:
POST
DELETE
GET
PATCH
PUT
Mandatory: Yes
Configuration Description
Description of the batch configuration.
Mandatory: Yes
Request and Response Body
Defines the template for the request and response bodies.
Mandatory: No
Extra Details
Defines additional details for the batch configuration in key-value pairs format.
Mandatory: No
Modify a batch configuration
To modify a batch configuration, select the desired configuration, then click the Edit icon.
Ensure that you have verified the JSON script in Postman before adding it to your Test Assistant configuration. See Verify JSON script in Postman.
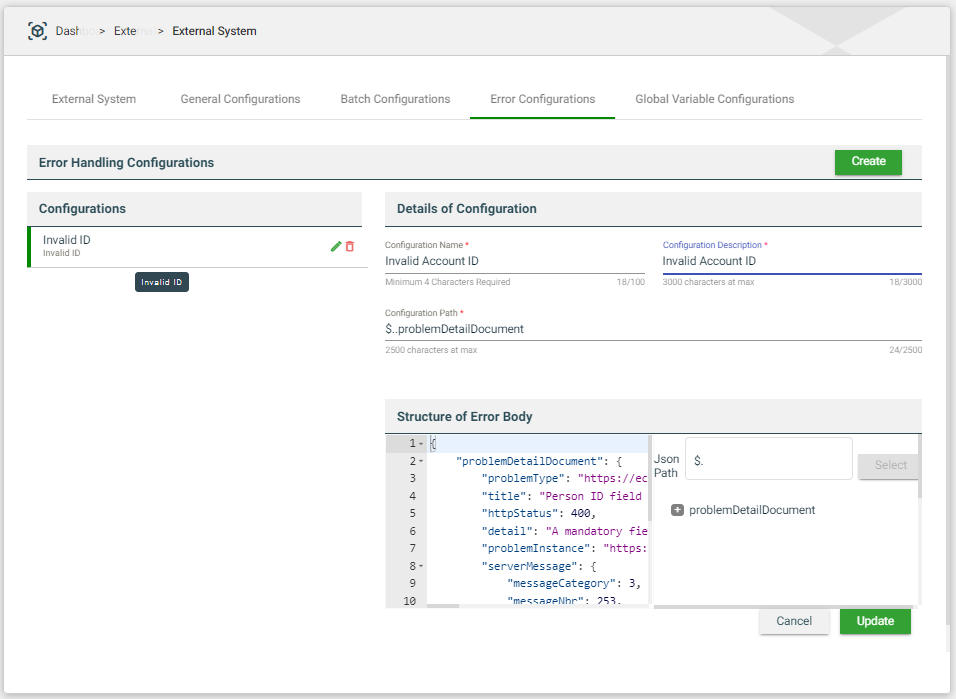
Error Configurations
Error configurations show customized error messages after test executions on the Run Results screen.
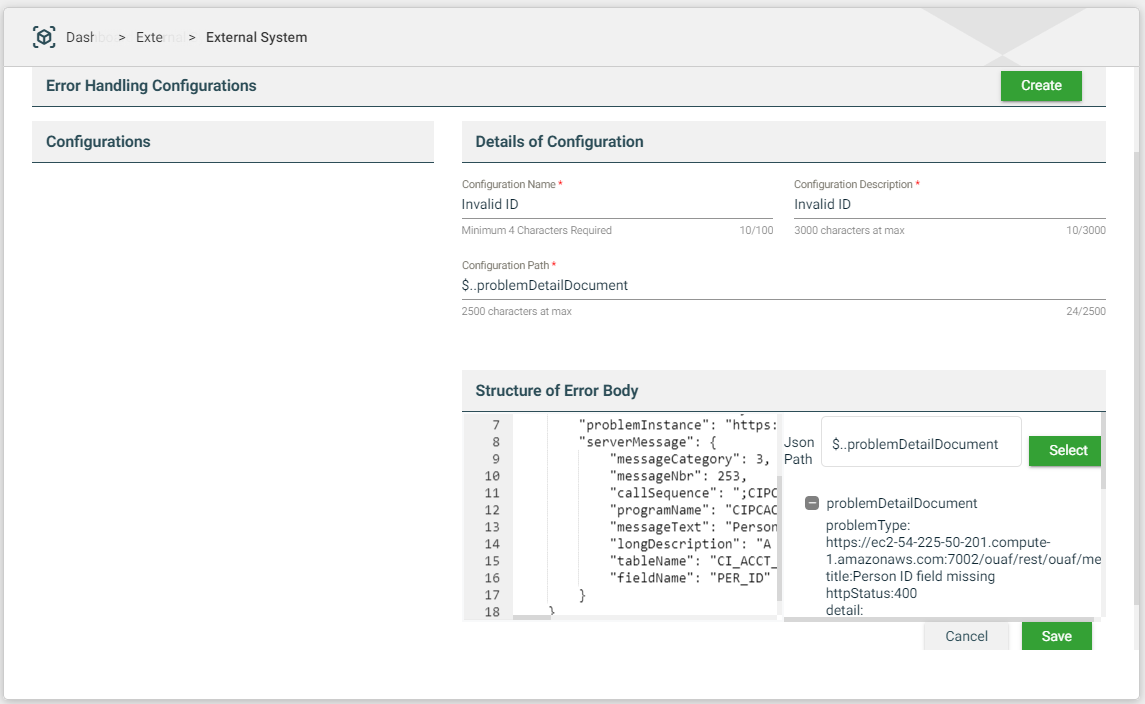
Create an error configuration
Navigate to Administration > External Systems.
Select an existing external system from the list.
Click Error Configurations > Create.
Field
Description
Configuration Name
Name of the error configuration.
Mandatory: Yes
Configuration Description
Description of the error configuration.
Mandatory: Yes
Configuration Path
Automatically gets the value of the JSON Path textbox in the Structure of Error Body configuration, when Select is clicked.
Mandatory: Yes
Structure of Error Body
Response value for failed results.
For example:
{
  "problemDetailDocument": {
    "problemType": "https://ec2-54-225-50-201.compute-1.amazonaws.com:7002/ouaf/rest/ouaf/message/3/253",
    "title": "Person ID field missing",
    "httpStatus": 400,
    "detail": "A mandatory field has been left blank. Please enter a value and retry your request.",
    "problemInstance": "https://ec2-54-225-50-201.compute-1.amazonaws.com:7002/ouaf/rest/ouaf/errorMessageInstance/20230612064333021/SYSUSER/3/253?request=%2Fouaf%2Frest%2Fouaf%2Fapi%2Fiws%2FTA-CreateAccount%2FaddAccount&method=POST",
    "serverMessage": {
      "messageCategory": 3,
      "messageNbr": 253,
      "callSequence": ";CIPCACPR;CIPCACPL;CIPCACCP",
      "programName": "CIPCACPR",
      "messageText": "Person ID field missing",
      "longDescription": "A mandatory field has been left blank. Please enter a value and retry your request.",
      "tableName": "CI_ACCT_PER",
      "fieldName": "PER_ID"
    }
  }
}
Mandatory: Yes
6. Click Save.
Modify an error configuration
To modify an error configuration, select the desired configuration, then click the Edit icon.
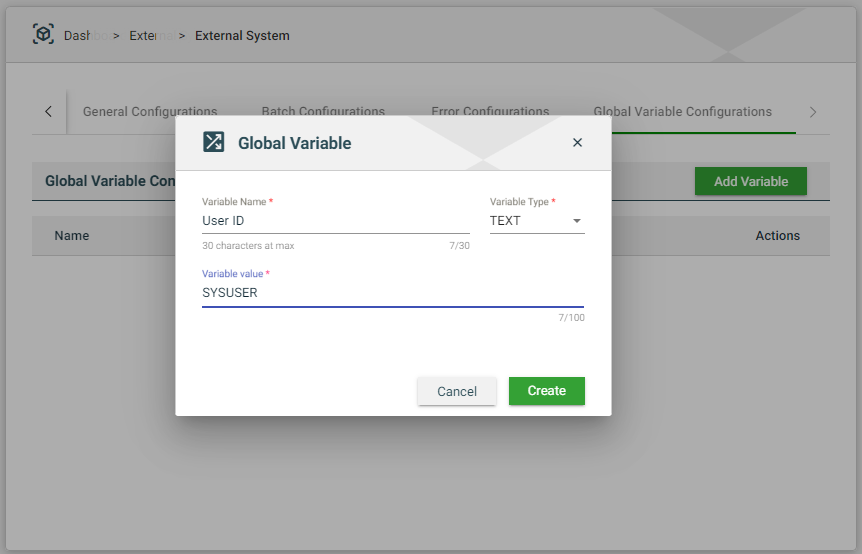
Global Variable Configurations
The variable configured in the Global Variable Configurations module can be used across the external systems. Global variables are used to hide actual values. A global variable will be displayed instead of its table actual parameter value. For example, you can set a global variable for your username and password so that their actual values will not be displayed on test execution and results.
You can use global variables in the Steps and Data Sets modules.
Create a global variable configuration
Navigate to Administration > External Systems.
Select an existing external system from the list.
Click Global Variable Configurations > Create.
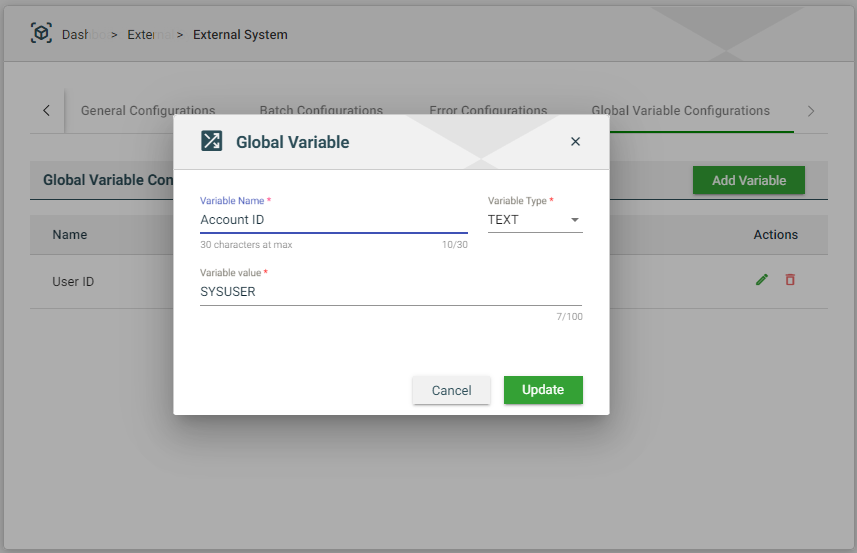
Modify a global variable configuration
To modify a global variable configuration, select the desired configuration, then click the Edit icon.
.png)