RIA Test Automation is a versatile software testing solution developed by RIA
Advisory to streamline and enhance the testing process for enterprise
applications. Initially created to address the challenges of efficient
regression testing in internal projects, it has now grown into a robust tool
that can adapt to any enterprise system, providing complete end-to-end testing
capabilities.
This tool especially supports various Oracle products, including Oracle
Revenue Management and Billing (ORMB), Customer-to-Meter (C2M), Utilities
Customer Cloud Service (CCS), and Meter Data Management (MDM). However, its
flexible architecture allows for seamless integration across diverse business
applications. Test Automation facilitates thorough testing across APIs, batch
processes, and user interface interactions, enabling you to deliver quality
software while minimizing the effort and costs involved in the testing
process.
When using Test Automation, it is advisable to utilize Starter Packs for streamlined configurations and efficient implementations. However, should you opt for creating all modules from the ground up, see General configuration.
Prerequisites
Kubernetes and Helm requirements
Kubernetes version 1.28 or higher
ingress-nginx
cert-manager
PostgreSQL database with TA DB Pack
Ocular Framework (if ocular will be used as auth)
Helm version 3.0 or higher
System requirements
The following are the minimum requirements for machines running Test Automation:
Specification
Minimum requirement
CPU
2 vCPU
Memory
8 GB
Storage
50 GB
Prerequisite packages
Test Automation offers two prerequisite packages — Bundles and Configuration Migration Assistant (CMA). These packages serve as the foundation for Test Automation to operate. Before installation, you are required to deploy only one of the two packages to ensure the functionality of Test Automation. For more information, see Prerequisite packages.
Selenium IDE plugin
Selenium IDE plugin is a third-party browser plugin that needs to be installed in your browsers. This plugin is the primary tool used for scenarios involving UI recordings.
Starter packs are sets of pre-defined scenarios that you can employ for your testing projects. These scenarios cover a wide range of diverse testing situations, enabling you to begin your testing project effortlessly and efficiently. This ensures comprehensive coverage of crucial testing scenarios right from the start.
Test Automation offers the following starter packs for the following industries:
Banking — To see the list of pre-defined scenarios for the banking industry, see Banking starter pack.
Healthcare — To see the list of pre-defined scenarios for the healthcare industry, see Healthcare starter pack.
Utilities — To see the list of pre-defined scenarios for the utilities industry, see Utilities starter pack.
Use a starter pack
The starter pack comes with all the necessary modules for running a test. However, it’s important to customize the data sets, batch configurations in external systems, and environment settings to match your business requirements and to run the tests in your preferred environments.
View your test results in Results. For more information, see Results.
Required Test Automation actions
Environment configuration and authentication details
Before running the test, ensure that the testing environment is properly set up and configured. This includes specifying the necessary credentials and database details for accessing the configured environment. For more information, see Environments.
General configuration
If you decide to customize all modules, follow these steps:
Before installation, you are required to deploy only one of the two packages to ensure the functionality of Test Automation.
Services
The following are the services included in a pre-requisite package:
Service
Service Type
Description
TA-IWSRestCatalog
Inbound web service
Returns the catalog of REST-based web services with details based on the REST web service catalog.
TA-GetOpenAPISpec
Inbound web service
Generates the OpenAPI Specification for a given REST Inbound Web Service and version of OpenAPI Specification.
TA-GetBatcCt
Inbound web service
Retrieve batch controls configured on the extendable lookup TA-AutomationBatchControls and their corresponding value TA-ValidAutomationBatchControls.
TA-RestBatchSubmission
Inbound web service
Provides functionalities to manage and monitor batch jobs through RESTful APIs.
TA-BatchStats
Inbound web service
Returns the statistics of a batch job, including the number of records processed, the threadpool used, start time, and end time.
TA-BatchJobSubmission
Business service
Submits a batch job instance for a given batch control.
TA-CheckBatchJobStatus
Business service
Returns the status of a batch job run, such as Started, Pending, or Ended.
TA-GetBatchControl
Business service
Returns the details of a given batch control.
TA-GetBatchRunStatus
Business service
Retrieves the status and run number of a batch run for a given batch control.
TA-BatchError
Business service
Returns an error message when a batch run encounters any error.
Bundles
Test Automation integrates with ORMB through the use of REST APIs. Components that may not be readily available in the base or framework version of ORMB can be added by importing bundles. This simplifies the integration process by removing the need to create new APIs.
On the Bundle Import popup window, input a value for the External Reference and Detailed Description fields.
Open a downloaded bundle XML file and copy the contents. Then, paste the contents to the Bundle Details field on the Bundle Import popup window.
Click Save. The Bundle Import popup window will be closed upon clicking Save.
On Main > Bundle Import > Record Actions, click Apply.
Configuration Migration Assistant (CMA)
If you have used Bundles, you do not have to use CMA. You are only required to deploy one prerequisite package.
CMA is a set of pre-defined configurations and SQL queries, such as Inbound web services, that help trigger batch executions and check the status of these executions.
Download
If you are using a TA Banking starter pack or an ORMB environment, download the files here.
If you are using a C2M environment, download the files here.
Import CMA files to your OUAF environment
Run the downloaded streamlineCMAProcess_script.sql in both the source and target environments.
Copy the created migration data export file, TA-EXPFINAL.cma, and paste it into the target environment:
If you are using ORMB 5.0, /u01/app/sploutput/ORMB5000/F1_CMA_FILES/export.
If you are using ORMB 6.0, /u01/app/sploutput/ORMB6000/F1_CMA_FILES/export.
Import the C2M_TA_C2M_Pre_Requisite.cma dataset to your target environment.
1.2.1.1 - TA Downloads
Overview
The downloads were generated using the following environment versions:
ORMB 6.0.0.0
Customer Release V4.5.0.1.1 000 000
Oracle Revenue Management and Billing for Financial Services V6.0.0.0.0 205149 000
To ensure batches are loaded in Test Automation (TA) tool and configured for execution, you need to ensure following steps are followed for every configured OUAF environment in TA.
Navigate to Admin > E > Extendable lookup.
You can also enter /Extendable lookup in the search bar.
Enter TA-AutomationBatchControls in the Business Object field. Click Search.
Click the link in the Description column of the TA-AutomationBatchControls object.
Click the edit icon for the TA-AutomationBatchControls in the Extendable Lookup Value List.
Click + in the Field Configurations section of the Extendable Lookup window.
Enter the batch name under the Batch Control column.
Copy the automatically generated description to the Description column. If the batch name is incorrect, the description will not be generated. Click Save.
Repeat Steps 7-8 for all other batches that will be configured in TA.
The batches will now load in TA. You can verify this by creating a batch step and clicking on the Batch Name field. All the configured batches should be available in the dropdown list.
Troubleshooting
Batches are still not loading
Ensure the required OUAF environment from which the batches need to load is set up as default.
Ensure if the Authentication type is correct.
Ensure the OUAF environment is whitelisted.
1.2.1.3 - IWS prerequisites
Add services
To ensure configured IWS are loaded in Test Automation (TA) tool and configured for execution, you need to ensure that the following steps are followed for every configured OUAF environment in TA.
Navigate to Admin > W > Extendable lookup page.
You can either click or enter `/Web Service Catalog` in the search bar.
Click the broadcast button beside the REST Web Service Class.
Select all the required services in the Candidate Services section, then click Add to Catalog.
The added services are now available in the REST catalog services link for an API step in TA.
Troubleshooting
REST Catalogs are not loading
Ensure the required OUAF environment from which the IWS services need to load is set up as default.
Ensure if the Authentication type is correct.
Ensure that the OUAF environment is whitelisted.
1.2.2 - Banking Starter Pack
Overview
This documentation lists all scenarios defined in the Banking starter pack. To use a starter pack, ensure that you have already completed the steps in Use a starter pack.
Customer onboarding test scenarios
Test scenarios
Service type
Description and Query
Create a customer
API
UI
Creates a user with the following details using API:
Customer ID number — ID number registered in the banking database.
Address — Home or work address of the user registered in the banking database.
Division — Specifies the division where the user is registered.
//Input - Customer Identifier
SELECT a.PER_ID_NBR CUST_IDENTIFIER
,b.ADDRESS1 ADDR_LINE1
,b.ADDRESS2 ADDR_LINE2
,b.ADDRESS3 ADDR_LINE3
,b.ADDRESS4 ADDR_LINE4
,b.CITY CITY
,b.POSTAL POSTAL_ID
,b.cis_division DIVISION
FROM CI_PER_ID a
,CI_PER b
,c1_address_entity c
,CI_CIS_DIVISION d
WHERE a.PER_ID_NBR = :F1 –Customer Identifier
AND a.PER_ID = b.per_id
AND c.ENTITY_ID = b.per_id
AND b.cis_division = d.CIS_DIVISION
Create an account and contract
API
UI
Creates a bank account with the following details using API:
Account number — Account number of the user as stored in the banking database
Account type — Specifies the account type of the account number.
Account start date — Specifies when the account became active.
Contract type — Type of the contract associated with the account number.
Contract status — Describes the current status of the contract.
Contract start date — Specifies when the contract became active.
//Input - Account Identifier
SELECT a.ACCT_NBR ACCT_IDENTIFIER
,a.ACCT_NBR_TYPE_CD ACCT_TYPE
,b.SETUP_DT ACCT_STRT_DT
,c.SA_TYPE_CD CONTRACT_TYPE
FROM CI_ACCT_NBR a
,CI_ACCT b
,CI_SA c
WHERE a.acct_id = b.acct_id
AND a.ACCT_NBR = :F1 – Account Identifier
AND b.acct_id = c.acct_id
Create parent-child relationship
API
UI
Links a child’s account to their parent’s account.
//Input - Parent Customer Identifier
SELECT PARENT_PER_NBR
,CHILD_PER_NBR
,A.PER_REL_TYPE_CD
,TO_CHAR(A.START_DT, ‘DD-MON-YYYY’) START_DATE
FROM CI_PER_PER A
,(
SELECT PER_ID PARENT_PER_ID
,PER_ID_NBR PARENT_PER_NBR
FROM CI_PER_ID
)
,(
SELECT PER_ID CHILD_PER_ID
,PER_ID_NBR CHILD_PER_NBR
FROM CI_PER_ID
)
WHERE A.PER_ID1 = PARENT_PER_ID
AND PER_ID2 = CHILD_PER_ID
AND CHILD_PER_NBR = :F1 – Child Customer
Update customer details
API
Updates the details of a customer. The Person ID number value cannot be updated, but the following can be:
Customer identifier
Email ID
Phone number
Address line 1
Address lne 2
Address line 3
Address line 4x
City
Postal ID
Division
//Input - Person Identifier
SELECT a.PER_ID_NBR CUST_IDENTIFIER
,b.per_id CUST_ID
,b.ADDRESS1 ADDR_LINE1
,b.ADDRESS2 ADDR_LINE2
,b.ADDRESS3 ADDR_LINE3
,b.ADDRESS4 ADDR_LINE4
,b.CITY CITY
,b.POSTAL POSTAL_ID
,b.cis_division DIVISION
FROM CI_PER_ID a
,CI_PER b
,c1_address_entity c
,CI_CIS_DIVISION d
WHERE a.PER_ID_NBR = :F1 – Person Identifier
AND a.PER_ID = b.per_id
AND c.ENTITY_ID = b.per_id
AND b.cis_division = d.CIS_DIVISION
//Input - Parent Customer Identifier
SELECT a.PER_ID1 PARENT_ID
,a.PER_ID2 CHILD_ID
,(
SELECT per_id_nbr
FROM ci_per_id
WHERE a.per_id2 = per_id
) Child_Identifier
FROM ci_per_per a
,ci_per_id b
WHERE b.PER_ID_NBR = ‘ABCD01’ – Parent Customer Identifier
AND a.per_id1 = b.per_id;
//Input - Person Identifier
select B.PER_ID_NBR, c.DESCR Char_Type , PER_ID_NBR Char_Value
from CI_PER_ID b , CI_ID_TYPE_l c
where B.PER_ID IN( select Per_id from CI_PER_ID where PER_ID_NBR = ‘87009953’) – Person Identifier
and b.ID_TYPE_CD = c.ID_TYPE_CD;
Update account details
API
Updates the details of an account. The Account number and Zone values cannot be updated, but the following can be:
Effective date
Char type
Char value
Bill cycle
Currency
//Input - Account Identifier

SELECT a.ACCT_ID
,a.EFFDT
,b.DESCR CHAR_TYPE
,decode(trim(a.CHAR_VAL), NULL, a.ADHOC_CHAR_VAL, a.CHAR_VAL) Char_Value
,d.BILL_CYC_CD
,d.CURRENCY_CD
FROM ci_acct_char a
,ci_char_type_l b
,CI_ACCT_NBR c
,CI_ACCT d
WHERE a.acct_id = c.ACCT_ID
AND c.acct_nbr = :F1 – Account Identifier
AND a.CHAR_TYPE_CD = b.CHAR_TYPE_CD
AND c.ACCT_ID = d.ACCT_ID
Pricing set-up test scenarios
Test scenarios
Service type
Description and Query
Assign price list at a customer level
API
UI
Assigns a list of standard prices for items to a customer, including the following details:
Price List ID — Identification number of the price list where prices of items are defined.
Start date — Effective date for the price list for the customer.
End date — Specifies when the price list is no longer for the customer.
//Input - Person Identifier
SELECT e.PER_ID
,a.PRICELIST_ID
,TO_CHAR(c.START_DT, ‘DD-MON-YYYY’) START_DT
,c.PRICE_STATUS_FLAG
,c.PRICEITEM_CD
,f.Value_amt
,l.descr
,g.TIERED_FLAG
FROM ci_pricelist a
,ci_priceLIST_asgn b
,ci_priceasgn C
,ci_party d
,CI_PER_ID e
,CI_PRICECOMP f
,CI_RC_MAP g
,CI_RC_MAP_L l
WHERE a.PRICELIST_ID = b.PRICELIST_ID
AND b.PRICELIST_ID = C.OWNER_ID
AND d.PARTY_UID = B.PARTY_UID
AND d.PARTY_TYPE_FLG = ‘PERS’
AND d.PARTY_ID = e.PER_ID
AND e.PER_ID_NBR = :F1 – Person Identifier
AND f.price_asgn_id = c.price_asgn_id
AND f.RC_MAP_ID = g.RC_MAP_ID
AND f.pricecomp_seqno = g.RC_SEQ
AND l.RC_MAP_ID = G.RC_MAP_ID
AND l.language_cd = ‘ENG’
ORDER BY f.PRICE_ASGN_ID
,f.PRICECOMP_SEQNO
Assign price list at an account level
API
UI
Assigns a list of standard prices for items to an account, including the following details:
Price List ID — Identification number of the price list where prices of items are defined.
Start date — Effective date for the price list for the customer.
End date — Specifies when the price list is no longer for the customer.
//Input - Account Identifier
SELECT e.ACCT_ID
,a.PRICELIST_ID
,TO_CHAR(c.START_DT, ‘DD-MON-YYYY’) START_DT
,c.PRICE_STATUS_FLAG
,c.PRICEITEM_CD
,f.Value_amt
,l.descr
,g.TIERED_FLAG
FROM ci_pricelist a
,ci_priceLIST_asgn b
,ci_priceasgn C
,ci_party d
,CI_ACCT_NBR e
,CI_PRICECOMP f
,CI_RC_MAP g
,CI_RC_MAP_L l
WHERE a.PRICELIST_ID = b.PRICELIST_ID
AND b.PRICELIST_ID = C.OWNER_ID
AND d.PARTY_UID = B.PARTY_UID
AND d.PARTY_TYPE_FLG = ‘ACCT’
AND d.PARTY_ID = e.ACCT_ID
AND e.ACCT_NBR = :F1 – Account Identifier
AND f.price_asgn_id = c.price_asgn_id
AND f.RC_MAP_ID = g.RC_MAP_ID
AND f.pricecomp_seqno = g.RC_SEQ
AND l.RC_MAP_ID = G.RC_MAP_ID
AND l.language_cd = ‘ENG’
ORDER BY f.PRICE_ASGN_ID
,f.PRICECOMP_SEQNO
Assign override pricing at a customer level
API
UI
Assigns a price list that overrides any existing price list assigned to the customer.
//Input - Customer Identifier

SELECT d.PER_ID_NBR
,b.START_DT
,b.END_DT
,b.PRICE_STATUS_FLAG
,c.DESCR
FROM ci_party a
,ci_priceasgn b
,ci_priceitem_l c
,ci_per_id d
WHERE a.party_uid = b.OWNER_ID
AND a.PARTY_TYPE_FLG = ‘PERS’
AND D.PER_ID_NBR = ‘55445566’ – Customer Identifier
AND D.PER_ID = a.PARTY_ID
AND b.PRICEITEM_CD = c.PRICEITEM_CD;
Assign override pricing at an account level
API
UI
Assigns a price list that overrides any existing price list assigned to an account.
//Input - Account Identifier
SELECT d.ACCT_NBR
,b.START_DT
,b.END_DT
,b.PRICE_STATUS_FLAG
,c.DESCR
FROM ci_party a
,ci_priceasgn b
,ci_priceitem_l c
,CI_ACCT_NBR d
WHERE a.party_uid = b.OWNER_ID
AND a.PARTY_TYPE_FLG = ‘ACCT’
AND D.ACCT_NBR = ‘RIAINDIA_MS01’ – Customer Identifier
AND D.ACCT_ID = a.PARTY_ID
AND b.PRICEITEM_CD = c.PRICEITEM_CD;
Billing test scenarios
Test scenarios
Service type
Description
Generate bill from billing batches
Batch
Generates a bill using the account name. For batch testing, it runs the following batches in order:
BILLOPEN (Pending Bill Generation) — Generates blank bill in pending status for accounts in a given division and bill cycle for a given cut-off date.
BSGENREG (Bill Segment Generation) — Generates bill segments, including all billable charges, of accounts that have blank bills in an open bill cycle, input bill cycle, or division for a given cutoff date.
POSTPROC (Bill Completion) — Creates post processing bill segment that has been generated by the previous batches.
//Input - Account Identifier ,Account Num Type
SELECT c.acct_nbr ACCT_IDENTIFIER
,c.acct_nbr_type_cd
,b.BILLABLE_CHG_ID
,TRIM(b.PRICEITEM_CD) PRICE_ITEM_CD
,CALC_AMT BSEG_AMT
,a.SVC_QTY TXN_AMT
,DECODE((
SELECT value_amt
FROM ci_pricecomp e
WHERE e.PRICE_ASGN_ID = b.PRICE_ASGN_ID
AND PRICECOMP_SEQNO = 10
), NULL, ‘NA’, (
SELECT ‘0’ || value_amt
FROM ci_pricecomp e
WHERE e.PRICE_ASGN_ID = b.PRICE_ASGN_ID
AND PRICECOMP_SEQNO = 10
)) Rate1
,DECODE((
SELECT LOWER_LIMIT
FROM ci_pricecomp_tier pt
,ci_pricecomp e
WHERE pt.PRICECOMP_ID = e.PRICECOMP_ID
AND e.PRICE_ASGN_ID = b.PRICE_ASGN_ID
AND PRICECOMP_SEQNO = 10
), NULL, ‘NA’, (
SELECT LOWER_LIMIT
FROM ci_pricecomp_tier pt
,ci_pricecomp e
WHERE pt.PRICECOMP_ID = e.PRICECOMP_ID
AND e.PRICE_ASGN_ID = b.PRICE_ASGN_ID
AND PRICECOMP_SEQNO = 10
)) TIER1_LOWER_LIMIT
,DECODE((
SELECT UPPER_LIMIT
FROM ci_pricecomp_tier pt
,ci_pricecomp e
WHERE pt.PRICECOMP_ID = e.PRICECOMP_ID
AND e.PRICE_ASGN_ID = b.PRICE_ASGN_ID
AND PRICECOMP_SEQNO = 10
), NULL, ‘NA’, (
SELECT UPPER_LIMIT
FROM ci_pricecomp_tier pt
,ci_pricecomp e
WHERE pt.PRICECOMP_ID = e.PRICECOMP_ID
AND e.PRICE_ASGN_ID = b.PRICE_ASGN_ID
AND PRICECOMP_SEQNO = 10
)) TIER1_UPPER_LIMIT
,DECODE((
SELECT value_amt
FROM ci_pricecomp e
WHERE e.PRICE_ASGN_ID = b.PRICE_ASGN_ID
AND PRICECOMP_SEQNO = 20
), NULL, ‘NA’, (
SELECT ‘0’ || value_amt
FROM ci_pricecomp e
WHERE e.PRICE_ASGN_ID = b.PRICE_ASGN_ID
AND PRICECOMP_SEQNO = 20
)) Rate2
,DECODE((
SELECT LOWER_LIMIT
FROM ci_pricecomp_tier pt
,ci_pricecomp e
WHERE pt.PRICECOMP_ID = e.PRICECOMP_ID
AND e.PRICE_ASGN_ID = b.PRICE_ASGN_ID
AND PRICECOMP_SEQNO = 20
), NULL, ‘NA’, (
SELECT LOWER_LIMIT
FROM ci_pricecomp_tier pt
,ci_pricecomp e
WHERE pt.PRICECOMP_ID = e.PRICECOMP_ID
AND e.PRICE_ASGN_ID = b.PRICE_ASGN_ID
AND PRICECOMP_SEQNO = 20
)) TIER2_LOWER_LIMIT
,DECODE((
SELECT UPPER_LIMIT
FROM ci_pricecomp_tier pt
,ci_pricecomp e
WHERE pt.PRICECOMP_ID = e.PRICECOMP_ID
AND e.PRICE_ASGN_ID = b.PRICE_ASGN_ID
AND PRICECOMP_SEQNO = 20
), NULL, ‘NA’, (
SELECT UPPER_LIMIT
FROM ci_pricecomp_tier pt
,ci_pricecomp e
WHERE pt.PRICECOMP_ID = e.PRICECOMP_ID
AND e.PRICE_ASGN_ID = b.PRICE_ASGN_ID
AND PRICECOMP_SEQNO = 20
)) TIER2_UPPER_LIMIT
FROM ci_bchg_sq a
,ci_bill_chg b
,ci_acct_nbr c
,ci_sa d
,ci_bseg_calc f
WHERE a.BILLABLE_CHG_ID = b.BILLABLE_CHG_ID
AND c.acct_nbr = :F1 – Account Identifier
AND c.acct_nbr_type_cd = :F2 – Account Num Type
AND c.acct_id = d.acct_id
AND d.sa_id = b.sa_id
AND f.BILLABLE_CHG_ID = b.BILLABLE_CHG_ID;
Generate bill from application
UI
Runs the following batches in order:
C1-GLASGN — Assigns the GL account to a financial transaction
//Input - Account Identifier, Bill ID
SELECT D.ACCT_NBR ACCT_IDENTIFIER
,A.ORIG_BILL_AMT BILL_AMOUNT
,SUM(C.PAY_AMT) TOTAL_PAID_AMOUNT
,B.DESCR PAYMENT_STATUS
FROM C1_BILL_DTLS_VW A
,CI_LOOKUP_VAL_L B
,CI_PAY C
,CI_ACCT_NBR D
WHERE A.ACCT_ID = C.ACCT_ID
AND C.ACCT_ID = D.ACCT_ID
AND D.ACCT_NBR = :F1 – Account Identifier
AND A.BILL_ID = :F2 – Bill ID
AND B.FIELD_NAME = ‘PAY_STATUS_FLG’
AND B.FIELD_VALUE = C.PAY_STATUS_FLG
GROUP BY A.ORIG_BILL_AMT
,D.ACCT_NBR
,B.DESCR
//Input - Account Identifier, Payment Event ID
SELECT C.PAY_AMT PAYMENT_AMT
,B.DESCR PAYMENT_STATUS
FROM CI_ACCT_NBR A
,CI_LOOKUP_VAL_L B
,CI_PAY C
WHERE A.ACCT_ID = C.ACCT_ID
AND B.FIELD_NAME = ‘PAY_STATUS_FLG’
AND B.FIELD_VALUE = C.PAY_STATUS_FLG
AND A.ACCT_NBR = :F1 – Account Identifier
AND C.PAY_EVENT_ID = :F2 – Payment Event ID
General ledger test scenarios
Test scenarios
Service type
Description
Link general ledger (GL) to account
Batch
Runs the following batches in order:
C1-GLASGN — Assigns the GL account to a financial transaction
GLS — Stages the GL download
GLDL — Extracts the GL download
Input - Account Identifier
SELECT COUNT(1) RECORDSCOUNT
FROM CI_FT A
,CI_BILL B
,CI_FT_GL C
,CI_ACCT_NBR D
WHERE A.FT_TYPE_FLG = ‘BS’
AND A.PARENT_ID = B.BILL_ID
AND C.FT_ID = A.FT_ID
AND C.GL_ACCT = ’ '
AND B.ACCT_ID = D.ACCT_ID
AND D.ACCT_NBR = :F1 – Account Identifier
SFTP test scenarios
The following scenarios support file uploads for SFTP and Batch service types:
Create price list
Define price list-price item
Assign price list
Onboard a customer
Create person hierarchy
Create account
Create invoice
Upload feed management
//Input-AccountIdentifier,BillIDSELECTTP.ACCT_NBR,TP.BILL_ID,TO_CHAR(MAX(TP.CRE_DTTM),'MM-DD-YYYY')ASBILL_DATE,TP.BILL_AMOUNT,TO_CHAR(TP.LATEST_PAYMENT_DATE,'MM-DD-YYYY')ASLATEST_PAYMENT_DATE,TP.LATEST_PAYMENT_AMOUNT,TP.TOTAL_PAYMENT_STATUS,TP.TOTAL_PAID_AMOUNT,(TP.BILL_AMOUNT-TP.TOTAL_PAID_AMOUNT)ASOUTSTANDING_PAYMENTFROM(SELECTB.ACCT_NBR,A.BILL_ID,A.ORIG_BILL_AMTASBILL_AMOUNT,SUM(D.PAY_AMT)OVER(PARTITIONBYA.BILL_ID)ASTOTAL_PAID_AMOUNT,C.DESCRASTOTAL_PAYMENT_STATUS,A.CRE_DTTM,D.PAY_AMTASLATEST_PAYMENT_AMOUNT,E.CRE_DTTMLATEST_PAYMENT_DATE,ROW_NUMBER()OVER(PARTITIONBYA.BILL_IDORDERBYE.CRE_DTTMDESC)ASRNFROMC1_BILL_DTLS_VWAINNERJOINCI_ACCT_NBRBONA.ACCT_ID=B.ACCT_IDINNERJOINCI_PAYDOND.ACCT_ID=A.ACCT_IDINNERJOINCI_LOOKUP_VAL_LCONC.FIELD_NAME='PAY_STATUS_FLG'ANDC.FIELD_VALUE=D.PAY_STATUS_FLGINNERJOINCI_PAY_EVENTEONE.PAY_EVENT_ID=D.PAY_EVENT_IDWHERETRIM(B.ACCT_NBR)=TRIM(:F1--Account Identifier)
ANDA.BILL_ID=${:F2-- Bill ID}
)TPWHERETP.RN=1GROUPBYTP.ACCT_NBR,TP.BILL_ID,TP.BILL_AMOUNT,TP.LATEST_PAYMENT_DATE,TP.LATEST_PAYMENT_AMOUNT,TP.TOTAL_PAYMENT_STATUS,TP.TOTAL_PAID_AMOUNTORDERBYBILL_DATEDESCFETCHFIRST1ROWONLY
Report generation
Available reports
Available service type
Description
Aging Detail Report
API download
SFTP download
Generates a Form of Payment (FOP) report based on aging details.
Payment Detail Report
API download
SFTP download
Generates a Form of Payment (FOP) report based on payment details.
Payment Summary Report
API download
SFTP download
Generates a Form of Payment (FOP) summary report.
Adjustment Detail Report
API download
SFTP download
Generates a Form of Payment (FOP) report with adjustment details.
1.2.3 - Healthcare Starter Pack
Overview
This documentation lists all scenarios defined in the Healthcare starter pack. To use a starter pack, ensure that you have already completed the steps in Use a starter pack.
Test scenarios
Test scenarios
Available service type
Description
Upload health product and health plan
API
Batch
Creates a health product and plan using API and processes it with batch execution.
Product code — code of the health product that will be used when creating a customer.
Plan code — code of the health plan that will be used when creating a customer.
Batch-C1-HCPHP — batch that processes the inbound messages for the creation of health products or plans.
Rate upload
API
Batch
Creates rates that define customer's charges and billable charges.
Batch-C1-HCPHP — batch that processes the inbound messages for the creation of rates.
Custmomer upload by referring rate plans
API
Batch
Updates a customer account based on product code, plan code, and rate. For example, if a rate is specified with Tobacco is Y and a customer has a YTobacco switch, then the rate will be mapped to the customer.
Runs the Batch - C1-HCEXS to process the inbound bound message for the creation of the customer, account, and contract.
Billable charge creation
Batch
Runs the following batches in order:
C1-REPC1 (Identify Entities for Repricing) — Identifies the entities that are eligible for repricing.
C1-REPC2 (Process Repricing Request) — Processes the entities captured by the C1-REPC1 batch.
C1-FIBCR (Fully Insured Billable Charge Creation) — Creates the billable charge for the processed entities.
Customer billing
Batch
UI
Generates a bill using the billable charges and account. For batch testing, it runs the following batches in order:
BILLOPEN (Pending Bill Generation) — Generates a blank bill in pending status for accounts in the specified division and bill cycle based on the given cut-off date.
BSGENREG (Bill Segment Generation) —Generates bill segments, including all billable charges, of accounts that have blank bills in an open bill cycle, input bill cycle, or division for a given cutoff date.
POSTPROC (Bill Completion) — Creates a post-processing bill segment generated by previous batches and finalizes the bill.
General ledger scenario
Batch
Runs the following batches in order:
C1-GLASGN — Assigns the General Ledger account to a financial transaction.
GLS — Stages the downloaded General Ledger.
GLDL — Extracts the downloaded General Ledger.
Create payment
API
Creates a payment for the generated bill.
1.2.4 - Utilities starter pack
Overview
This documentation lists all scenarios defined in the Utilities starter pack. To use a starter pack, ensure that you have already completed the steps in Use a starter pack.
Manage customer data
Test scenarios
C2M/CCS prerequisite
Service type
Create a person and account
None
API
Add person characteristics
Added person in the previous scenario
API
Add a person of relationship type of roommate to an account
Existing person or account
API
Remove person characteristics
Existing person
API
Maintain customer information - life support/phone/email/mailing address
Existing person
API
Maintain customer info- remove life support alert
Existing person
API
Change mailing address to person
Existing account
API
Change mailing address to account override
Existing account
API
Change mailing address to mailing premise on account
Existing account
API
Maintain customer account information - financial responsibility
Existing account
API
Add copy of bill & bill route
Existing account
API
Maintain customer information - add autopay
Existing account
API
Maintain customer information - remove autopay
Existing account
API
Add Premises - residential or commercial
API
Delete premise
Existing premise
API
Update premise
Existing premise
API
Update premise characteristics
Existing premise
API
Change a premise type on an existing premise
Existing premise
API
Establish service
Test scenarios
C2M/CCS prerequisite
Service type
Add a Service Point - Electric/Water/ Gas/Refuse
Existing premise
API
Delete a service point
Existing premise
API
Update service point - device location
Existing service point
API
Update service point - SP instruction
Existing service point
API
Manual change of service point, service route, and sequence
Existing service point
API
Disconnect service point
Existing service point
API
Deactivate service point
Existing service point
API
Start SA on a premise not linked to any account, with current date Start SA on a premise not linked to any account, with future date
Existing person, account, service point
API
Device Management
Test scenarios
C2M/CCS prerequisite
Service type
Manually Add a Device to SP - Water Residential/Water Commercial
Existing service point and device configuration
API
Install a Device - Manual Water Meter/Manual Waste Water Meter/Sensus Water Meter /Sensus Waste Water Meter [CCS]
Existing install event
API
Remove install event [CCS]
Existing install event
API
Turn off or remove a device - Manual Water Meter/Manual Waste Water Meter/Sensus Water Meter /Sensus Waste Water Meter [CCS]
Existing install event
API
Configure a device - Manual Water Meter/Manual Waste Water Meter/Sensus Water Meter /Sensus Waste Water Meter [CCS]
Existing device and configuration
API
Install a device - Water Analog Meter/Water Smart Meter/Water AMR Meter [C2M]
Existing install event
API
Update install event - Remove device
Existing install event
API
Update install event - Turn off device
Existing install event
API
Financial management
Test scenarios
C2M/CCS prerequisite
Service type
Add bill cycle to an account
Existing account
API
Add bill message to an account
Existing account
API
Add bill intercept to account
Existing account
API
Remove bill intercept to account
Existing account
API
Add copy of bill and bill route
Existing account
API
Enter a bill after date on an account that is scheduled to bill
Existing account
API
Change budget bill amount manually
Existing service agreement
API
Create account alert - protected bill cycle
Existing account
API
Generate a first bill Generate a bill - Final Bill (with Balance Owed) Generate and complete a manual bill - Deposit Generate and complete a manual bill - First Bill for Account greater or equal to X days Generate and complete a manual bill - First Bill for Account less than X days
Existing bill
API
Add bill message - to a bill
Existing bill
API
Delete a pending bill - Bill Segments in Freezable status Delete a pending bill - Bill Segments in Error status
Existing bill
API
Cancel a bill
Existing bill
API
Reopen a completed online bill
Existing bill
API
Reopen a bill and add an adjustment
Existing bill
API
Rebill bill segment
Existing bill segment
API
Delete bill segment Delete bill segment in freezable status
Existing bill segment
API
Process payments - Process Customer Payments
Existing account and payment tender
API
Distribute payment Payment distribution
Existing payment
API
Cancel a payment
Existing payment
API
Misapplied payment - Transfer payment
Existing payment
API
Apply adjustment Add an adjustment
Existing service agreement
API
Cancel an adjustment Cancel a transfer adjustment
Existing adjustment
API
Credit and collections
Test scenarios
C2M/CCS prerequisite
Service type
Start collection process
Existing account with debt and service agreement
API
Cancel a collection process
Existing account with debt and service agreement
API
Change or update a collection event information
Existing account with debt and service agreement
API
Add a collection event
Existing account with debt and service agreement
API
Delete a collection event
Existing account with debt and service agreement
API
Start severance process
Existing account with debt and service agreement
API
Cancel a severance process
Existing account with debt and service agreement
API
Change a severance event
Existing account with debt and service agreement
API
Add a severance event
Existing account with debt and service agreement
API
Start the write-off process
Existing account with debt and service agreement
API
Cancel a write-off process
Existing account with debt and service agreement
API
Add, change, or delete write-off process
Existing account with debt and service agreement
API
1.3 - Key Features
Modernized UI
V3 boasts a completely redesigned user interface focused on usability. The clean, uncluttered, and logically organized interface enables users to navigate effortlessly, locate information quickly, and perform tasks efficiently.
Intuitive Graphical Test Flow
V3 revolutionizes test scenario creation with a user-friendly, visual, top-down workflow. Testers can effortlessly design end-to-end test scenarios using a drag-and-drop interface, providing a clear visual representation of complex test flows. This eliminates the need for complex navigation, making the process intuitive and efficient.
Streamlined Setup
V3 simplifies configuration with a centralized approach. Users can configure assertions, and integrations directly within the test flow screen, eliminating the need to navigate multiple menus and reducing setup time.
Version Control
V3 enables flexible management of different service configurations within projects through its integrated version control system. This feature allows users to easily maintain and switch between multiple versions, ensuring adaptability to changing requirements and testing environments.
Enhanced Issue Tracking
V3 seamlessly integrates with popular issues and project tracking software like Jira and Azure DevOps. This integration allows automatic defect reporting, ensuring no issue is overlooked. It streamlines collaboration between development and QA teams, accelerates issue resolution, and keeps everyone synchronized.
Robust Testing Environment
V3 provides a robust testing environment with advanced features:
Soft Assertions: Allow test executions to continue even when validation fails, logging warnings for these non-critical failures.
Hard Assertions: Stop test execution immediately upon encountering a validation failure, ensuring critical issues are addressed promptly.
Custom Assertions: Allow users to write custom logic using code or expressions for specific validation needs, offering unparalleled flexibility.
Centralized Project-Level Global Variables
Manage global variables centrally at the project level, reducing redundancy and ensuring consistency across all test cases. This centralized control simplifies maintenance while allowing seamless customization. Project-level variables can also be overridden at the environment level, enabling different values for variables across environments and providing enhanced flexibility to tailor the test environment to specific needs throughout the entire project.
Test Step Validation: Ensure Setup Accuracy
Validate individual test step configurations before executing the full test suite, catching errors early and saving valuable time and resources. This proactive approach enhances the accuracy of results and ensures that each step is set up correctly, improving the overall reliability of your test cases.
Results Comparison
V3 enables easy comparison of results from different test runs or iterations of the same run. This feature provides insights into changes over time, highlights potential regressions, and facilitates trend analysis for continuous improvement.
1.4 - Architecture
Overview
This document provides a high-level infrastructure diagram and an overview of the various components, processes, and protocols relevant to the Test Automation tool.
Core Components
Client
This refers to the user interface of a web application, which is the point of interaction between users and the software. It includes elements such as buttons, menus, forms, and graphics that allow users to navigate and utilize the functionalities of the application.
Auth Server
This handles user authentication and authorization processes, ensuring that only authorized individuals have secure access. This includes verifying user identities through login credentials and granting access to specific resources based on predefined roles and permissions.
Core Service
The core service is responsible for orchestrating various processes, implementing business logic, and providing API access. This microservice efficiently manages requests related to configuration management, which includes creating and managing projects, defining steps within those projects, establishing assertions for testing purposes, designing test flows, and generating datasets necessary for testing and analysis. By centralizing these functions, this service ensures a streamlined and cohesive approach to handling user requests and enhancing the overall application performance.
Execution Dispatcher
The Execution Dispatcher is responsible for managing the submitted executions. It uses Kafka to queue the executions when multiple tasks are in progress. Additionally, it handles the logic for distributing the execution to different types of steps. During this process, Hazelcast’s cache is utilized to store the state of each execution.
SQL Executor, Batch Executor, API Executor, UI Executor
These microservice components are responsible for establishing a connection to a target system and executing various testing operations. Each component is designed to handle specific aspects of the testing process. By integrating with the target system, these components facilitate data exchange and verification.
Kafka Streams
A stream processing platform used for real-time data processing, enabling users to analyze and act on streaming data as it flows in. This platform facilitates the immediate collection, processing, and analysis of data from various sources, ensuring that insights are generated in the moment. Furthermore, it provides timely feedback to end users while the execution is ongoing, allowing for quick adjustments and responses to changing conditions.
Hazelcast
An in-memory data grid that is used for caching information and managing distributed data storage. It allows for quick access to data by storing it directly in the system’s memory.
PostgreSQL
A relational database that is used for the storage and management of persistent data. It organizes data into structured formats, typically utilizing tables, which allow for efficient retrieval and management.
MinIO Object Storage
An object storage solution designed for efficiently storing large files and media assets that are produced during user interface (UI) execution or report generation processes.
2 - Web Application
2.1 - Dashboard
Overview
The Dashboard is the main screen where the user interacts with the TA and provides a high-level overview of the testing activities.
The date filter located in the top-right corner of the application enables you to customize the timeframe for the data displayed on the dashboard. By selecting a specific date range, you can focus on relevant execution data within that period. This filter applies to all dashboard sections, ensuring that metrics, graphs, and reports reflect only the data from the selected timeframe.
Tests Executed
This section provides a high-level overview of the executed test flows, categorized by their outcomes. It includes counts of test flows that successfully passed, those that failed, those that passed but with warnings, and those that were terminated or canceled.
Execution Average Time
This section provides an overview of the average execution time for test runs, categorized by step types.
Issues Reported
This section displays a count summary of all the reported issues encountered during execution, categorized by their current status.
Recent Runs
The Recent Runs section of the dashboard features a dynamic graph displaying all test executions within the configured timeframe. Each bar represents a single execution, showcasing the count of scenarios run and their statuses: Success, Fail, Warning, or In Progress.
The graph provides an at-a-glance view of execution results, with a navigation bar above the legend that allows users to zoom in for a more focused analysis by adjusting the displayed timeframe.
Trends Over Time
The Trends Over Time section presents a line graph that tracks execution results over the configured timeframe. The graph includes two lines: a green line representing the number of successful executions and a red line representing the number of failed executions for each day.
The graph provides an at-a-glance view of execution trends, with a navigation bar above the legend that allows users to zoom in for a more focused analysis by adjusting the displayed timeframe.
2.2 - Project
Overview
The Project module enables you to create a personalized testing workspace to avoid overlap in your activities. Depending on your testing requirements, you can customize your workspace by adding items.
Create a project
To create a project, click on the button on the top left pane.
Field
Description
Logo
Logo of the project. The supported file types are png, jpg, and jpeg.
Mandatory: No
Project Name
Name of the project.
Mandatory: Yes
Project Code
Unique identifier assigned to a project.
Mandatory: Yes
Project Description
Description of the project.
Mandatory: Yes
Releases
Shows configured releases. Only 1 release can be active at a time.
Environments
Configured environments for the project. For more information, see Environments.
Global Variables
Configured global variables for the project. For more information, see Global Variables.
Update a project
Select a project to view and edit its details. You can update all details except the Project Code. After you make the modifications, click the Update button.
Search a project
The search feature allows you to filter the list of steps by providing a keyword or the full name of the step. Only the steps that match the provided keyword or name will be displayed in the view.
Versions
Versions allow you to create new versions of an existing project, where all parameters and their values are automatically copied. This enables you to change parameters while keeping the original version.
To create a new version, click the plus icon in the Version section and enter a valid name that has a maximum of 20 characters.
2.2.1 - Environments
Overview
The Environments section is where your testing environments are defined. A testing environment can be a development, staging, production, or any other project-specific environment. This section allows you to add, modify, or delete environments according to your needs.
Create an Environment
To create an environment, click Create Environment and enter valid values in the following fields:
Field
Description
Environment Name
Name of the environment. Should be minimum 4 characters long.
Mandatory: Yes
API Base URL
URL of the environment for API or Batch testing.
Mandatory: Yes
Application URL
URL of the environment for UI testing.
You can also specify the target URL in the Service > Uploaded File > url field . In case, different target URLs are specified in the Application URL and Uploaded File > url fields, the system will use the URL specified in the Application URL.
Mandatory: No
Default
Sets the selected environment as default for test runs and templates of an external system. Selecting will override the existing default environment, if any.
Mandatory: No
Authentication
Specifies the authentication details for the test environment. The following are the possible values:
Parameters used to connect to a database. For more information, see Database Details.
Mandatory: Yes
Proxy
Enables the proxy server for the environment. For more information, see Proxy Details.
Mandatory: No
SFTP
Enables the Secure File Transfer Protocol(SFTP) to download and upload files from any server. For more information, see SFTP Details.
Mandatory: No
Authentication Details
The following are the supported authentications for your environment and the additional mandatory settings that you need to provide.
Authentication
Description
BASIC
If you select BASIC authentication, you need to supply the following:
Username — Username to use when connecting to the target test environment.
Password — Password to use when connecting to the target test environment.
ORMB
If you select ORMB authentication, you need to supply the following:
Username — Username to use when connecting to your ORMB environment.
Password — Username to use when connecting to your ORMB environment.
API_KEY
If you select API_KEY authentication, you need to supply the following:
Key — API key to access the API service.
Value — Actual value of the specified API Key.
Add To — Defines how and where the API Key should be added to the API service.
TOKEN
If you select TOKEN authentication, you need to supply the following:
Token — Value of the token to access an application or an API service.
SIGNATURE
If you select SIGNATURE authentication, you need to supply the following:
Access Key — Authorization key to access your account or application.
Secret Key — Password of the Access Key.
NO_AUTH
No authentication type is required.
OCULAR
If you select OCULAR authentication, you need to supply the following:
Username — Username to use when connecting to your EPM.
Password — Password to use when connecting to your EPM.
NONE
No additional details/settings are required.
Database Details
To configure a database, click and enter valid values in the following fields. After adding the details, click Test Connection to ensure that the connection details you configured are correct and working properly. The status will change from Pending to Success or Failed depending on the result of the test connection.
Field
Description
Name
Name of the database to connect to.
Mandatory: Yes
Database Type
Type of the database. The possible values are the following:
POSTGRES
ORACLE
Mandatory: Yes
DB Connection
Specifies the status of the database connection.
Default?
Indicated whether the database is set as default.
Actions
Displays a delete icon that when clicked deletes the selected database.
SFTP Details
The Secure File Transfer Protocol (SFTP) allows you to download and upload files from the configured server. To configure your SFTP server, enter valid values to the following fields:
Field
Description
Server Address
Address of the SFTP server.
Mandatory: Yes
Port
Port of the SFTP server.
Mandatory: Yes
Username
Username used to log in to the SFTP server.
Mandatory: Yes
Password
Password used to log in to the SFTP server.
Mandatory: Yes, if authentication is being done without the .pem file.
Add .pem File
A .pem file is a base64-encoded file used to store and share cryptographic keys and certificates securely. There are two methods of authentication of the SFTP —
With .pem file
Without .pem file
If you need to change the attached .pem file, click the Upload File button.
Passphrase
Password to decrypt an encrypted .pem file.
Test Connection
Tests the network connection and validates if the SFTP details are correct.
Proxy Details
If you want to enable the proxy server for the environment, enter valid values to the following fields:
Field
Description
Proxy Address
Address of the proxy server.
Mandatory: Yes
Proxy Port
Port of the proxy server.
Mandatory: Yes
Variables
If you want to specify a value that is unique to a specific environment, please enter valid values in the following fields. Make sure that the variable you want to define at the environment level is already defined at the project level.
When a variable is defined with a new value for a specific environment, this new value will replace the default value set at the project level.
However, if a variable is not defined at the environment level, it will use the default value specified at the project level.
Field
Description
Name
Name of the variable.
Default Value
Specifies the default value of the variable.
Value
Specifies other possible values for the variable.
Action
Displays the delete button that allows you to delete the added variable.
You cannot change the values in the Name and Default Value columns. Only the Value column can be modified by directly editing the cell.
2.2.2 - Variables
Overview
The variables in the Variables section can be reused across all steps and flows within your project. For example, if you need to automate a login process, you can store sensitive login credentials like username and password as project variables. Instead of manually entering these credentials in every API or UI step, you can reference them using {{username}} and {{password}}, ensuring consistency and simplifying maintenance.
By using project variables, you can easily update values in one place. If you need environment-specific values, for example, different credentials for development or production, you can configure Variables in Environments to manage these settings for each environment, making it easy to switch between them without modifying individual steps.
When a variable is defined with a new value for a specific environment, this new value will replace the default value set at the project level.
However, if a variable is not defined at the environment level, it will use the default value specified at the project level.
Create a variable
To create a variable, follow these steps:
Navigate to the Project > Variables.
Click . A new row will be added to the Variables table.
Optional. Click Is Secret if you want the value to be hidden.
Enter valid values for the Name, Type, and Value columns.
Click Save. If you wish to cancel the creation of a new variable, click X.
Edit a variable
The name of the variable is not editable. You can only modify the type or value of a variable. Once modified, click Save.
Delete a variable
To delete a variable, click the delete icon on the row of the variable you wish to delete.
Search a variable
To search for a variable, you can enter a keyword of the full name or value of the parameter on the Search box beside . Only the variable names that match the provided keyword or name will be displayed in the view.
2.3 - Step
Overview
Steps are individual actions or instructions that make up a Scenario, and multiple steps can be associated with a single scenario. A step can also be reused across different scenarios within the same Project. There are no limitations on the type of steps you can add in a scenario as long as they are part of the same project. Any changes made to a step in a flow will be reflected across all flows where that step is reused.
If you want to prevent any changes to a step from affecting other Flows, you can use the Clone Step or Clone Scenario option at the test flow level. By assigning a unique name to the cloned steps or scenarios, you ensure that any future changes to the original will not impact the cloned entities.
View
In the upper left corner, select your project from the Select Project dropdown list and the version from the Version dropdown list. Only the steps associated with the selected project and version are displayed on the left pane.
Edit a step
To view or modify the details of a step, select the step from the left pane that lists all steps associated with the selected project and version. You can change any detail by directly editing the corresponding field. Ensure to click Update after making your modifications.
Search
The search feature allows you to find a specific step by entering a keyword or the full name of the step on the textbox. Only the steps that match the provided keyword or name will be displayed in the view.
Filter
The filter feature allows you to filter the list by clicking the icon to select the Step Type. For example, you can get the list of only API steps by selecting API in the Step Type dropdown list.
Create a step
To create a step, click on the Create Step button and enter valid values to the following fields.
Field Name
Description
Step Name
Name of the step. It should be a minimum of 5 characters long.
Mandatory: Yes
Step Type
Specifies the type of step. The following are the possible values:
To create an API step, enter valid values in the following fields:
Field
Description
HTTP Method
Specifies the action to be performed by the external system to your server. The following are the possible values:
GET
POST
PUT
PATCH
DELETE
Mandatory: Yes
URL
Specifies the API URL used for the validation. It consists of 2 parts:
Environment — automatically displays the default environment set in the selected project. If you wish to select a different environment, click the dropdown arrow beside Send to display all environments configured within the selected project.
URL — specify the URL of the API service.
Mandatory: Yes
Params
Specifies the type of parameters for query execution and data retrieval. You can specify the parameters in the following ways:
Query Params— allows you to specify keys and their respective values for data retrieval. It can be updated by changing the URL or adding queries in the table.
Path Params — shows the specified keys requested for retrieval in the API URL. You can only change the key values by updating the API URL.
Mandatory: No
Body
Specifies the payload details of the step. You can choose between the following formats:
Form Data — allows you to define key-value pairs.
JSON — allows you to define the template of the request and response bodies.
Mandatory: No
Headers
Specifies the API headers in HTTP requests or responses that provide important metadata, such as content type, authentication details, and instructions for processing the data.
Template
Template for a request payload. For more information, see Template.
Response
Displays the data returned by the server in response to an API request. They contain the information or results of the request, such as user data, search results, or confirmation messages.
Template
A request payload template simplifies dataset configuration by defining the structure of the request body, including JSON nodes and parameters like path or query parameters. The values in the template can be static, user input, or project variables:
Static values: The same value is used every time the dataset is used.
Project variables: The value of the project variable assigned to the node is used.
User input: The user provides the value each time the dataset is configured.
The purpose of the template is to declare fixed values once and reuse them in datasets, reducing configuration effort. Only the varying fields need to be populated when the template is reused.
Create a Batch step
To create a batch step, select a batch from the Batch Name dropdown field and enter valid values in the following fields:
Field
Description
Batch Job ID
Unique identifier of the batch job.
Mandatory: Yes
Batch Code
Unique code that associates with the batch job.
Mandatory: Yes
Description
Description of the batch.
Mandatory: Yes
Thread Number
Thread within the batch process.
Mandatory: Yes
Thread Count
Total number of threads to be used for parallel processing within the job.
Mandatory: Yes
Batch Rerun Number
Run number of the re-execution of a batch process in ORMB.
Mandatory: Yes
Batch Business Date
Specific date for ORMB transactions to be processed.
Mandatory: Yes
Override Nbr Records to Commit
Total number of records that can be manually overridden and committed to the database during a batch process in ORMB.
Mandatory: Yes
Override Max Timeout Minutes
Maximum time limit for a process to run before it times out.
Mandatory: Yes
User
User account to log in to ORMB.
Mandatory: Yes
Language
Language or locale settings are used to process and display data, messages, and invoices in ORMB.
Mandatory: Yes
Email Address
Email address of the user.
Mandatory: Yes
Trace Program Start
If enabled, detailed logs are captured at the beginning of a trace process.
Default: Disabled
Trace Program Exit
If enabled, end of logs are captured to mark the completion of a trace process.
Default: Disabled
Trace Sql
If enabled, SQL queries executed during a trace process are captured and logged.
Default: Disabled
Trace Output
If enabled, all trace output, including logs and reports, about the execution flow, SQL queries, and performance metrics is generated.
Default: Disabled
Parameters
Field
Description
Sequence
Unique values used to identify the parameter.
Parameter Name
Name of the parameter.
Description
Description of the parameter.
Parameter Value
Specifies the value of the parameter.
Required
Indicates whether the parameter is required for a batch job to run.
Create a Query step
Section
Description
Schema
Specifies the schema of the database where the query will be executed. This is automatically populated from the configured database at the environment level and only needs to be selected at the assertion level.
Query
Defines the query being executed to get results for validation.
Parameters
Lists the input key-value pairs extracted from the provided query.
Result
Specifies the expected result after running the query.
Output Columns
List of database columns included in the expected result after running the query, along with their data types.
Create a File upload step
To add a new file, follow these steps:
Click the Add New File button.
Specify the Destination remote folder path.
Drag or browse the files to upload. You have an option to overwrite an existing file.
Click the Upload button.
Create a File download step
To add a new file, follow these steps:
Click the Add Remote File button.
Specify the Remote folder path and the Remote File Name.
Click the Add button.
Create a UI step
To create a UI step, upload your .side file in the designated upload box.
Once uploaded, a table with the following columns is displayed:
Column
Description
Command
Describes the command or action to be performed on the target.
Mandatory: Yes
Input
Indicates whether a value is necessary to be supplied to the target element for the command to be executed.
Mandatory: No
Target
Specifies the xpath of the target.
Mandatory: Yes
Value
Specifies the value to be supplied to the target element.
Mandatory: Only if the Input box is checked.
Description
Describes the command.
Mandatory: Yes
Screenshot
Indicates whether a screenshot will be captured during the execution of the command.
Mandatory: No
Run Details
After uploading a side file, you can click the Run button to preview the execution details of the commands defined in the uploaded file.
2.4 - Assertion
Overview
Assertions serve as a quality control measure ensuring the completeness and correctness of the expected data as defined in a Step.
View
In the upper left corner, select your project from the Select Project dropdown list and the version from the Version dropdown list. Only the assertions associated with the selected project and version are displayed on the left pane.
Edit an assertion
To view or modify the details of an assertion, select the assertion from the left pane that lists all assertions associated with the selected project and version. You can change any detail by directly editing the corresponding field. Ensure to click Update after making your modifications.
Search
The search feature allows you to filter the list of assertions by providing a keyword or the full name of an assertion. Only the assertions that match the provided keyword or name will be displayed in the view.
Create an assertion
To create an assertion, click on the icon on the top left pane and enter valid values to the following fields.
Field Name
Description
Assertion Service Name
Name of the assertion. It should be a minimum of 5 characters long.
Mandatory: Yes
Assertion Type
Specifies the type of step. The following are the possible values:
To create an API assertion, enter valid values in the following fields:
Field
Description
HTTP Method
Specifies the action to be performed by the external system to your server. The following are the possible values:
GET
POST
PUT
PATCH
DELETE
Mandatory: Yes
URL
Specifies the API URL used for the validation. It consists of 2 parts:
Environment — automatically displays the default environment set in the selected project. If you wish to select a different environment, click the dropdown arrow beside Send to display all environments configured within the selected project.
URL — specify the URL of the API service.
Mandatory: Yes
Params
Specifies the type of parameters for query execution and data retrieval. You can specify the parameters in the following ways:
Query Params— allows you to specify keys and their respective values for data retrieval. It can be updated by changing the URL or adding queries in the table.
Path Params — shows the specified keys requested for retrieval in the API URL. You can only change the key values by updating the API URL.
Mandatory: No
Body
Specifies the payload details of the assertion. You can choose between the following formats:
Form Data — allows you to define key-value pairs.
JSON — allows you to define the template of the request and response bodies.
Mandatory: No
Headers
Specifies the API headers in HTTP requests or responses that provide important metadata, such as content type, authentication details, and instructions for processing the data.
Create a Query assertion
Section
Description
Schema
Specifies the schema of the database where the query will be executed. This is automatically populated from the configured database at the environment level and only needs to be selected at the assertion level.
Query
Defines the query being executed to get results for validation.
Parameters
Lists the input key-value pairs extracted from the provided query.
Results
Specifies the expected result after running the query.
Output Columns
List of database columns included in the expected result after running the query, along with their data types.
2.5 - Flow
Overview
A test flow is a sequence of scenarios that verifies the functionality or correctness of your business system. The Flow module allows you to manage all your test flows in a project. This includes defining Scenarios, choosing or creating the steps and assertions for each scenario, and modifying or running test flows.
View
In the upper left corner, select your project from the Select Project dropdown list and version from the Version dropdown list. Only the flows associated with the selected project and version are displayed on the left pane.
Edit a flow
To view or modify the details of a flow, select the flow from the left pane that lists all flows associated with the selected project. You can change any detail by directly editing the corresponding field. Ensure to click Update after making your modifications.
Filter
The filter feature allows you to filter the list of test flows by providing a keyword or the full name of the flow. Only the flows that match the provided keyword or name will be displayed in the view.
Additionally, you can refine your search by clicking the<img src=/images/Step_Filter_Icon.png" alt="" data-size=“line”> icon. A Scenario filter is available, allowing you to select one or more scenarios currently used in the flows within the selected project.
Create a Test Flow
To create a new test flow, follow these steps:
Select the Project and the Version on the upper left dropdown lists. If there are existing test flows in the selected project and version, they will be displayed on the left pane.
Click the plus icon.
Enter a valid test flow title, replacing Untitled Test Flow.
Click on the Untitled Scenario, which is automatically added when creating a new flow.
Add your first scenario by selecting an existing scenario within your project in the Create/Select Scenario field in the Scenario Details section. You can also Create a new scenario.
Note that if you are using an existing scenario, the steps configured in that scenario for other flows will be included. However, the Source, Target, and Assertion details that are configured for these steps in other flows will not be included.
Click Apply Scenario on the popup window.
Optional. Add a description to the Scenario Description textbox.
Click on the Scenario Start and choose the step type you wish to add.
Add your first step by selecting an existing step within your project in the Create/Select Step field in the Step Details section. You can also Create a step on the fly.
Click Apply Step on the popup window.
Optional. Add a description to the Step Description textbox.
Optional. Verify if the step you added is correct. You can check its details by clicking the Details button.
Add a source for the step by selecting an option in the Source dropdown list. For more information on the possible values of a source, see Step sources.
Add a target for the step by selecting an option in the Target dropdown list. For more information on the possible values of a target, see Step targets.
Add an assertion to your step by clicking the + Add assertion and selecting an existing assertion within your project in the Create/Select Assertion field. You can also Create an assertion on the fly.
Click Apply Assertion on the popup window.
Optional. Add a description to the Assertion Description textbox.
Optional. Verify if the assertion you added is correct. You can check its details by clicking the Details button.
Optional. Click the step and verify if the added assertion has been added to the Assertions section of the Step Details.
Optional. To add more steps, repeat Steps 7-17.
Add a success node to your step by clicking the Scenario Success icon.
Add a failure node to your step by clicking the Scenario Fail icon.
Click the scenario you added in Step 6.
Optional. Verify if the added step is displayed in the Steps section of the Scenario Details.
Add a success node to your scenario by clicking the Test Plan Success icon.
Add a failure node to your scenario by clicking the Test Plan Fail icon.
Optional. If you need to add more scenarios, repeat the steps above.
Click Save.
Run a test flow
To run the test flow, click the Run button. A new browser tab displaying the Run Details page will open. For more information, see Results.
Steps
The Flow modules allow you to use the steps defined in the Step module or add a new step to the project within the module.
Create a step on the fly
To create a new step in the Flow module, follow these steps:
Click the step that precedes your new step.
Select the step type.
Click the newly added step.
Enter a valid name of the new scenario in the Create/Select Step field.
Click the Create “<valid name entered in step 4>” text.
Optional. Add a description for your step.
Add the necessary details by clicking the Details button. For more information, see
The assertions created on the fly will appear in the Assertion module for the project.
2.5.1 - Scenarios
Overview
A scenario is a high-level description of what you are testing. It consists of Steps that break down the scenario further, and Assertions that serve as validation criteria. A scenario can only be considered a success if it meets the validation criteria. Otherwise, it will be tagged as failed.
Create a new scenario
To create a new scenario, follow these steps:
Enter a valid name of the new scenario in the Create/Select Scenario field.
Click the Create “<valid name entered in step 1>” text.
Click the options icon in the Create / Select Scenario field.
Select Rename Scenario.
Enter a new name for the scenario.
Click Apply.
Renaming the scenario will only change its name. Other details will remain unchanged.
Clone a scenario
To clone a scenario, follow these steps:
Click the options icon in the Create / Select Scenario field.
Select Clone Scenario.
Enter a new name for the scenario.
Click Apply.
2.6 - Dataset
Overview
A dataset is a collection of input data used for the parameters included in a test flow. First, you must define your test flow in the Flow module and ensure that the steps added to each scenario have a well-defined template. The templates for all the Steps in the flow will be used to create your dataset.
View
In the upper left corner, select your project from the Select Project dropdown list. Only the datasets associated with the selected project are displayed on the left pane.
Edit a dataset
To view or modify the details of a dataset, select the dataset from the left pane that lists all datasets associated with the selected project. You can change any detail by directly editing the corresponding field. Ensure to click Update after making your modifications.
Search
The search feature allows you to filter the list of datasets by providing a keyword or the full name of a dataset. Only the datasets that match the provided keyword or name will be displayed in the view.
Create a dataset
To create a dataset, click on the icon on the top left pane and enter valid values to the following:
Field Name
Description
Dataset Name
Name of the dataset.
Mandatory: Yes
Test Flow
Dropdown list displays all test flows defined in the Scenarios and Steps associated with it.
Mandatory: Yes
Step Dataset Template
To view or modify a dataset template, first select a scenario and then choose the corresponding step. Next, select a template from all the templates defined for the chosen step.
After selecting a template, the Request payload will be displayed.
Mandatory: Yes
Source Type
Specifies the type where the parameter will get its value. Possible values are the following:
Default Value — Value comes from the step dataset template or the user input variable submitted during the bulk dataset upload via the Excel template.
Project Variable — Value comes from a project variable.
Mandatory: Yes
Source Value
Specifies the value to be used by the parameter.
To modify the pre-defined value of a project variable source, select a variable from the dropdown list.
To modify the pre-defined value of a static variable source, directly enter the new value in the textbox.
Mandatory: Yes
Upload a Bulk Dataset
The Dataset module allows you to upload large datasets by using a predefined Excel template. You can format your data according to the specified template, then it can be uploaded into the system.
2.7 - Results
Overview
The Results module provides a centralized view of test execution results, allowing you to track real-time progress or review metrics for completed tests. It displays detailed information about the executed scenarios and steps, along with visual summaries like pie charts. There are two tabs in the Results module: Summary and Results.
Header
The header section provides a quick and high-level overview of the test execution with the following details:
Field
Description
Execution status
Indicates the current state of the execution. The possible values are Completed, In Progress, Warning, and Failed.
Run Number
Unique identifier of the test execution run.
Test Flow
Name of the test flow being executed.
Run By
User who initiated the test execution.
Started At
Date and time when the test flow execution began.
Ended At
Date and time when the test flow execution was completed.
If the execution is still in progress, this field is empty.
Duration
Total time elapsed during the test flow execution.
If the execution is still in progress, this field is empty.
Test Datasets
Number of datasets used during the test execution.
If the execution is still in progress, this field is empty.
Scenarios
Total number of scenarios executed within the test flow.
If the execution is still in progress, this field is empty.
Steps
Total number of steps executed within the test flow.
If the execution is still in progress, this field is empty.
Passed Percentage
Percentage of scenarios that successfully passed.
If the execution is still in progress, this field is empty.
The Total Datasets pie chart provides a quick visual representation of how many datasets passed, failed, are in warning status, or are still running.
Error Categorization
The Error Categorization pie chart provides a quick visual representation of how the errors are categorized.
Duration
The Duration chart provides a quick visual representation of how long the test was executed.
Pass Rate Over Time
The Pass Rate Over Time chart provides a quick visual representation of how the success rate of tests changes throughout the test runs.
Test Flow Average Execution Time per Test Run
The Test Flow Average Execution Time per Test Run chart provides a quick visual representation of how long the test runs and the average each test run takes to complete.
The dashboard highlights the details of the executed test scenarios and their individual steps. The left pane provides a hierarchical view of the test flow, broken down into its constituent scenarios. Each scenario is further expanded to display the steps within it, allowing users to examine the execution status, duration, and other relevant metrics for each step.
Details
The Details tab displays the following information:
Field
Description
Step Name
Name of the selected step.
Step Type
Type of the selected step.
Start time
Date and time when the test step execution began.
End time
Date and time when the test step execution was completed.
Duration
Total time elapsed during the test step execution.
Assertion status distribution
Pie chart that provides the status distribution of the assertions.
Step Started
Displays the step status, date and time the step execution began, and the query if available.
Step Failed
Displays the step status, date and time the step execution began, payloads, and the query if available.
Step Completed
Displays the step status, date and time the step execution began, and the payloads.
Assertions
The Assertions tab displays a detailed list of all the field names specified for validation within the selected test step. For each field, the expected value, the actual value, and the operator are displayed in a tabular form.
When the expected and actual values are the same, meaning the validation passed, the row is highlighted in green. Otherwise, the row will be red.
Payloads
If the step type is API, the Payloads tab provides access to the request and response payloads associated with the selected step. This tab allows you to review the details of the data exchanged during the execution. Additionally, you can search for specific nodes by entering a keyword or the full parameter in the search text box.
Attachments
The Attachments tab displays all files utilized during the test step execution. This includes any relevant documents, logs, or additional files uploaded for reference during the test.
Overall Scenario Summary
The Overall Scenario Summary offers a high-level overview of the scenario to which the selected step belongs.
Field
Description
Scenario name
Name of the scenario to which the selected step belongs.
Environment
Environment where the test scenario was executed.
Started at
Date and time when the test scenario execution began.
Ended at
Date and time when the test scenario execution was completed.
Passed steps
Percentage of the passed steps within the scenario.
Scenario Step Types Distribution
The Scenario Step Types Distribution pie chart shows the proportion of different step types within the selected scenario, such as API, UI, or database steps.
Scenario Step Status Distribution
The Scenario Step Status Distribution pie chart provides a quick visual representation of how many steps passed, failed, or are still running.
3 -
What is RIA Test Automation?
RIA Test Automation is a versatile software testing solution developed by RIA Advisory to streamline and enhance the testing process for enterprise applications. Initially created to address the challenges of efficient regression testing in internal projects, it has now grown into a robust tool that can adapt to any enterprise system, providing complete end-to-end testing capabilities.
This tool especially supports various Oracle products, including Oracle Revenue Management and Billing (ORMB), Customer-to-Meter (C2M), Utilities Customer Cloud Service (CCS), and Meter Data Management (MDM). However, its flexible architecture allows for seamless integration across diverse business applications. Test Automation facilitates thorough testing across APIs, batch processes, and user interface interactions, enabling you to deliver quality software while minimizing the effort and costs involved in the testing process.


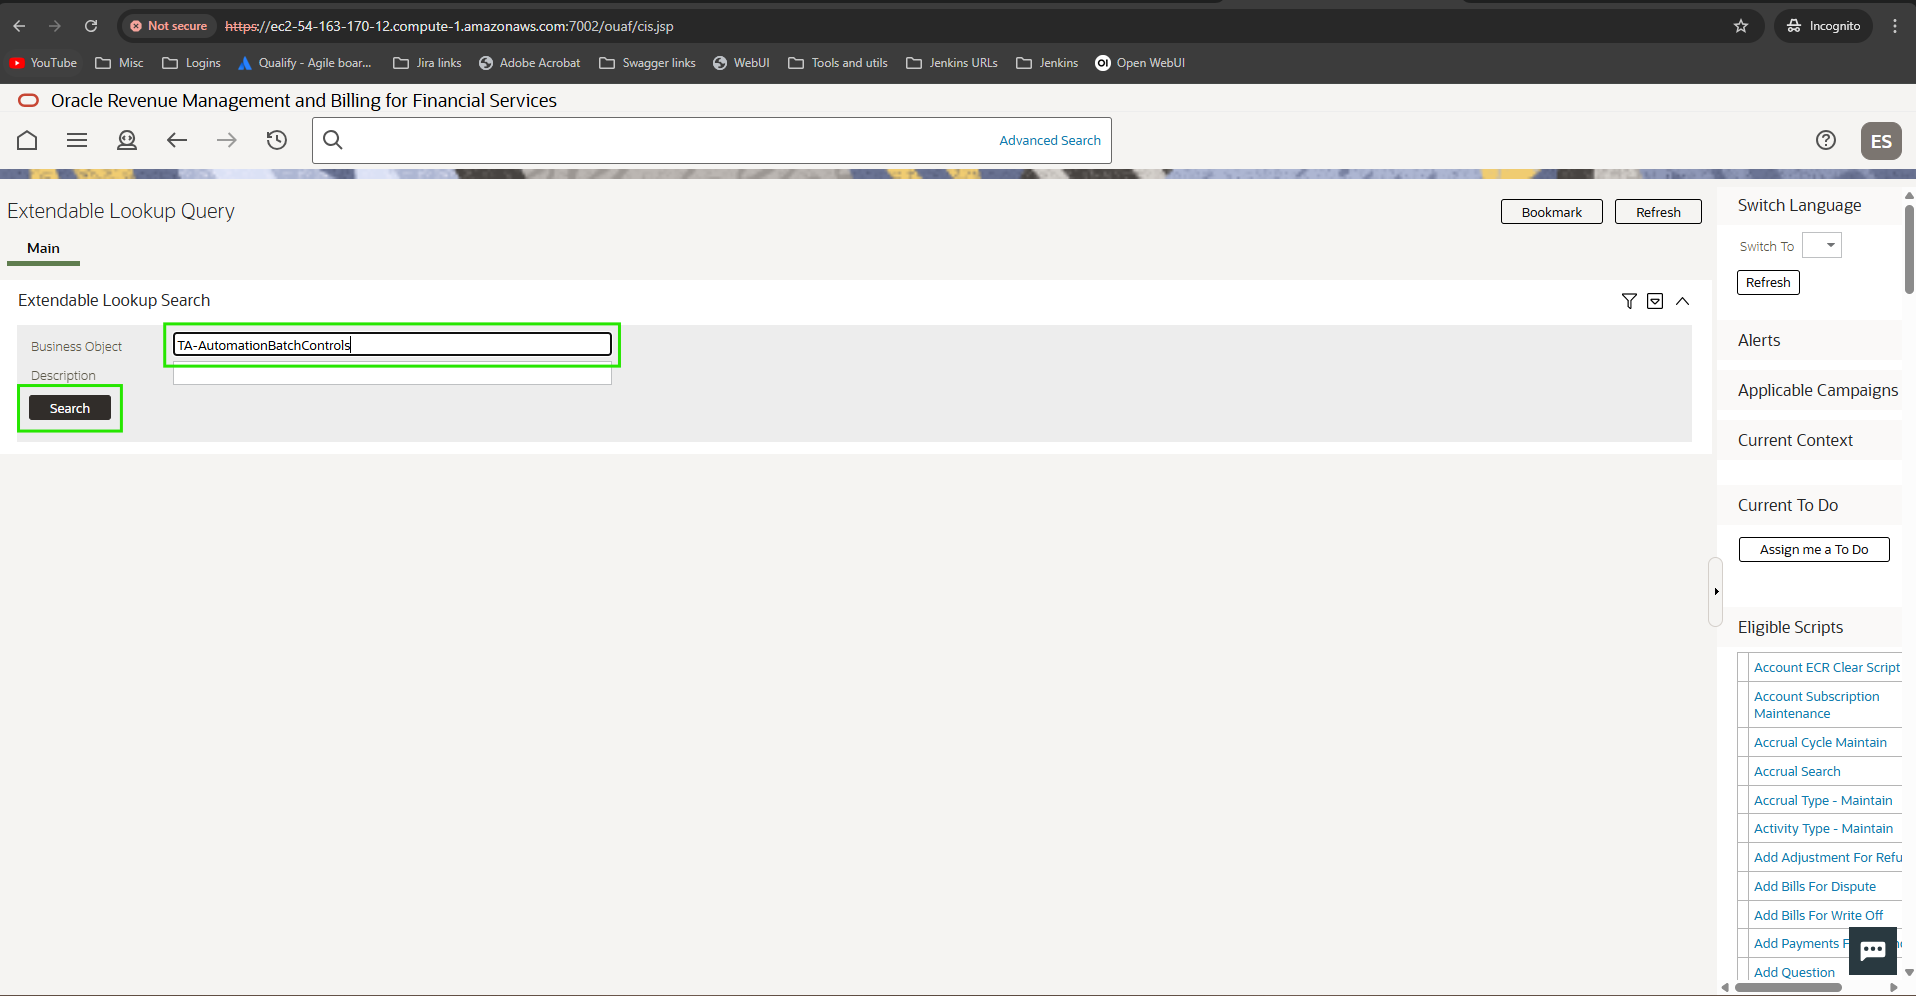
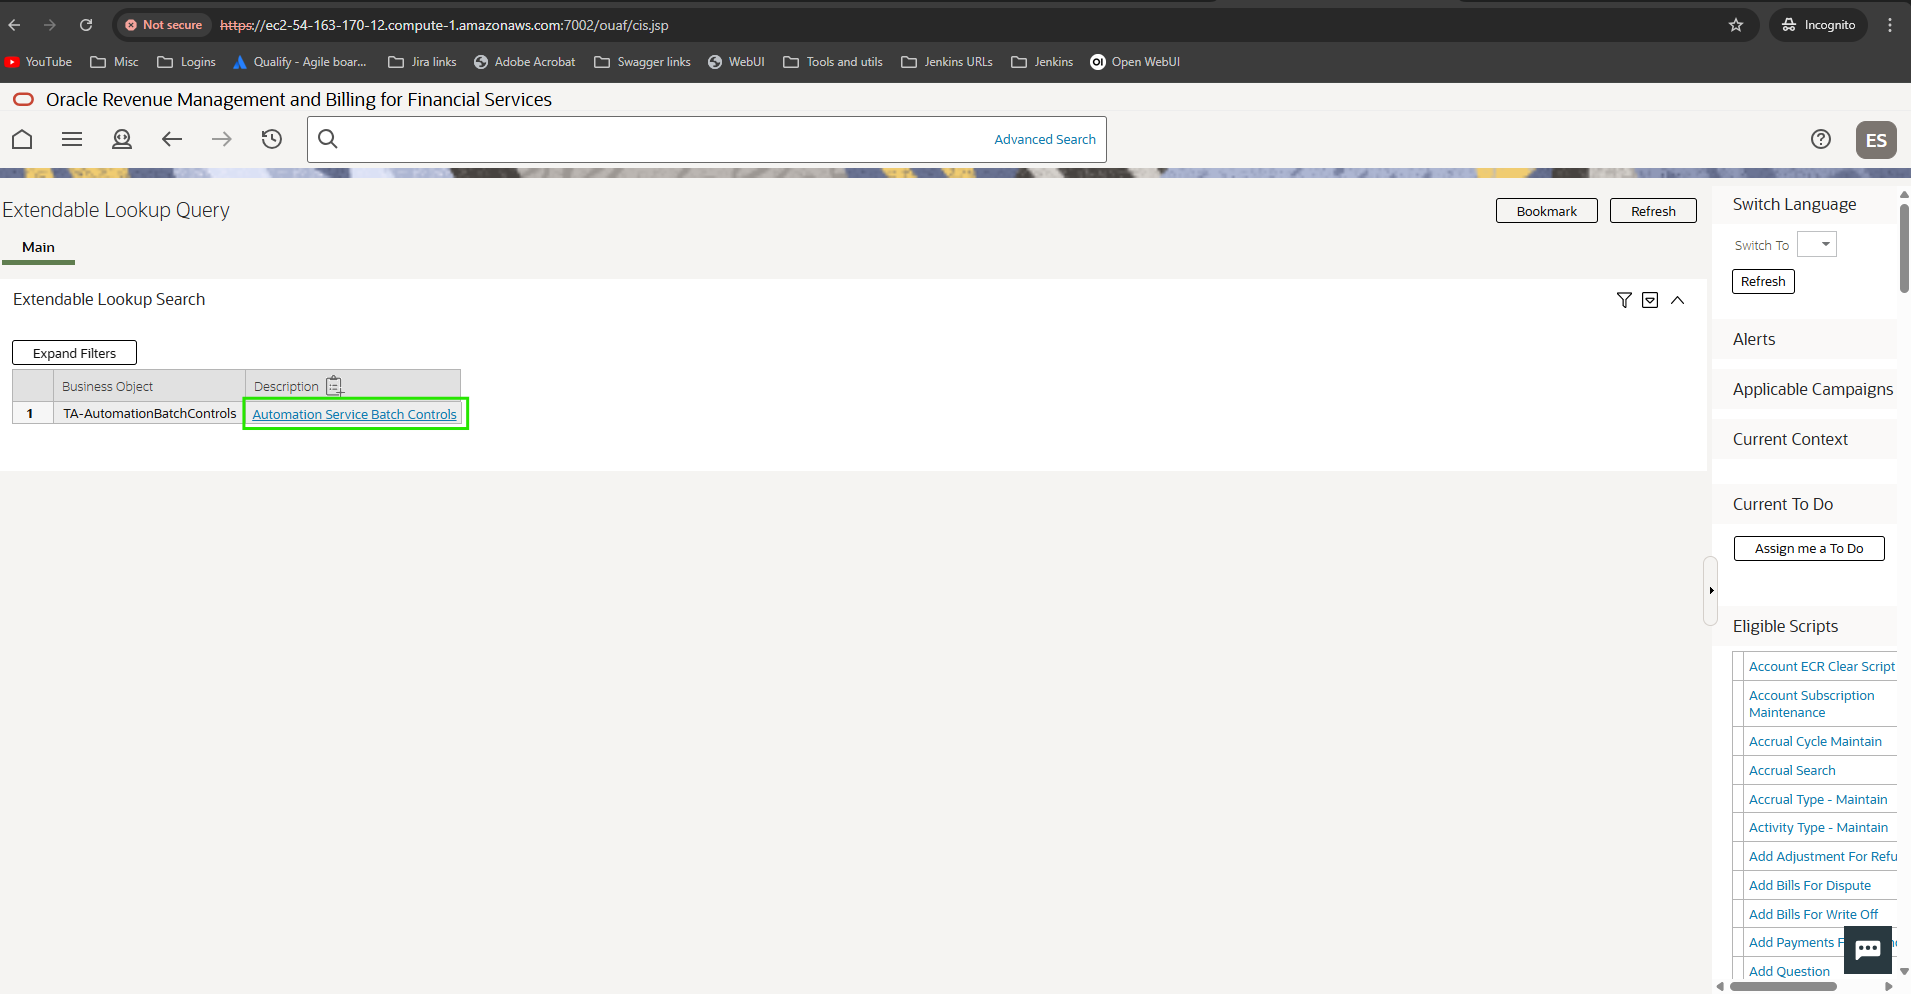
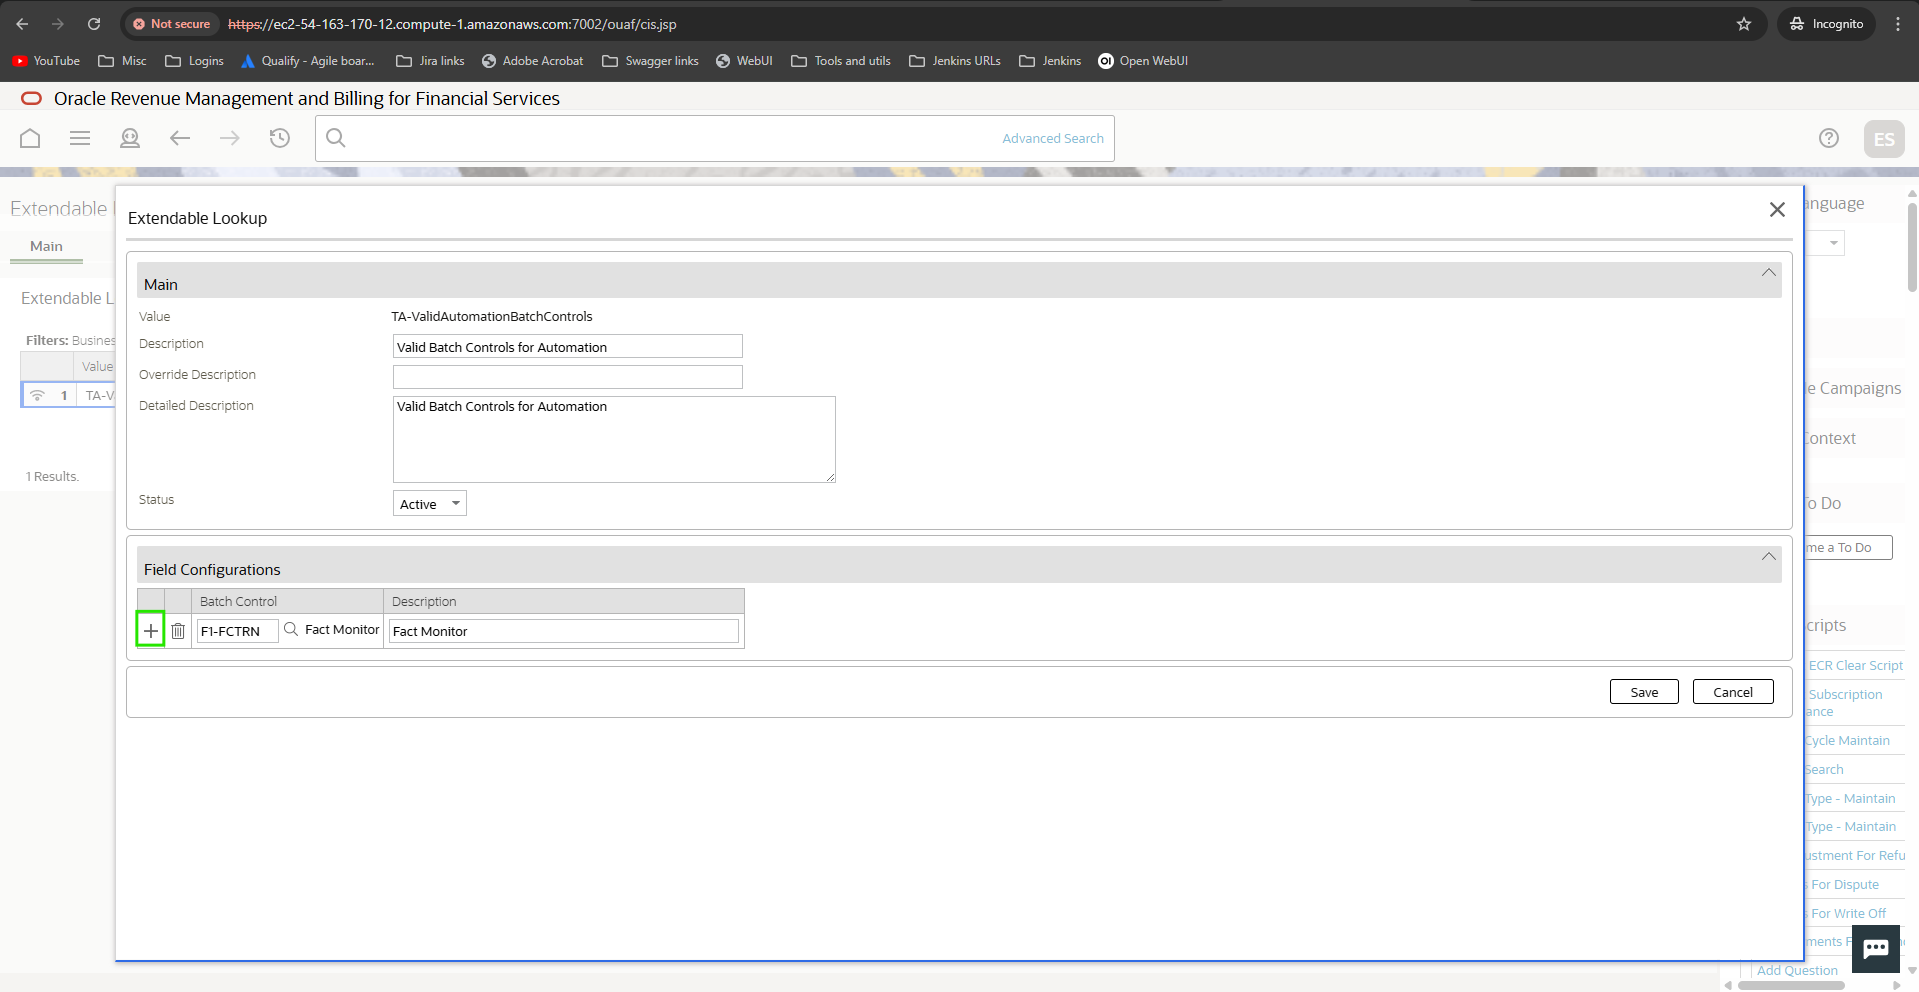
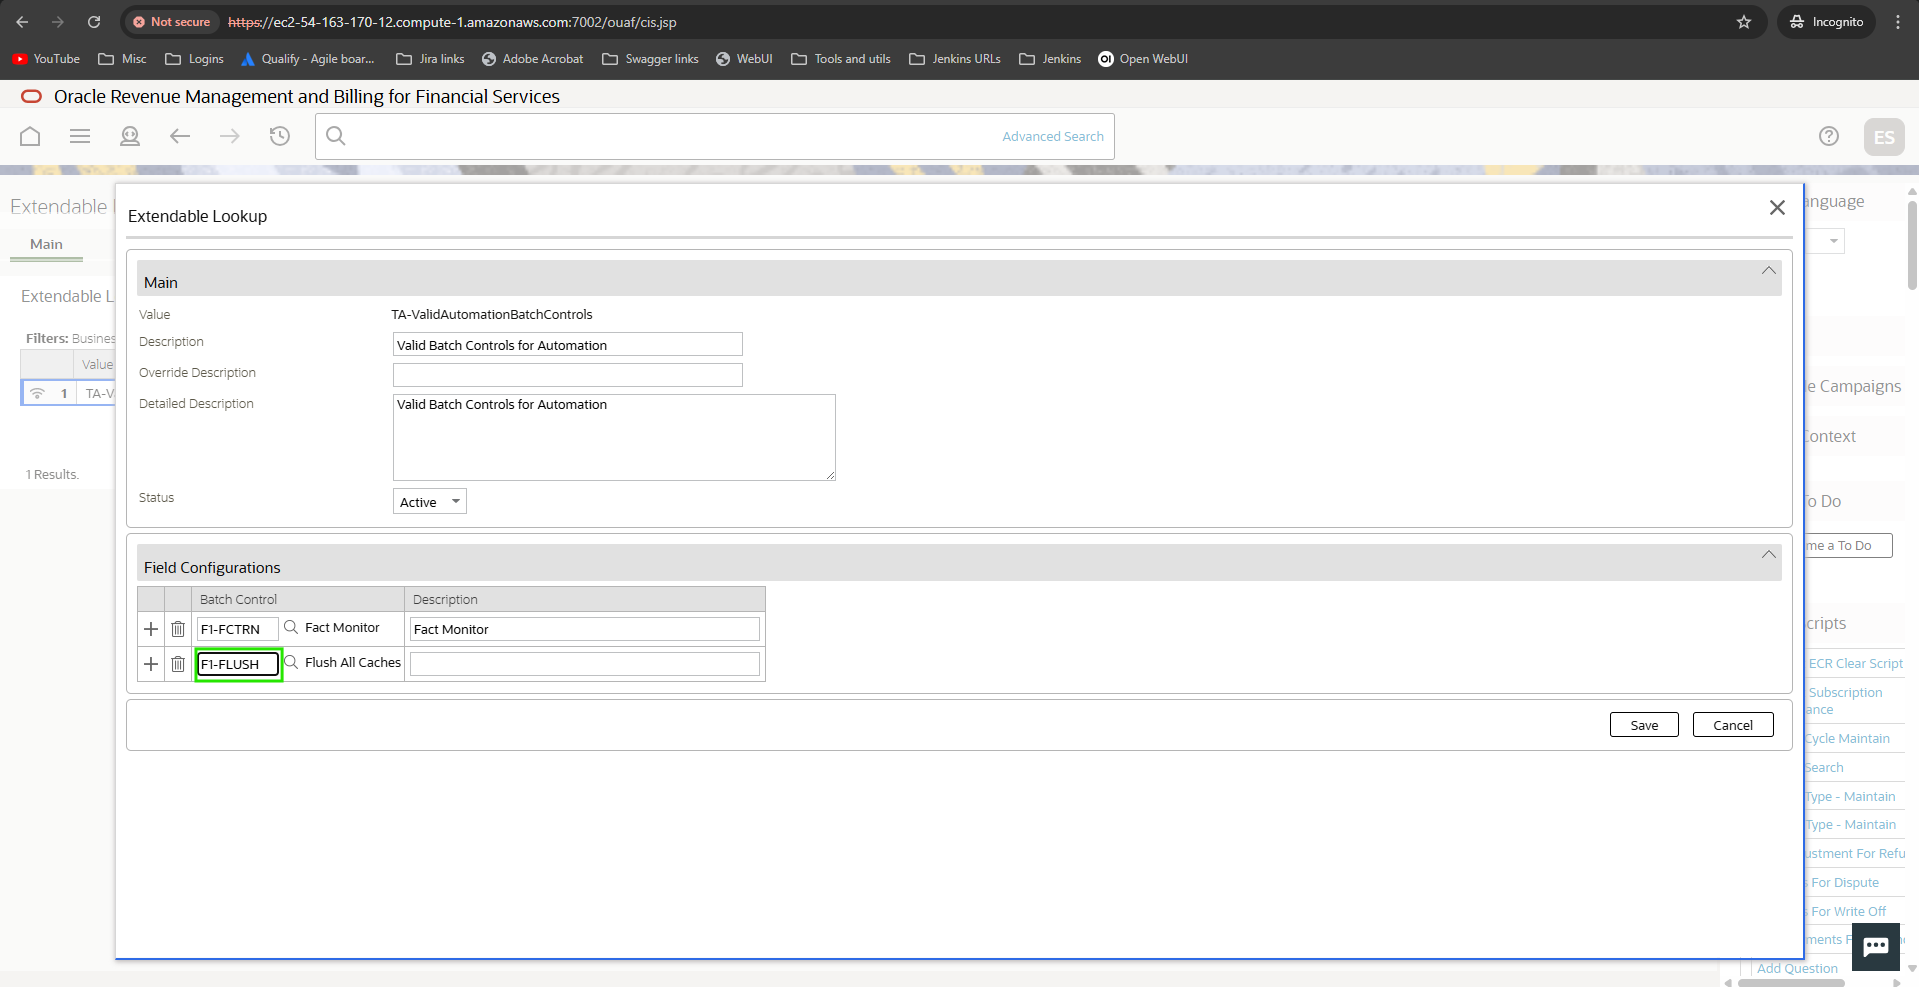
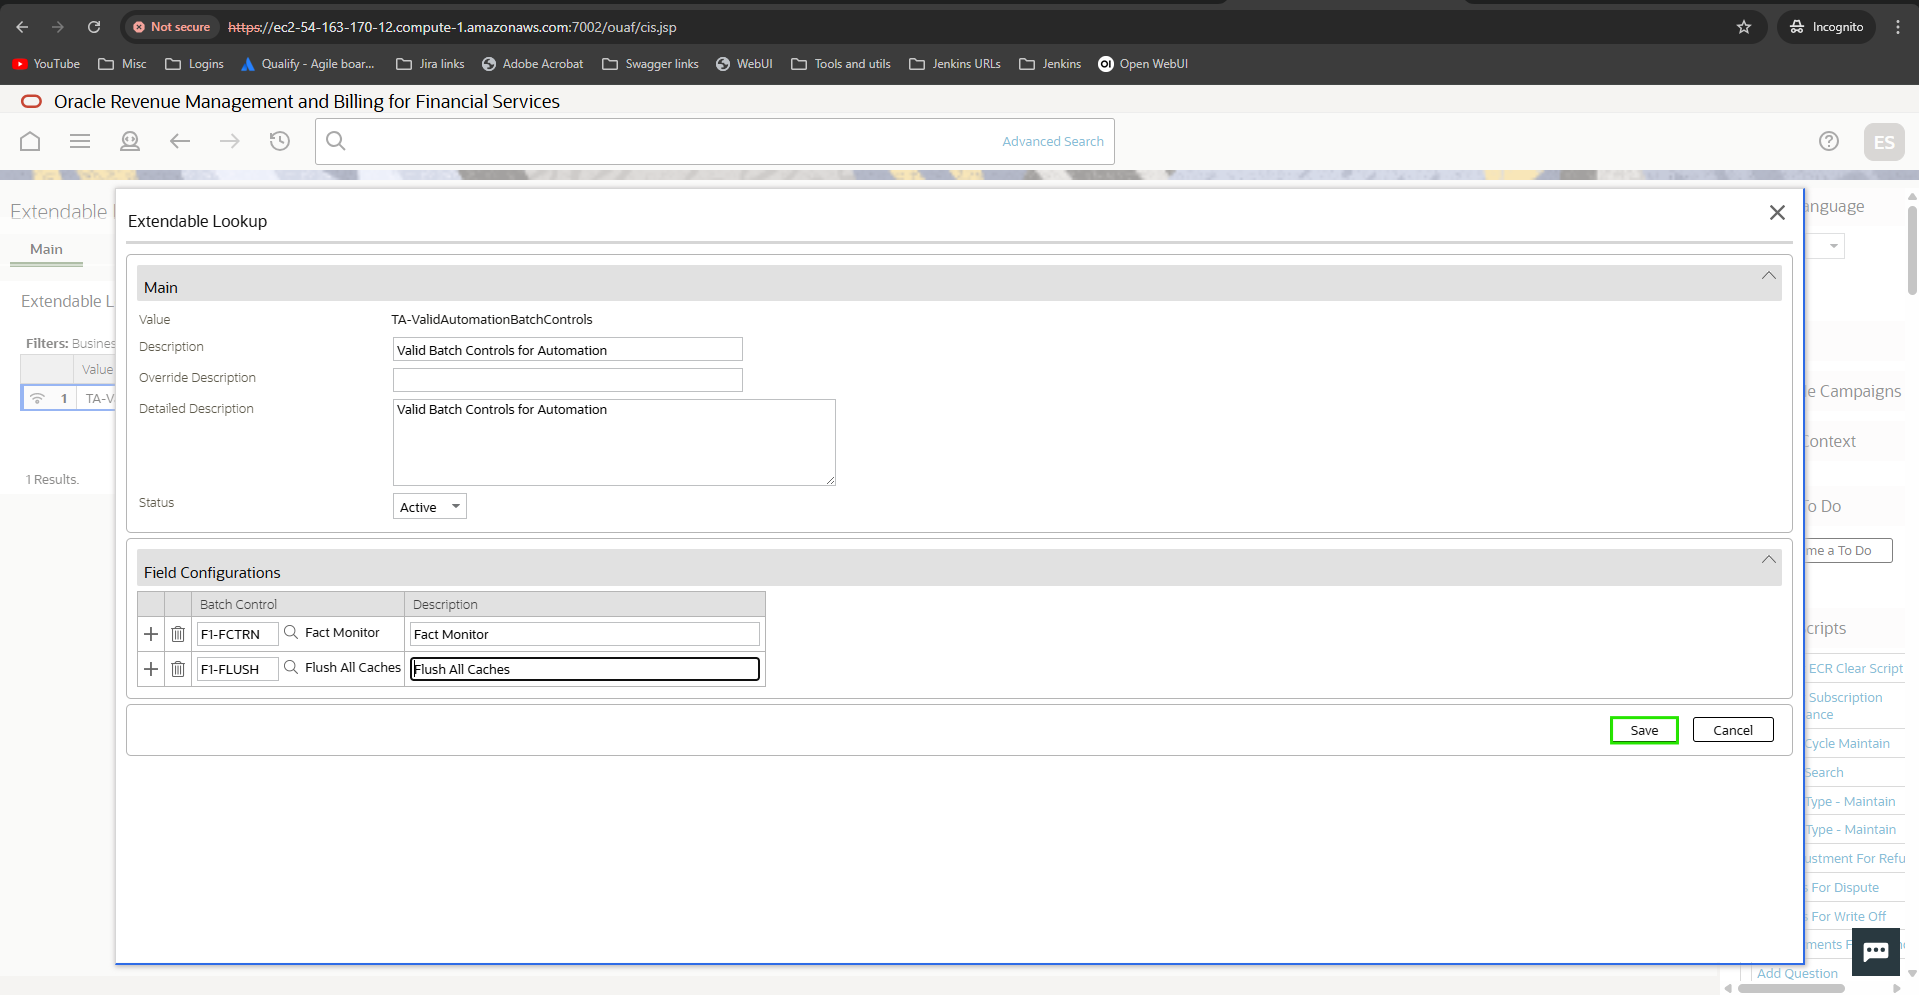
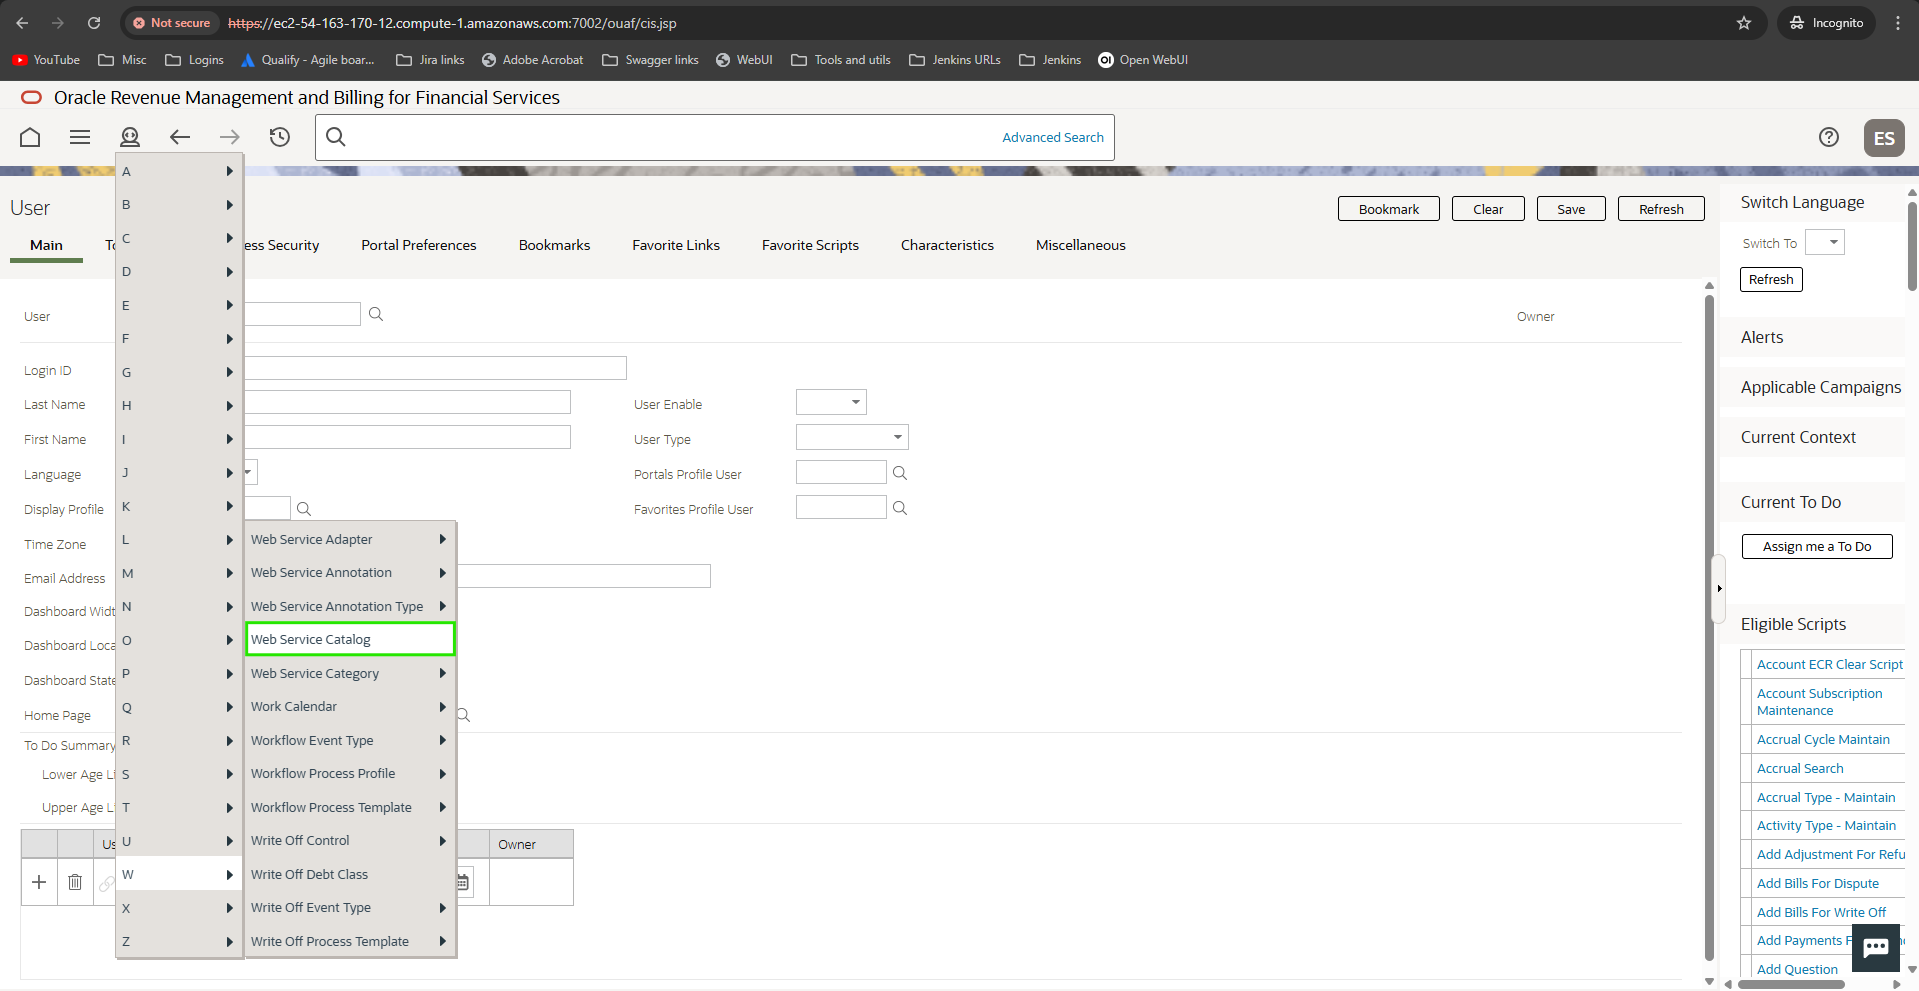
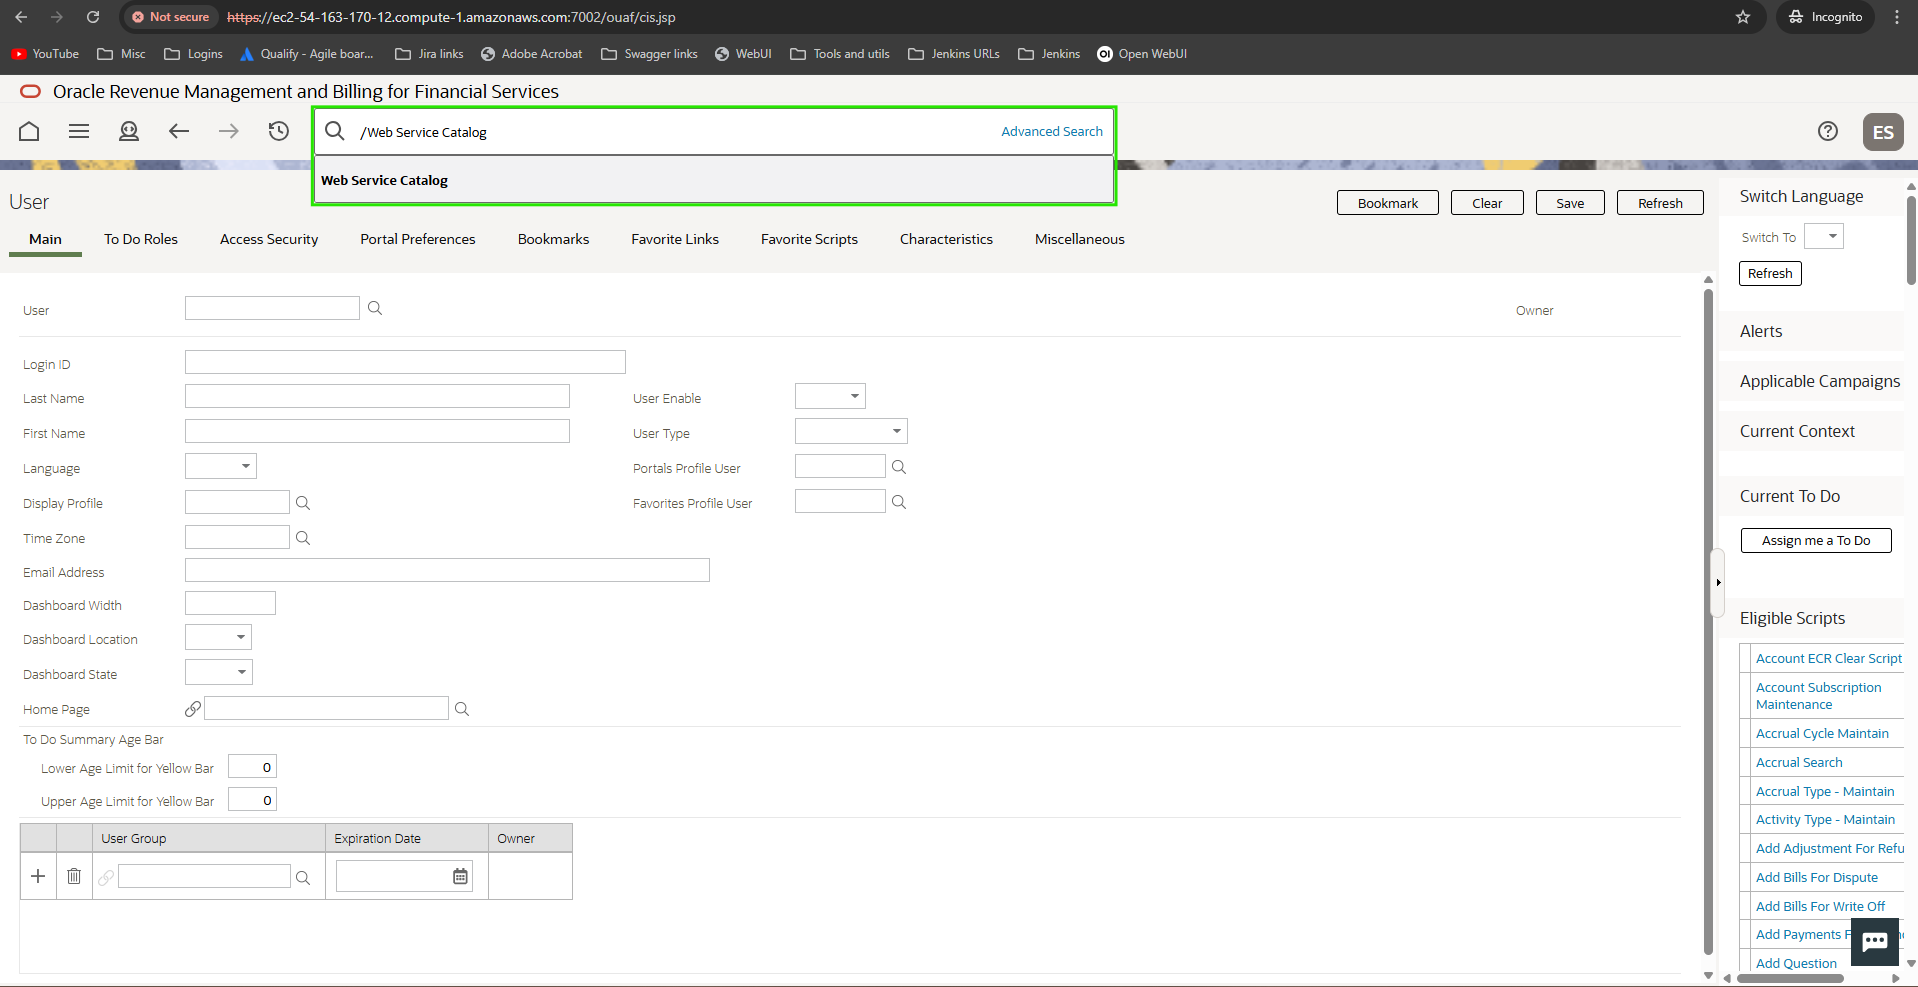
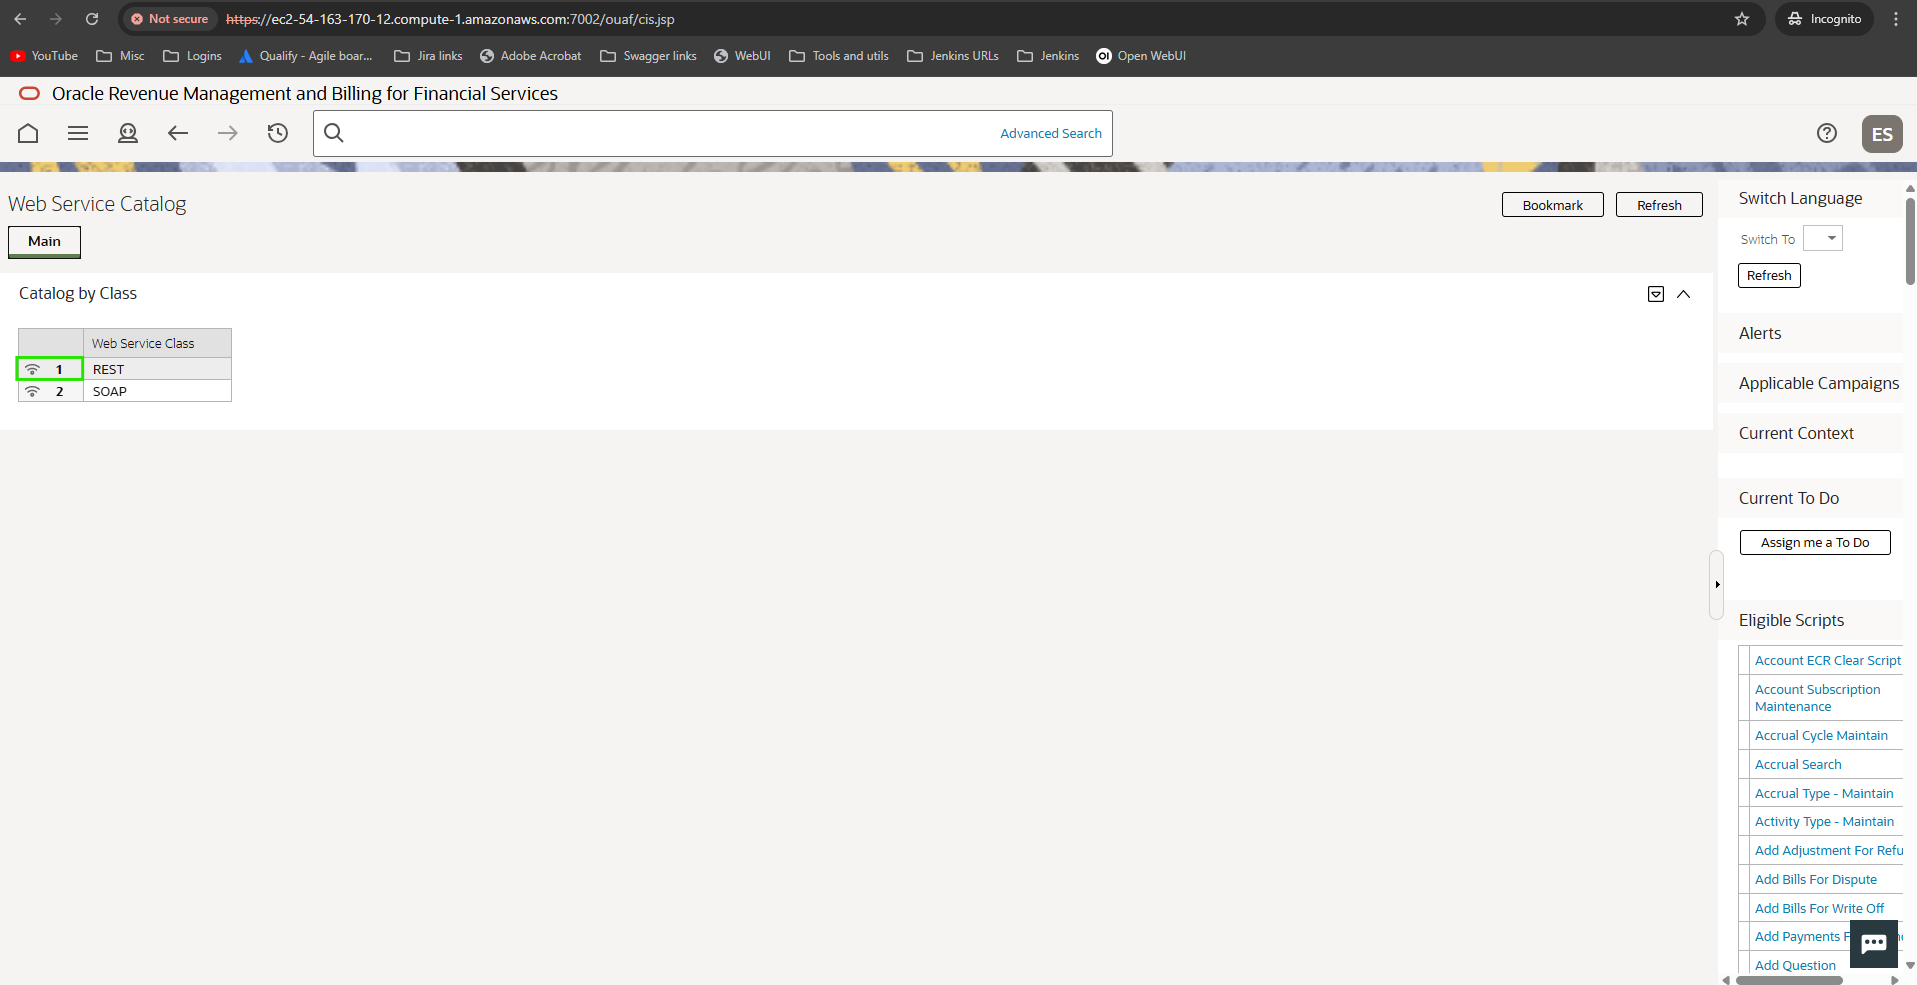
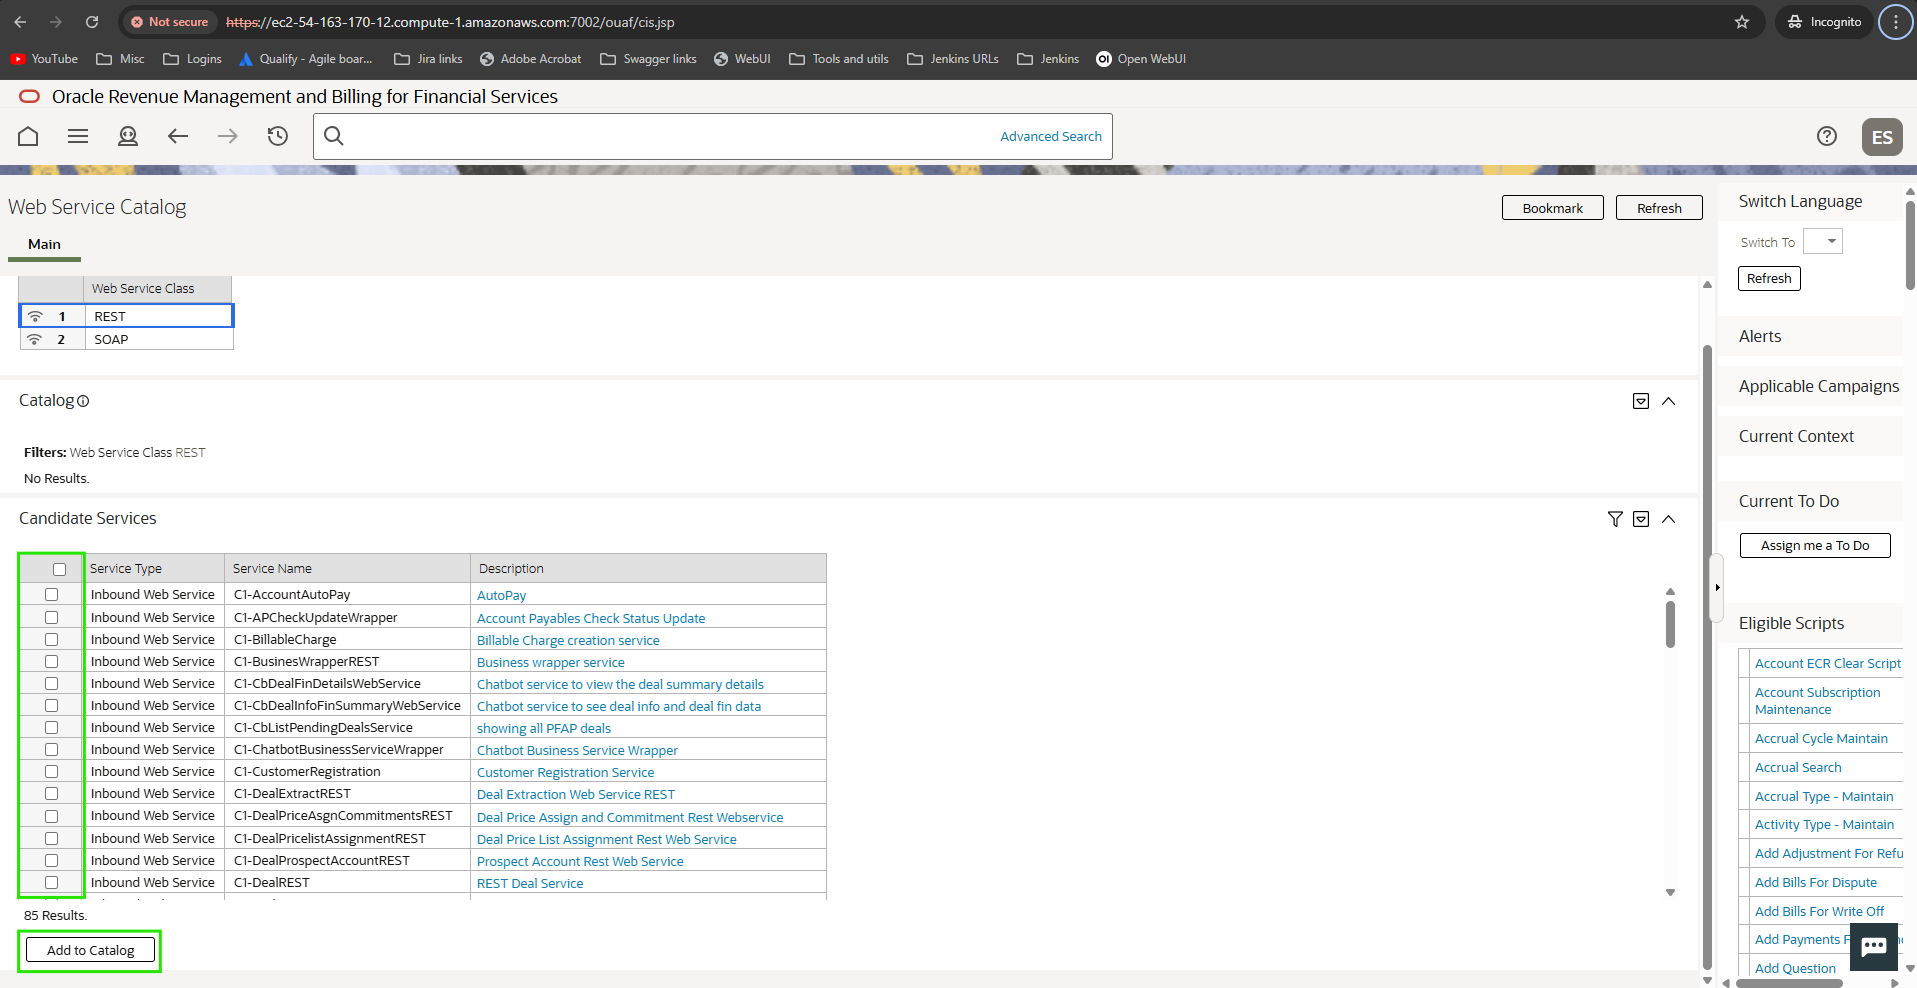
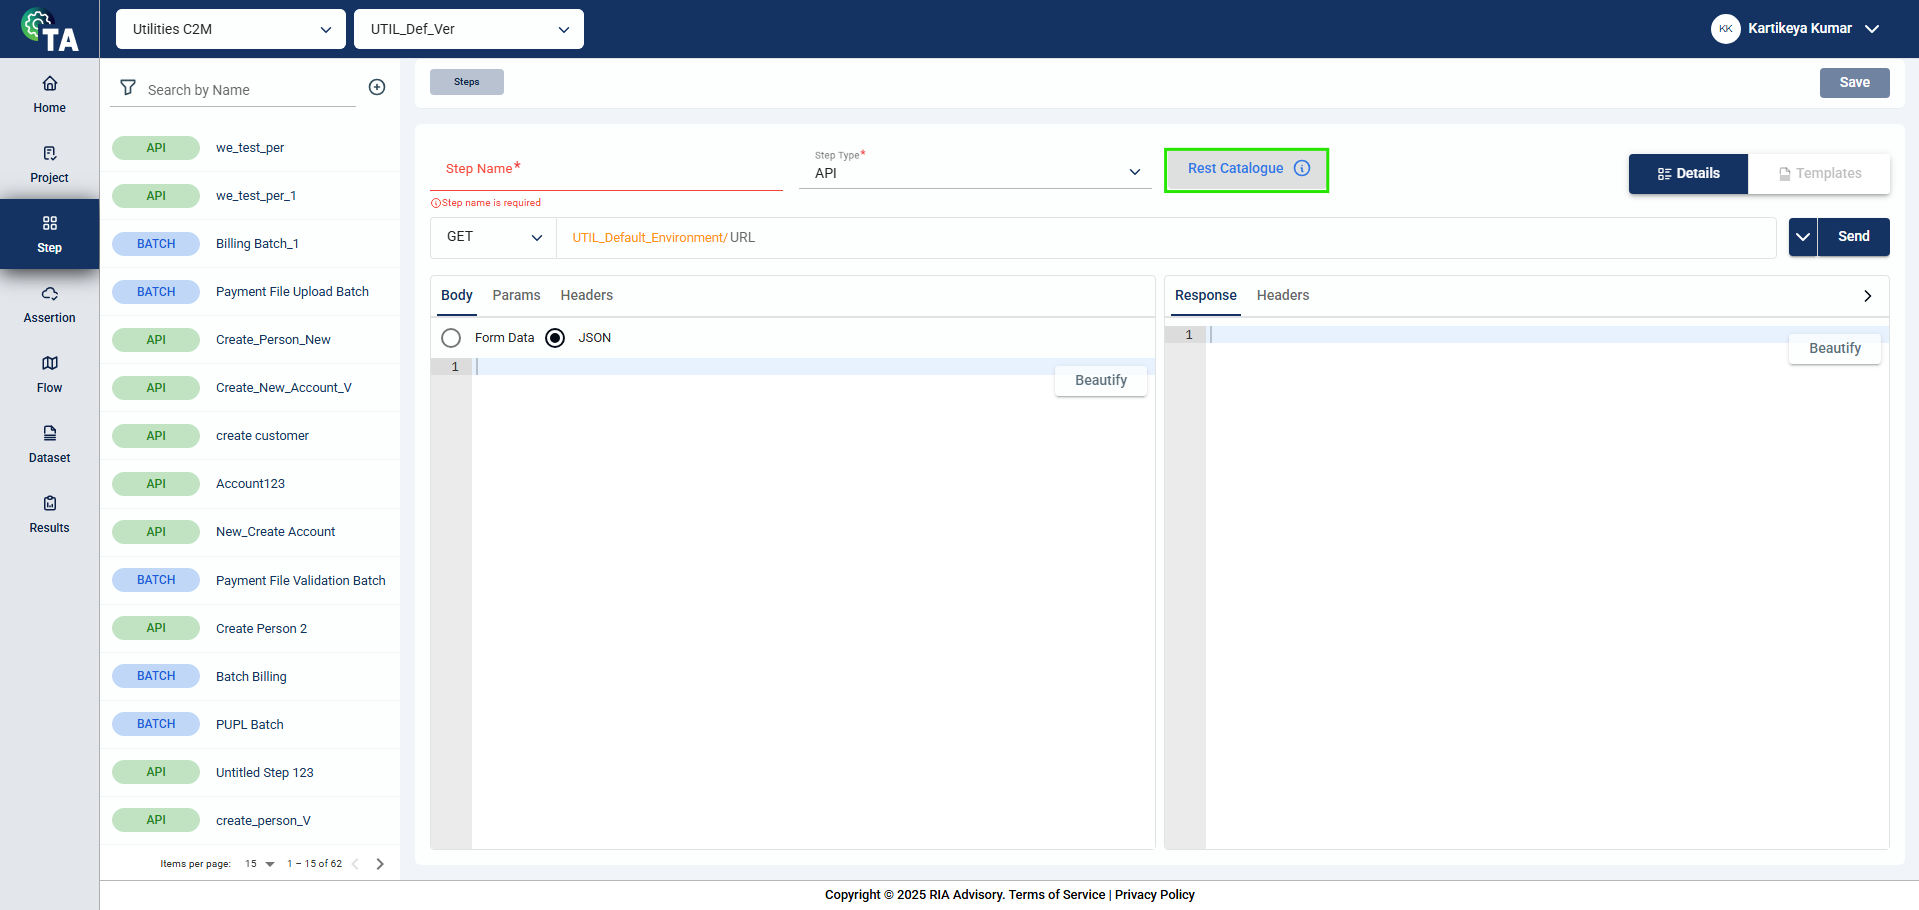
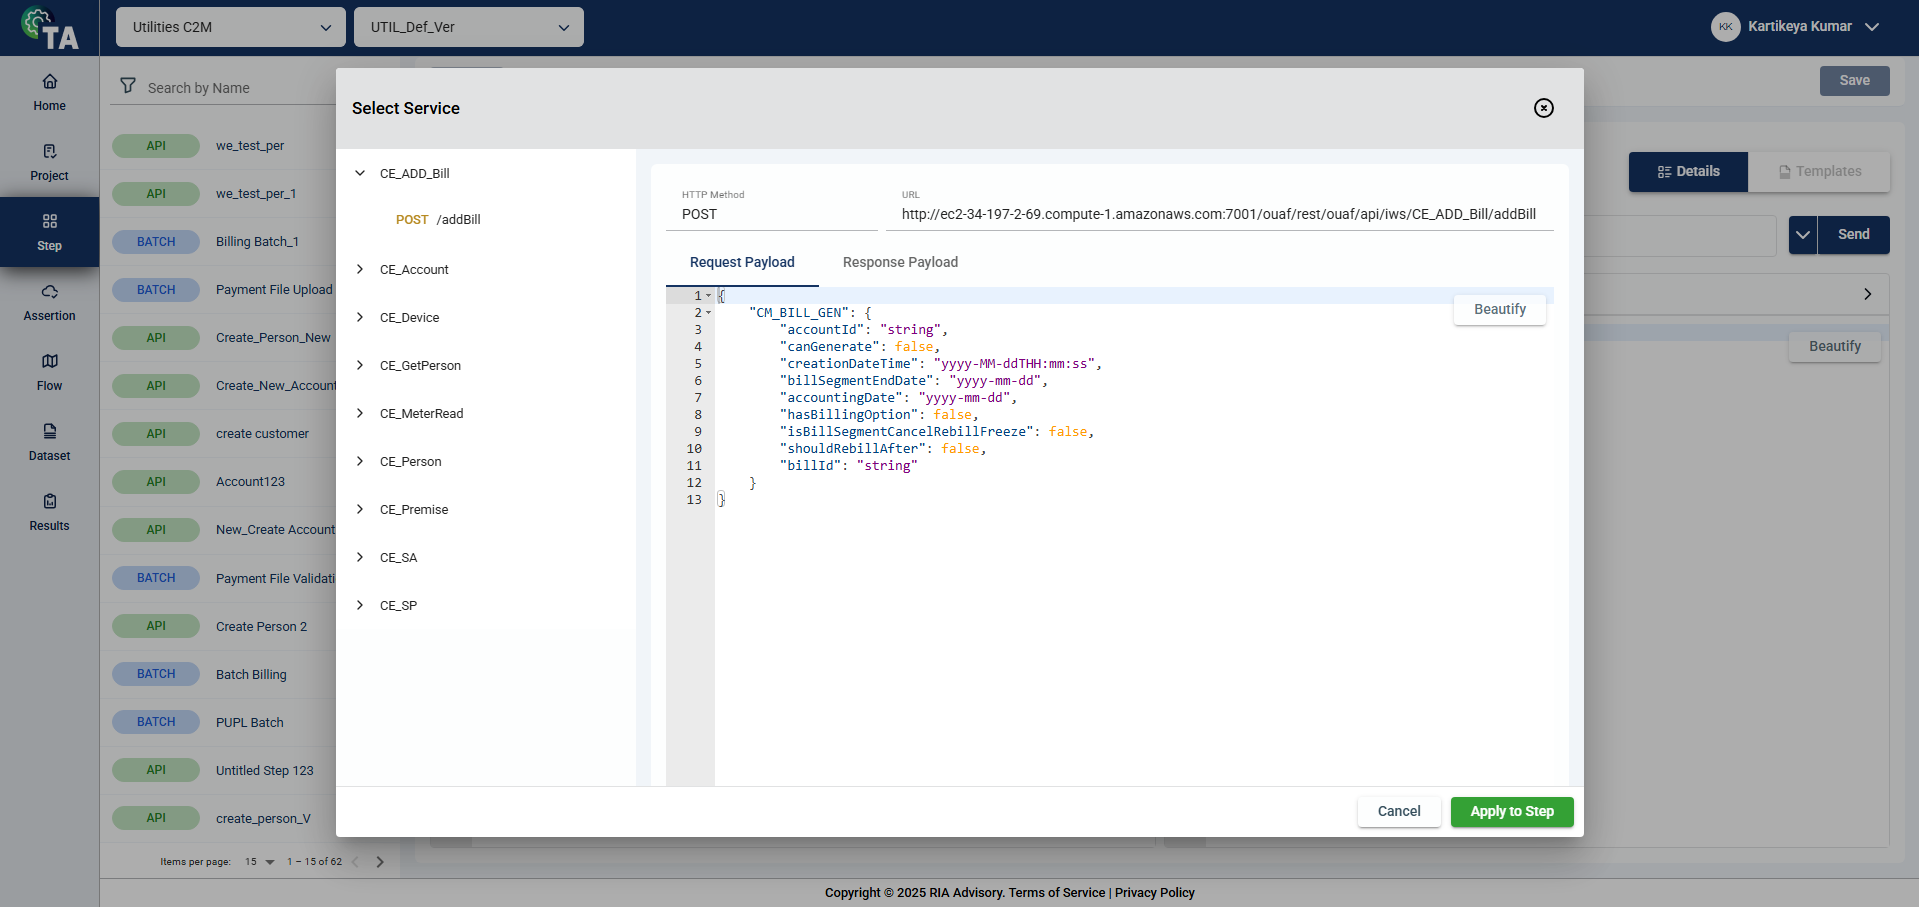
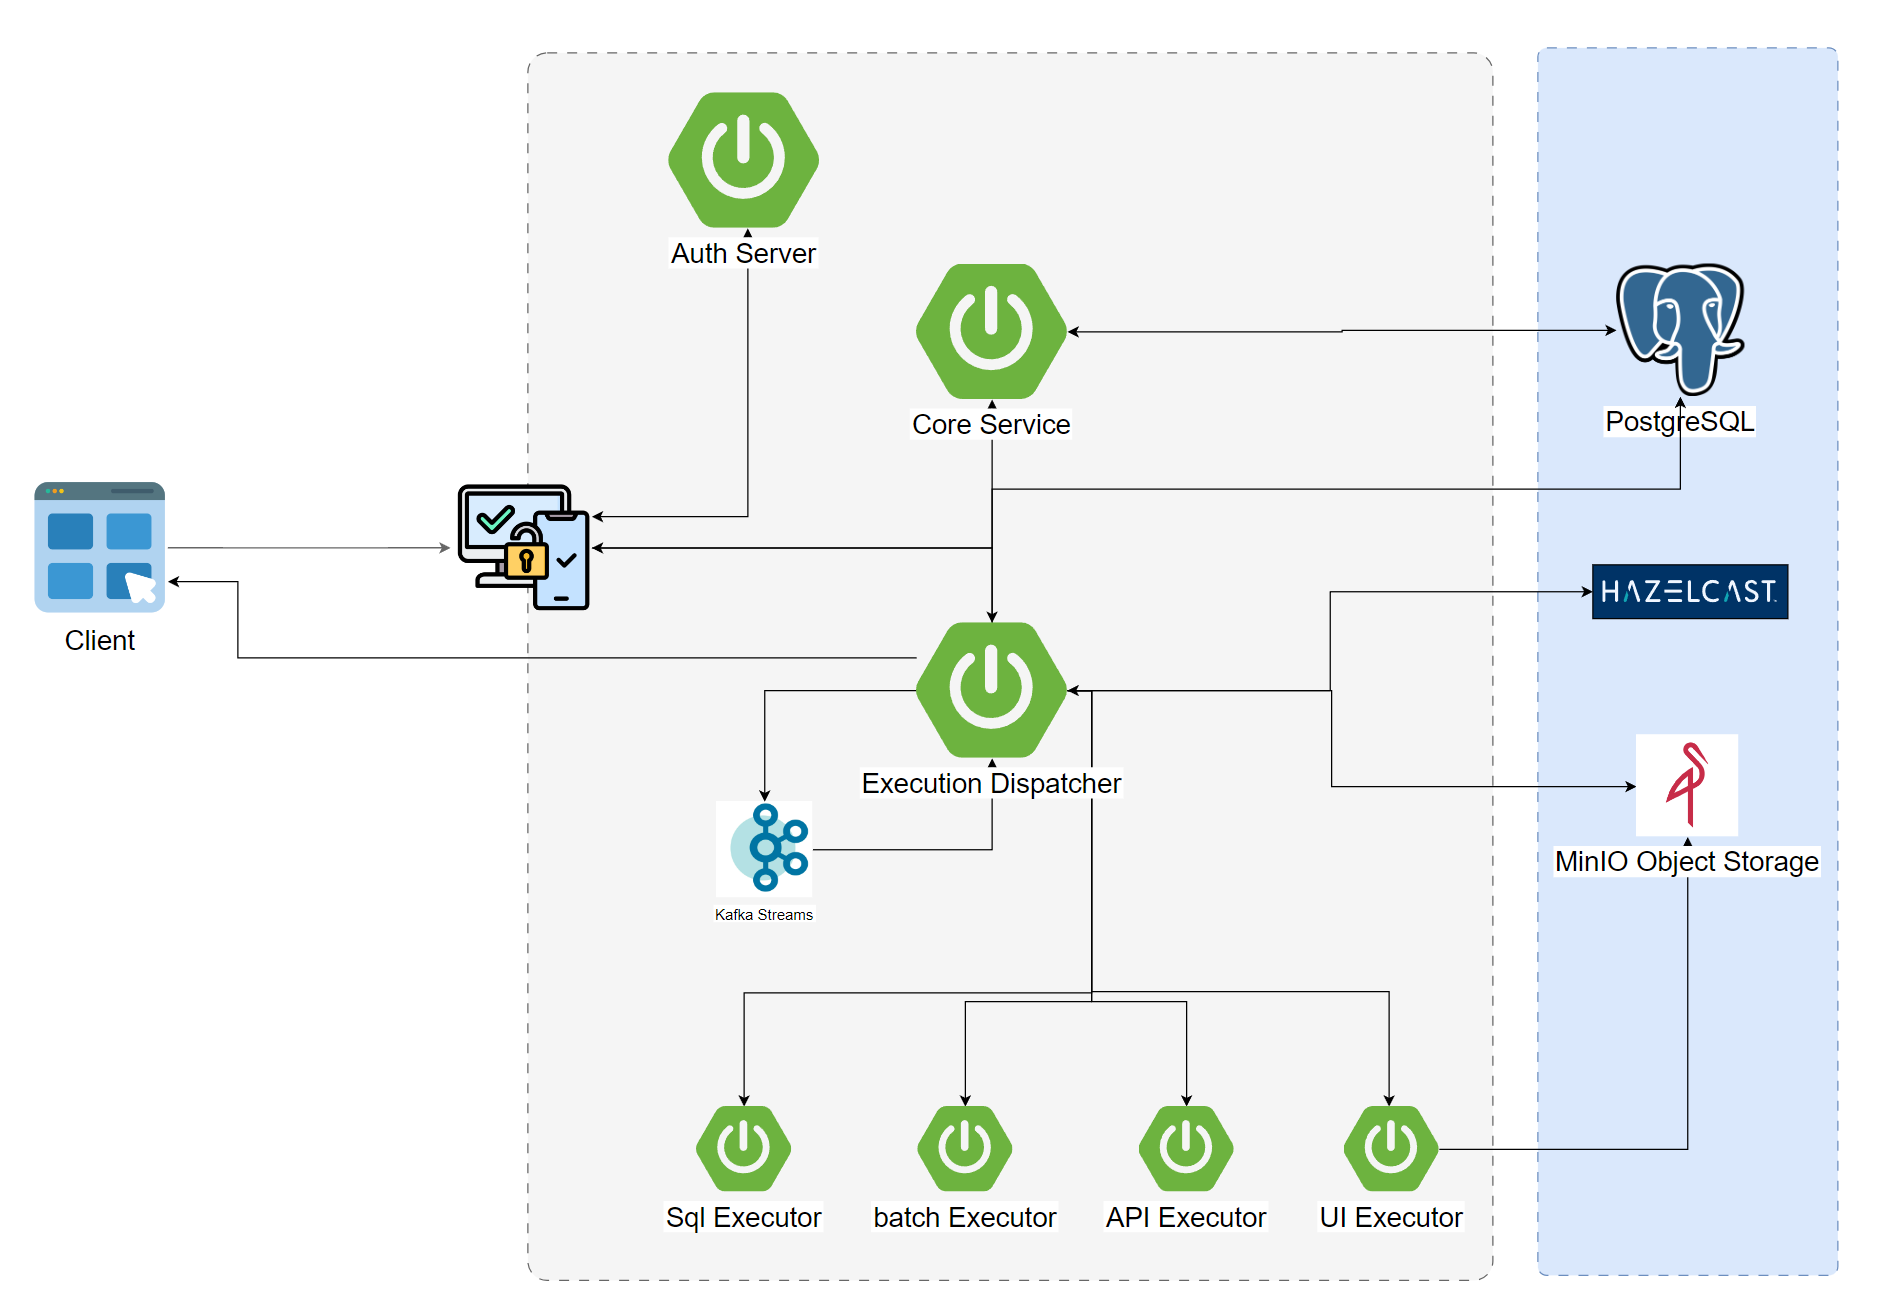
.png)
.png)
.png)
.png)
.png)
.png)
.png) button on the top left pane.
button on the top left pane.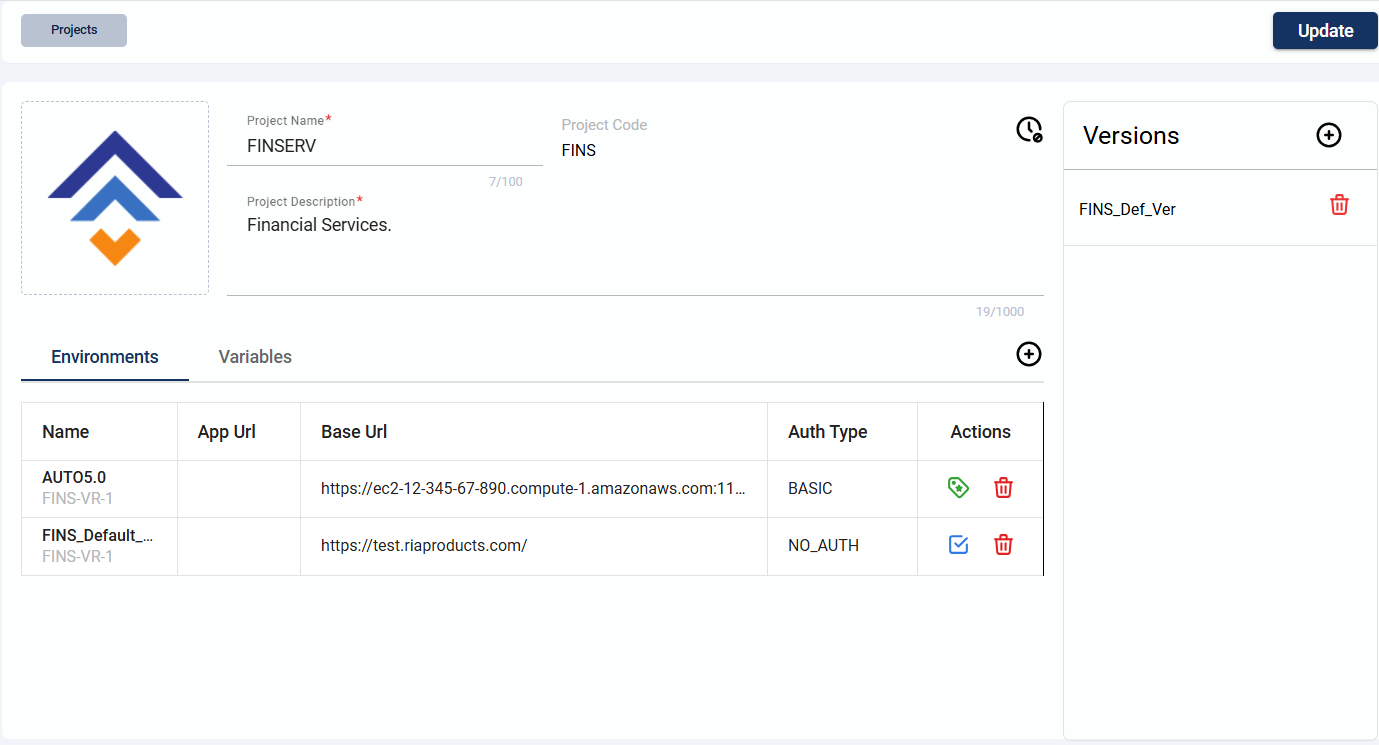
.png)
.png)
.png)
.png)
.png) and enter valid values in the following fields. After adding the details, click Test Connection to ensure that the connection details you configured are correct and working properly. The status will change from
and enter valid values in the following fields. After adding the details, click Test Connection to ensure that the connection details you configured are correct and working properly. The status will change from 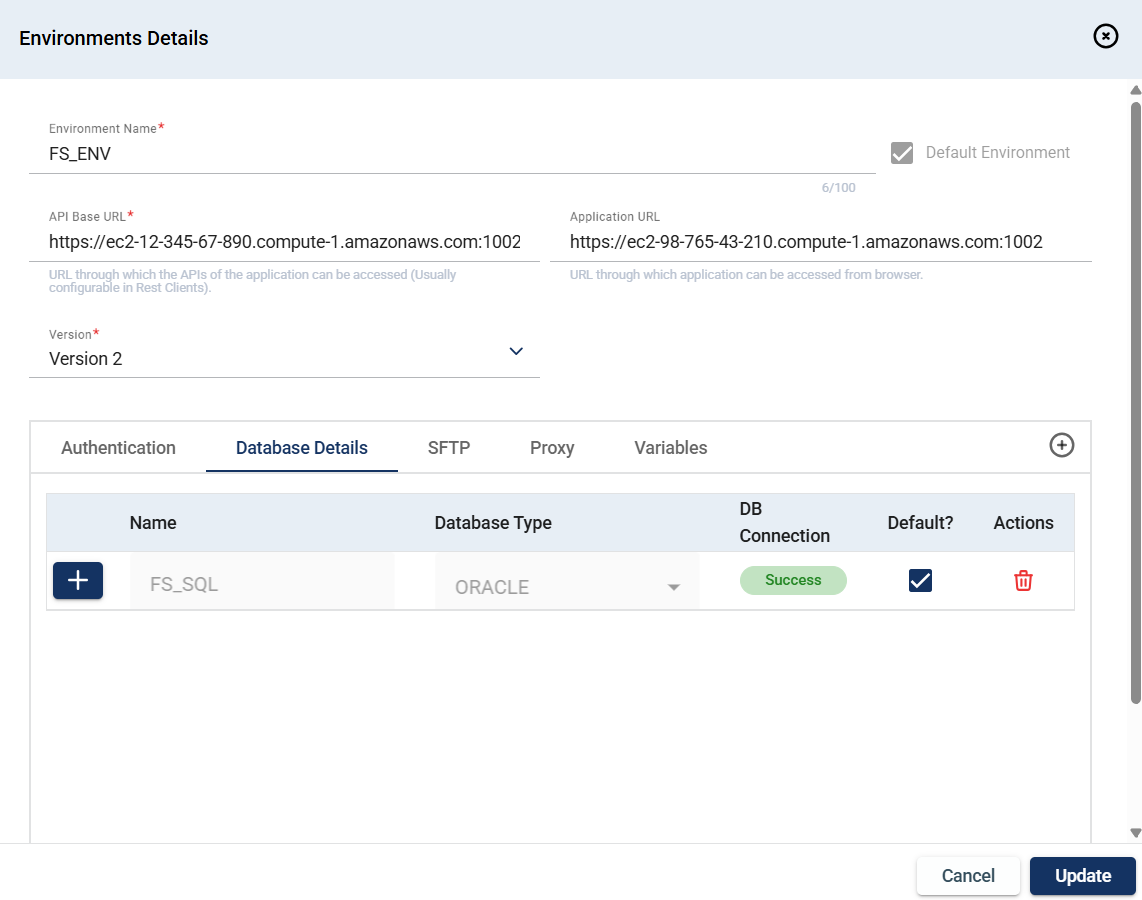
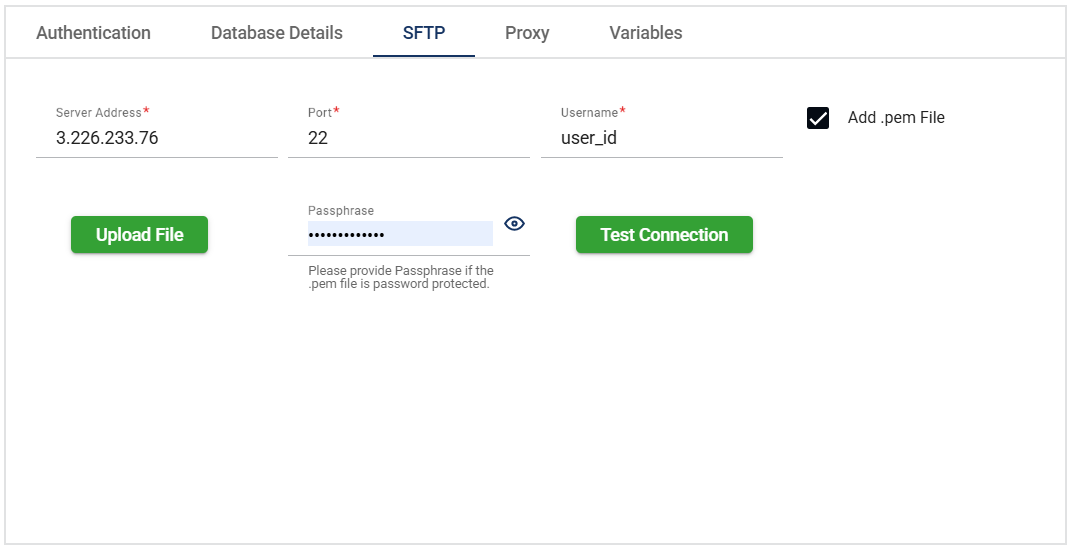
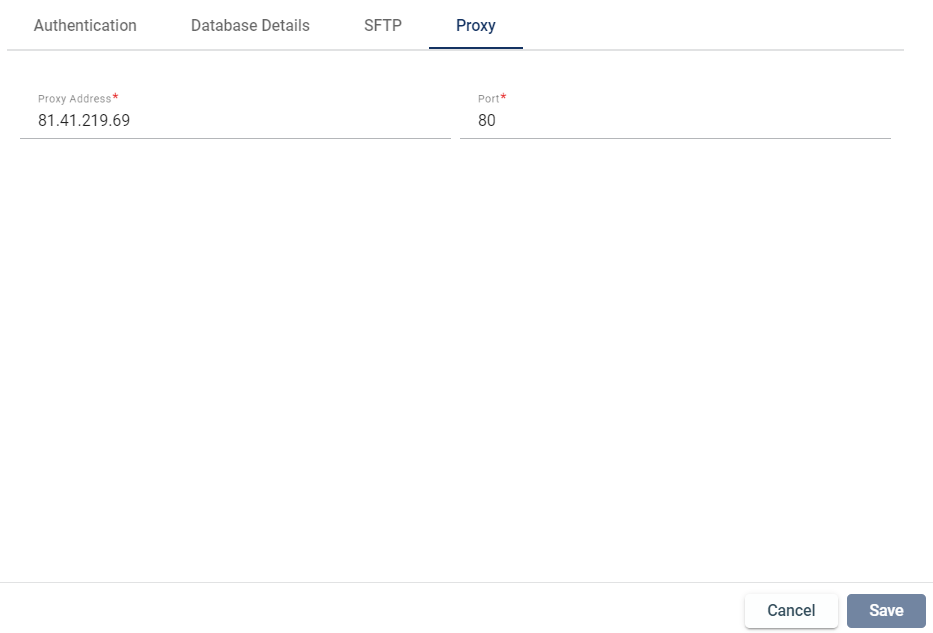
.png)
.png)
.png)
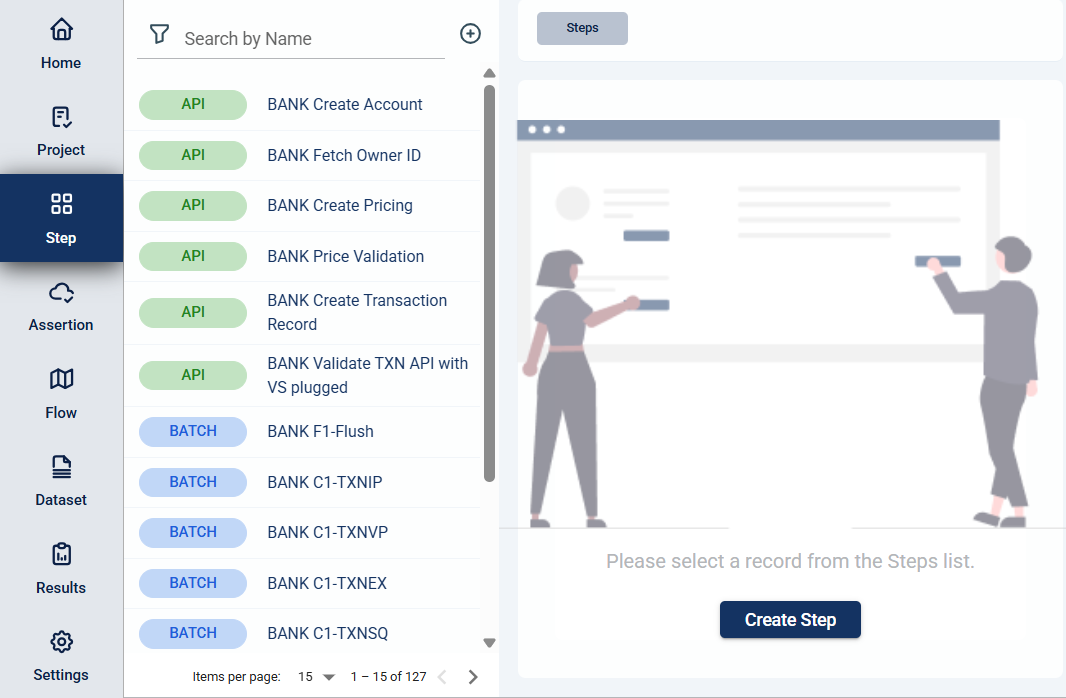
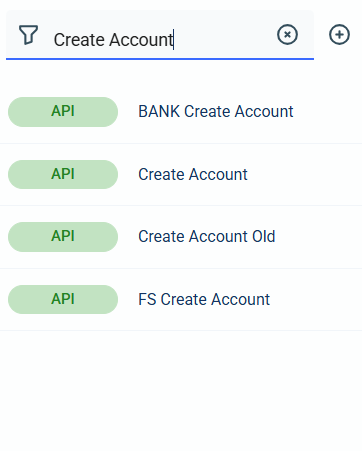

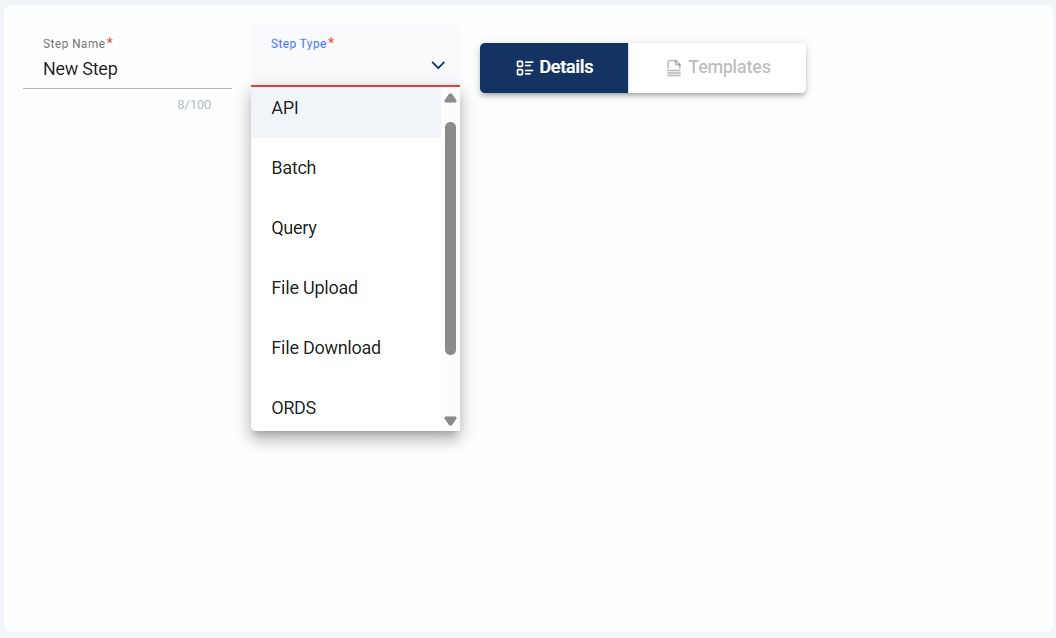
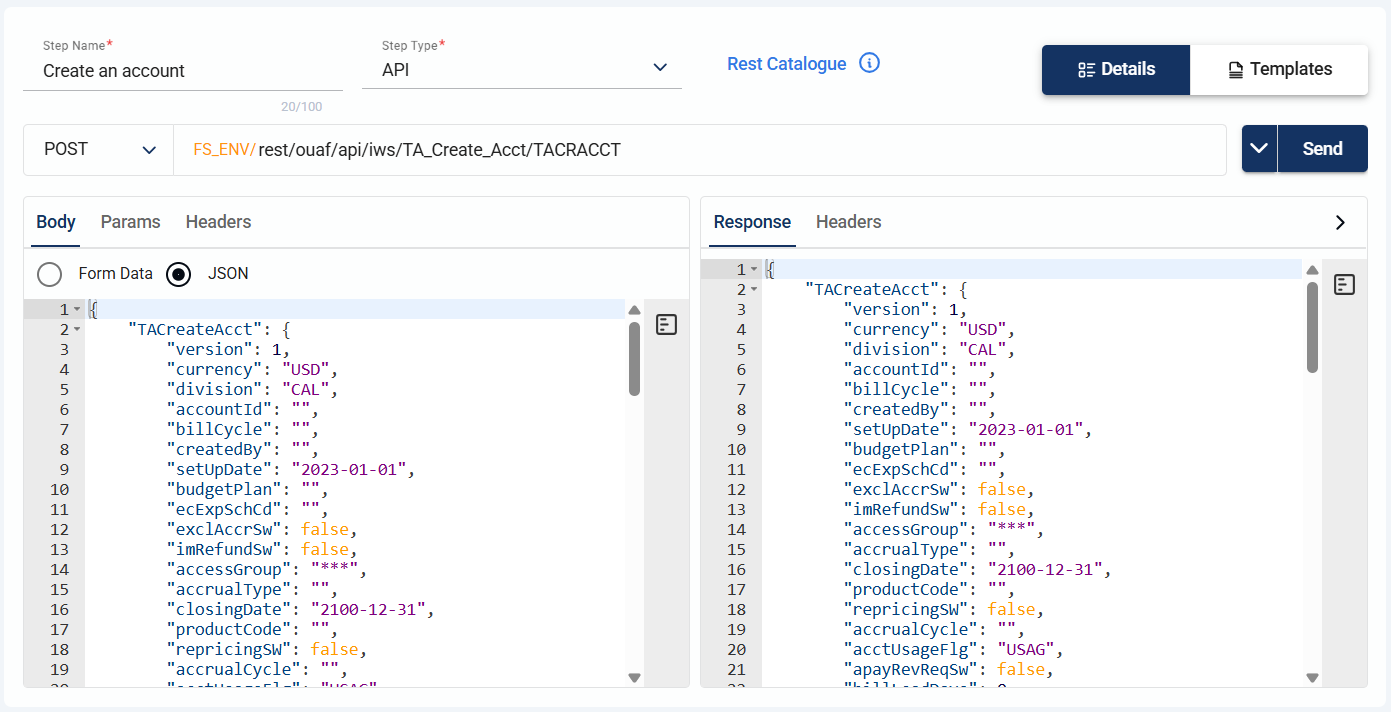
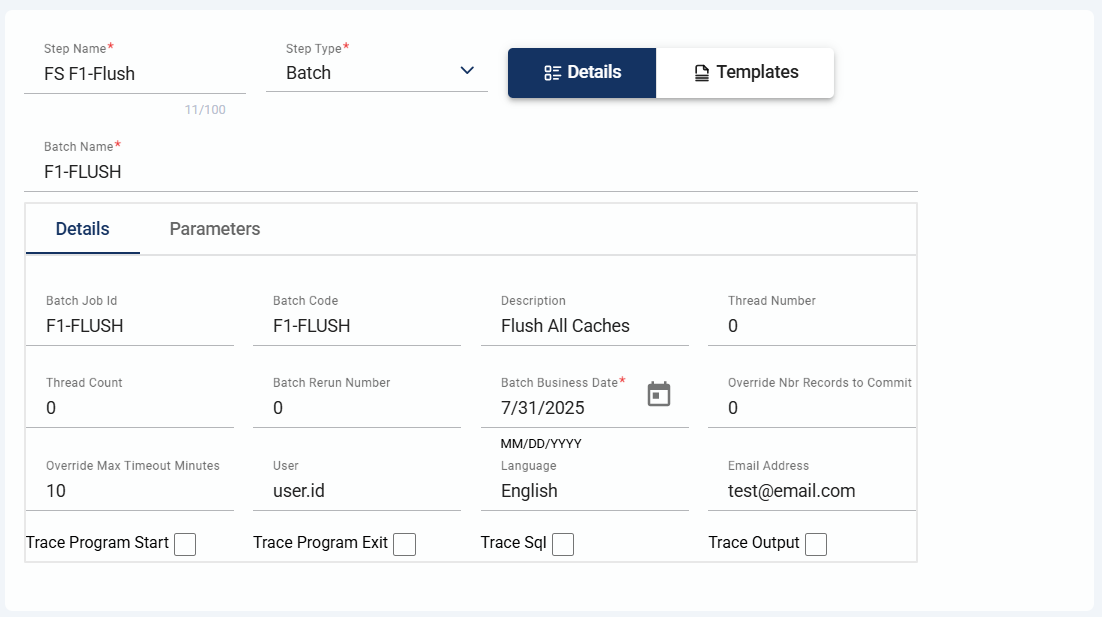
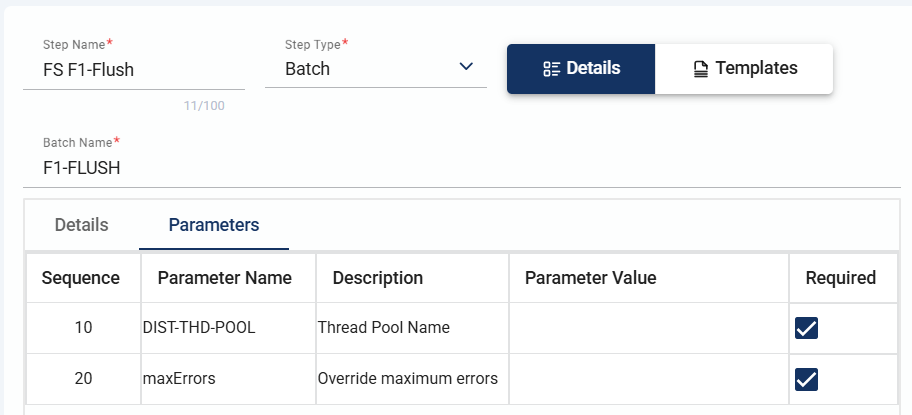
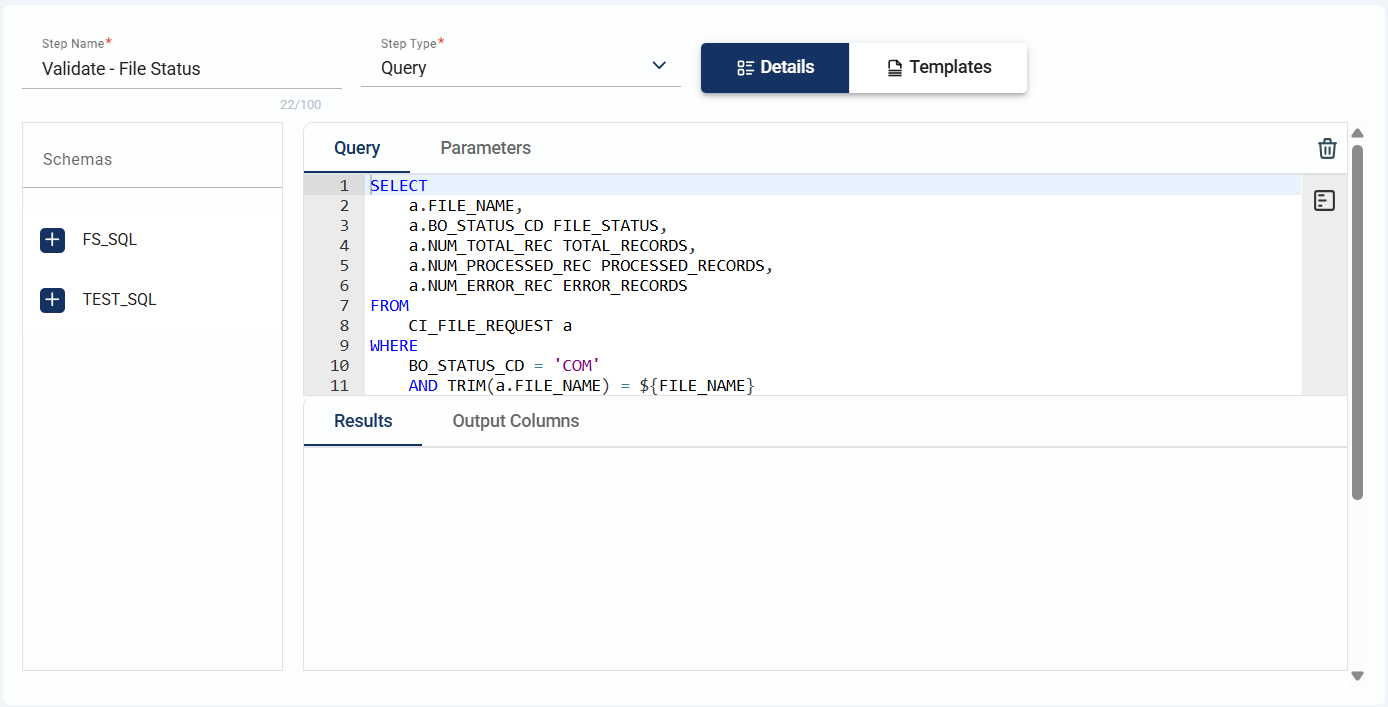
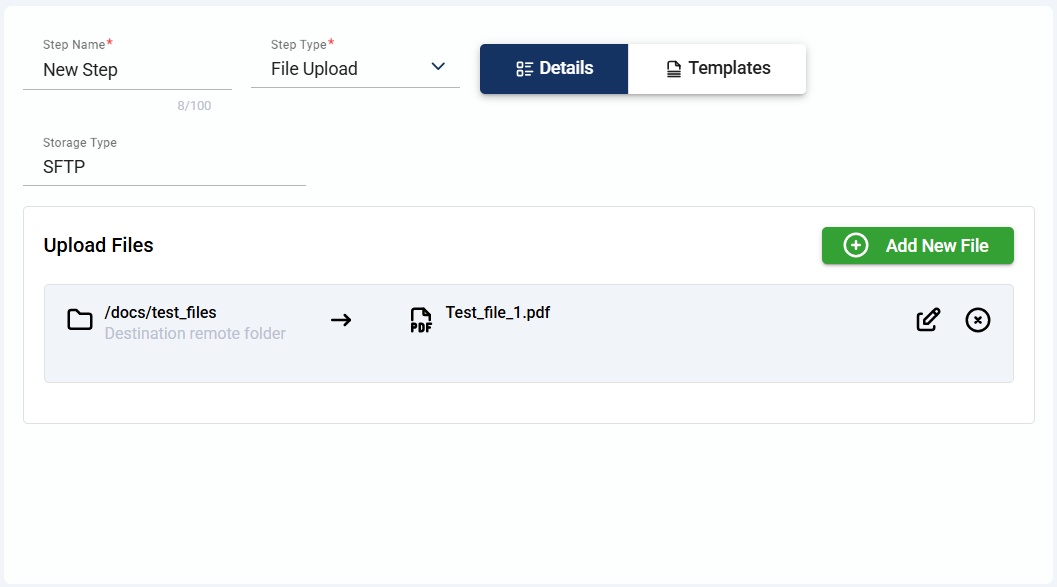
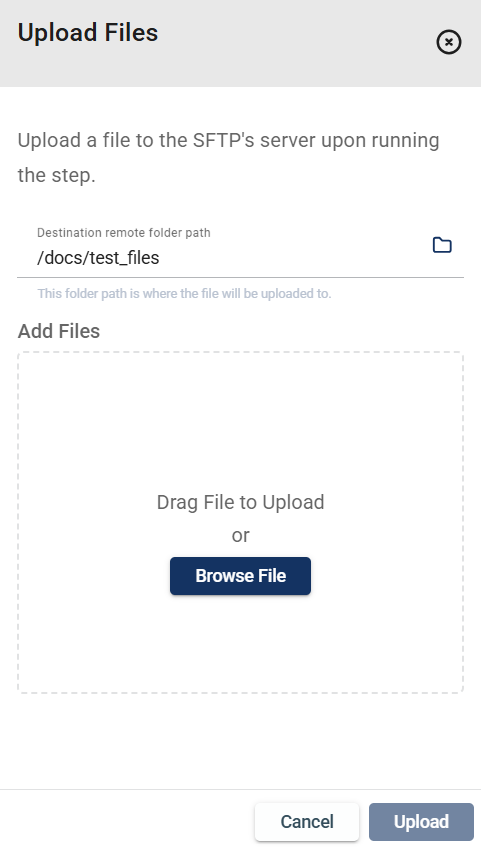
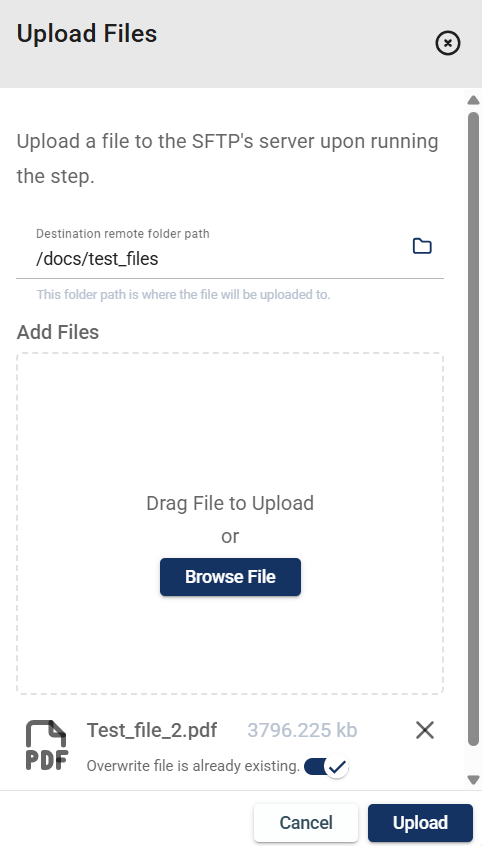
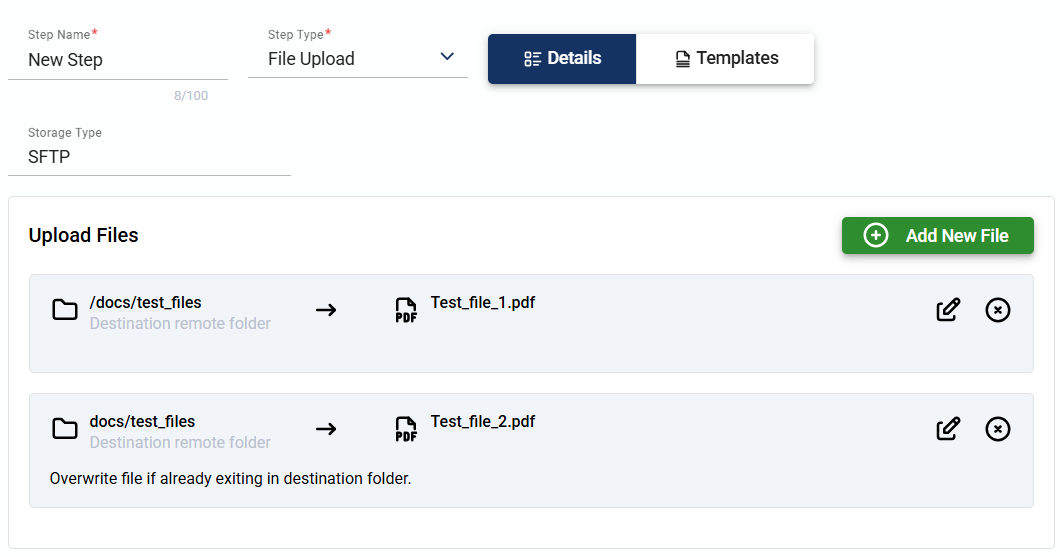
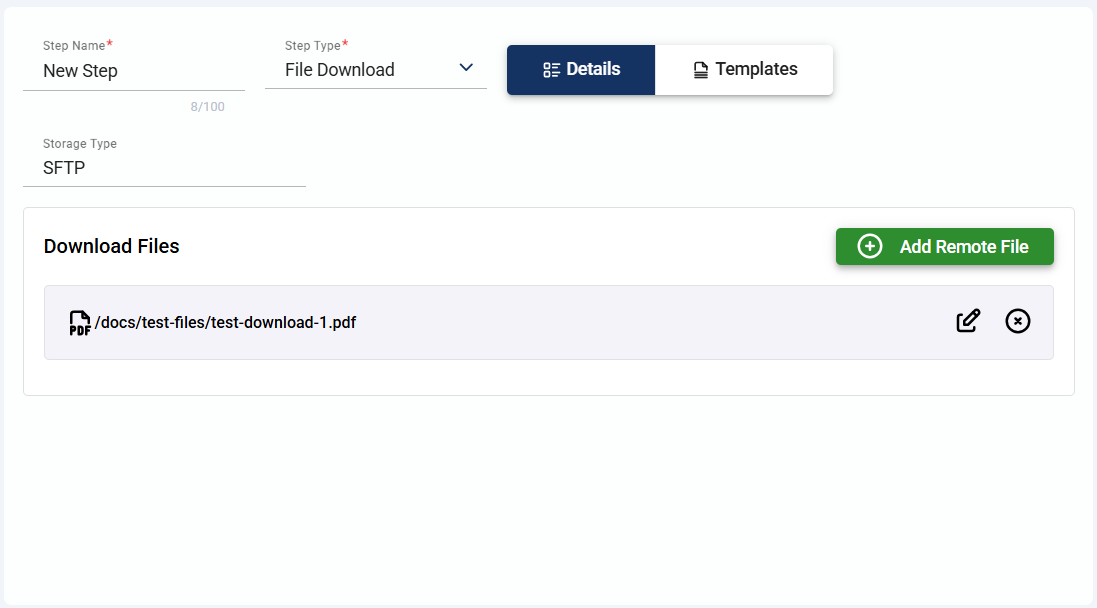
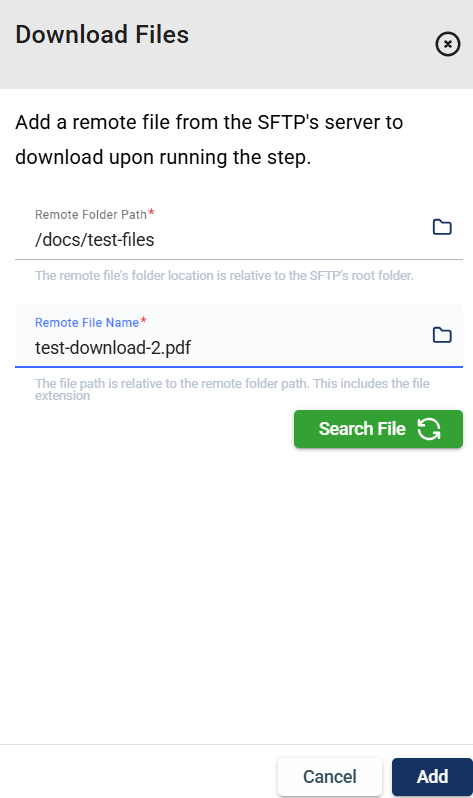
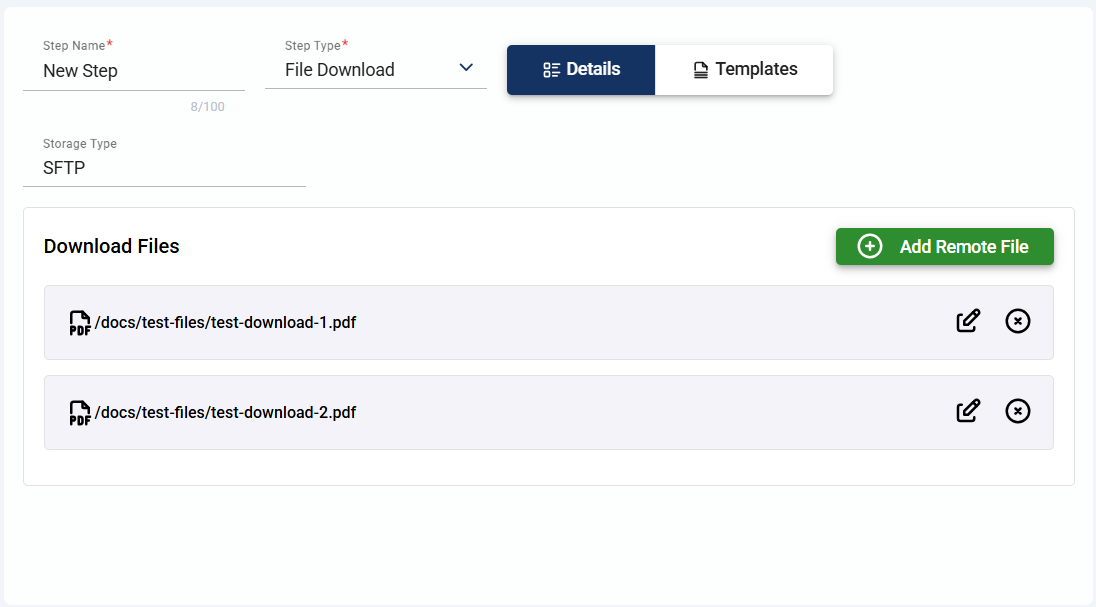
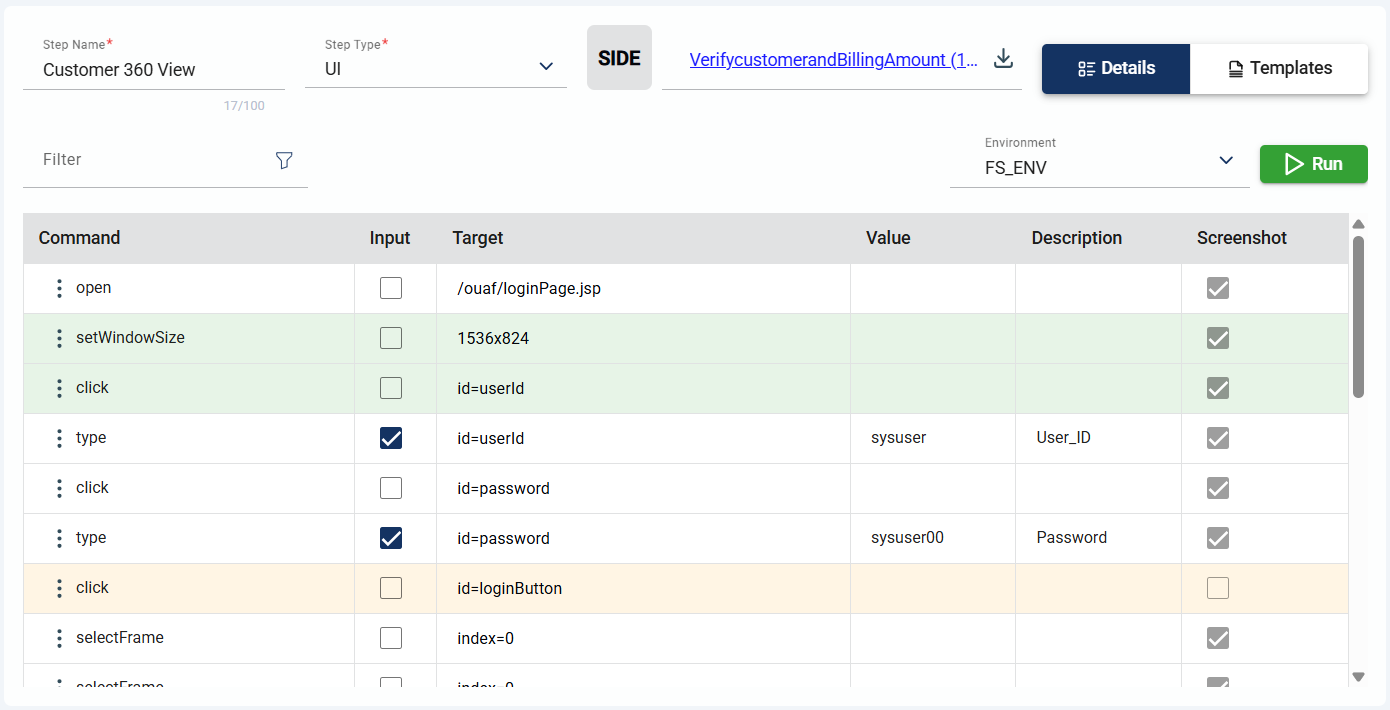

.png)
.png)
.png)
.png)

.png)
.png)
.png)
.png)
.png)
.png)
.png)
.png)
.png)
.png)
.png)
.png)
.png)
.png)
.png)
.png)
.png)
.png)
.png)
.png)
.png)
.png)
.png)
.png)
.png)
.png)
.png)
.png)
.png)
.png)
.png)
.png)
.png)
.png)
.png)
.png)
.png)
.png)
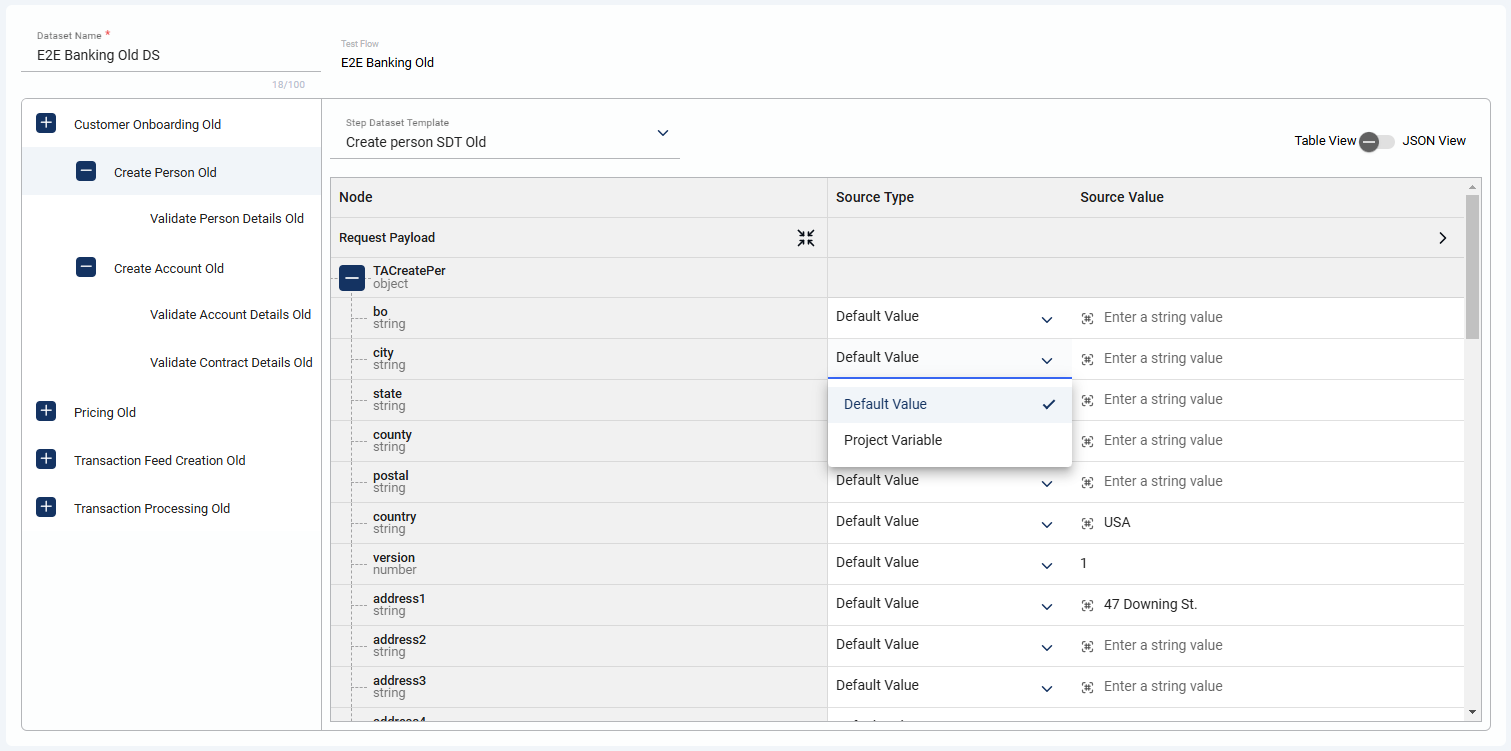
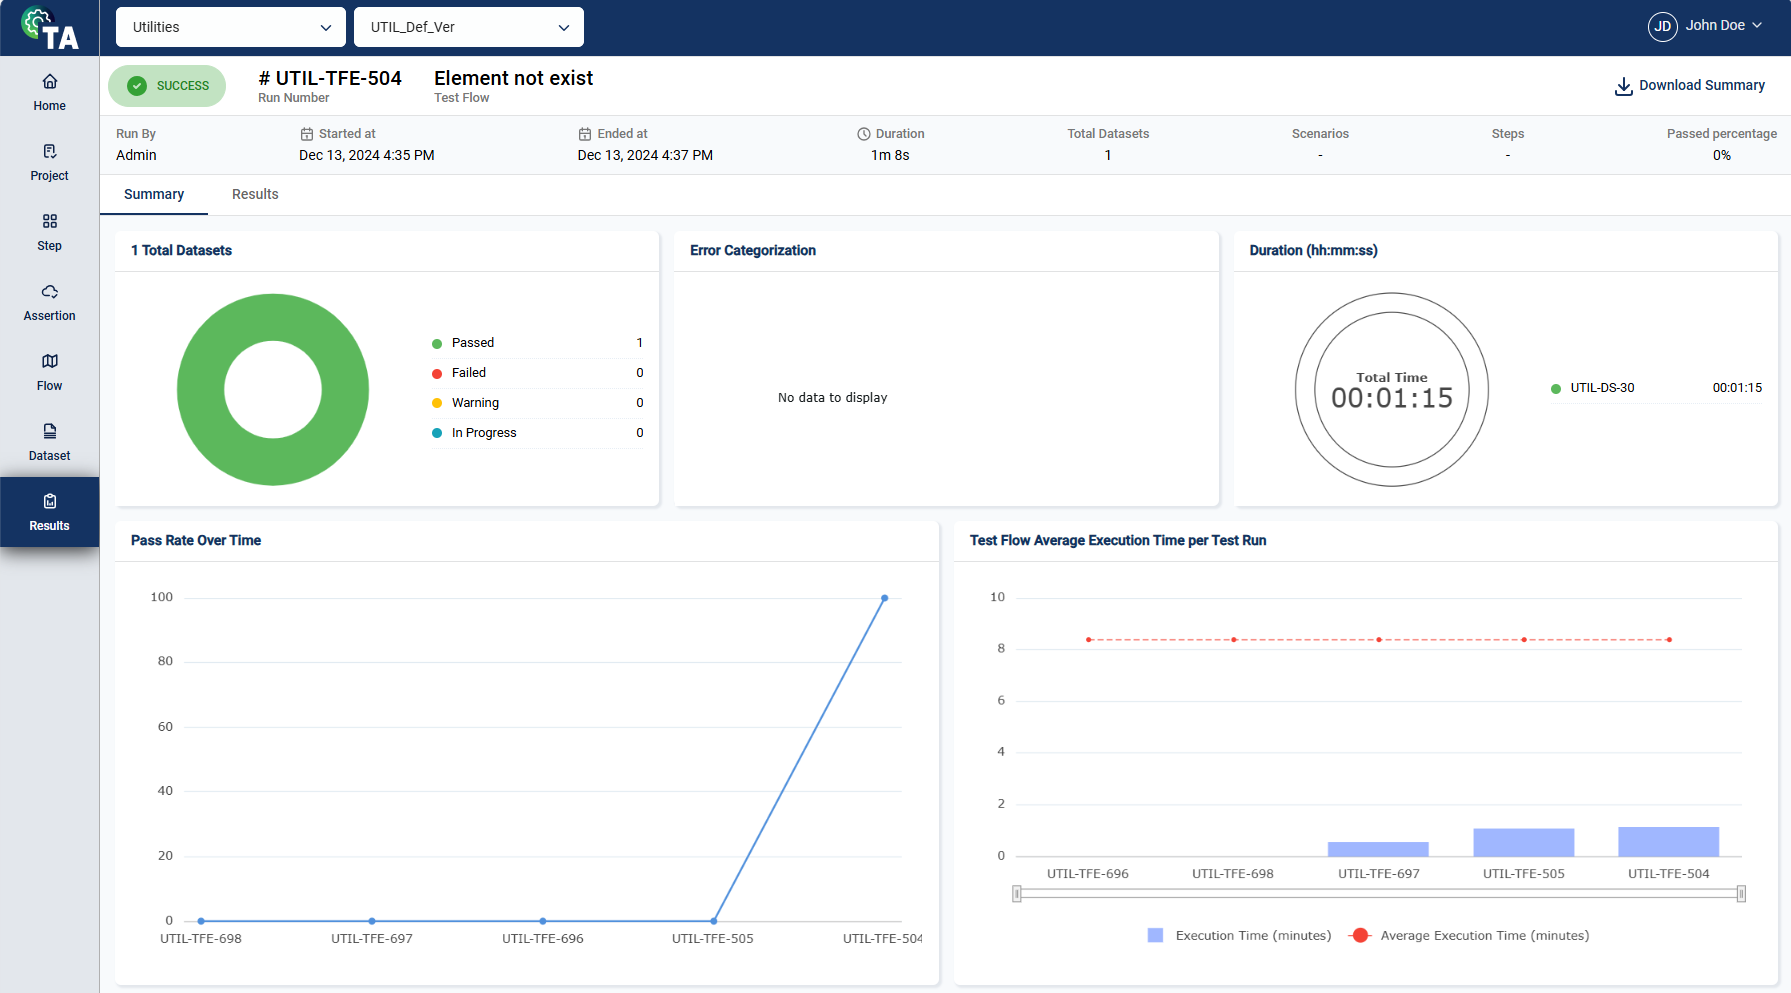
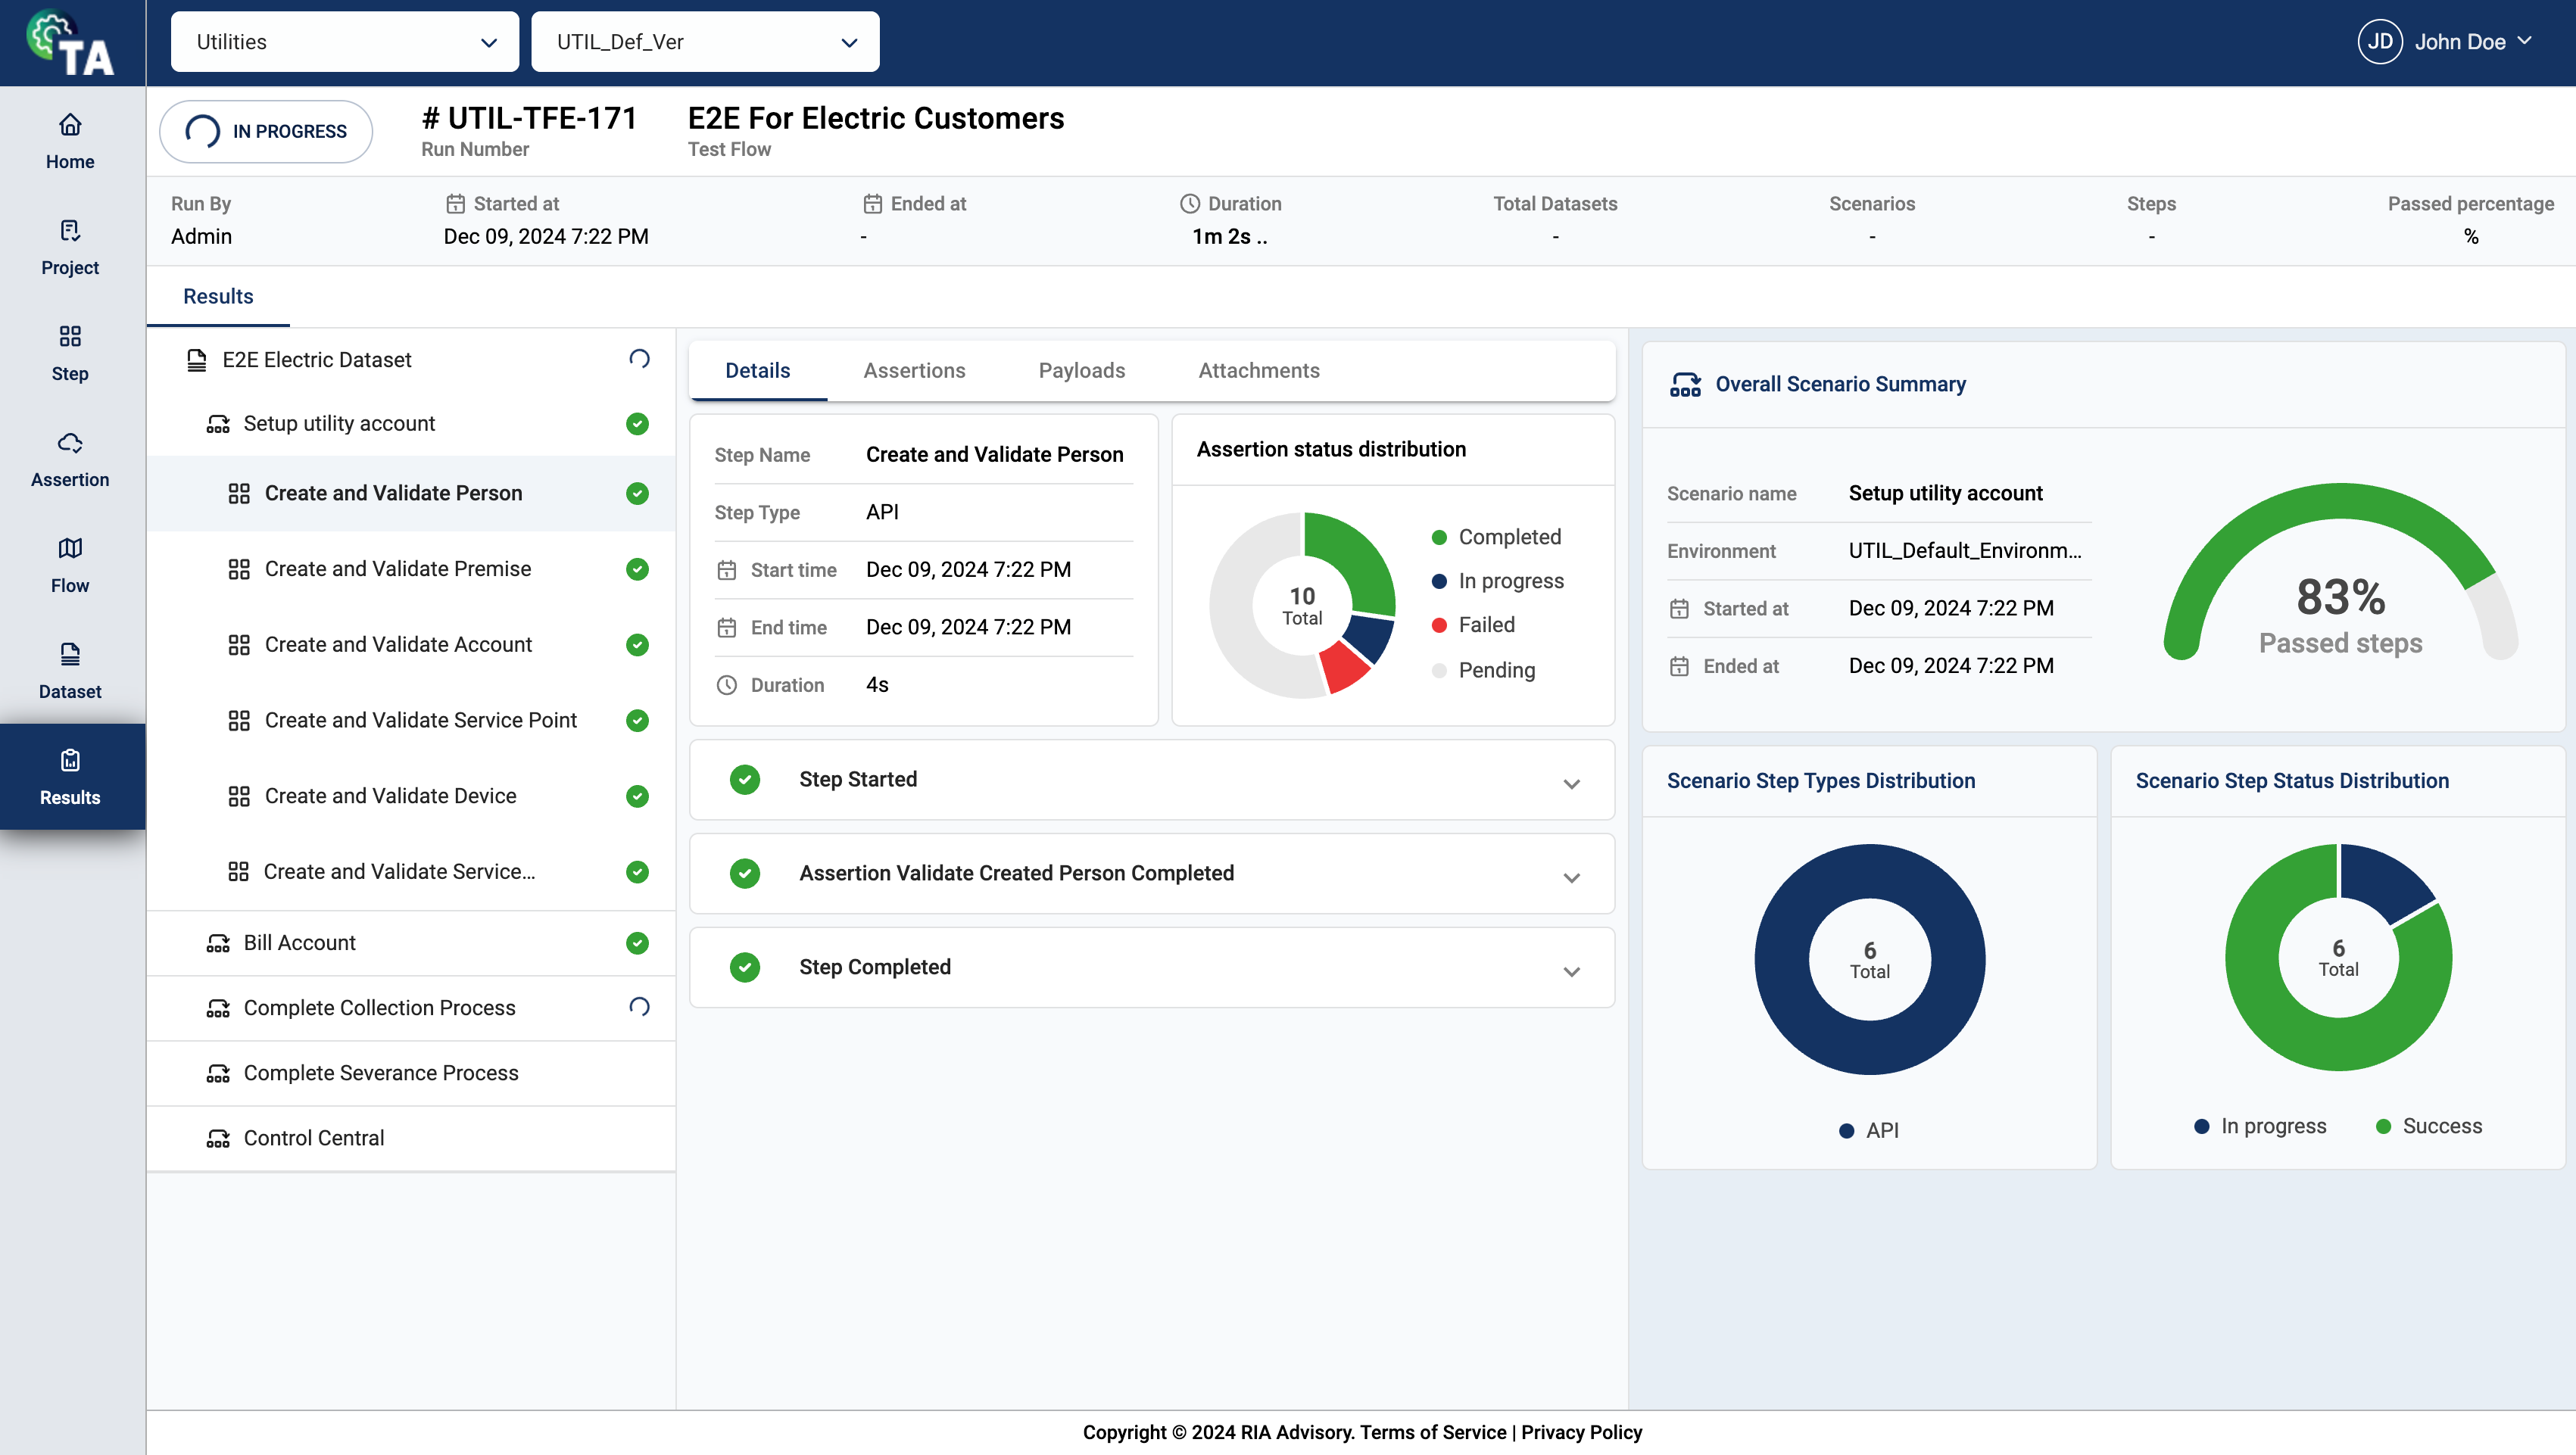


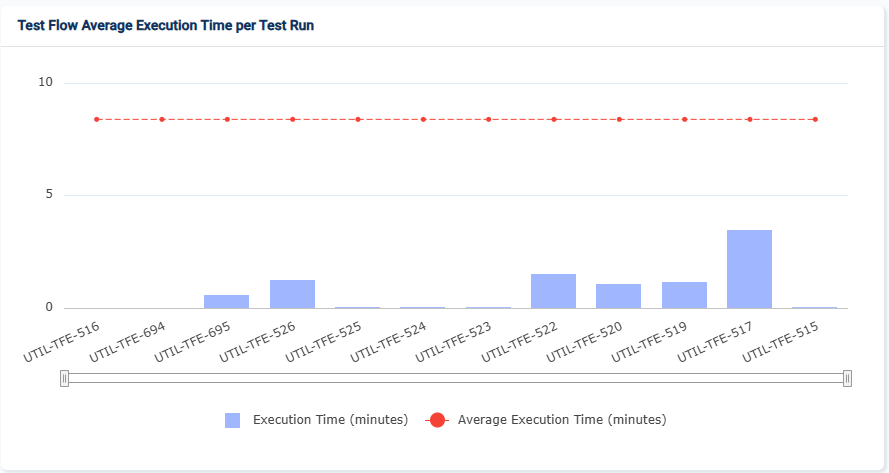
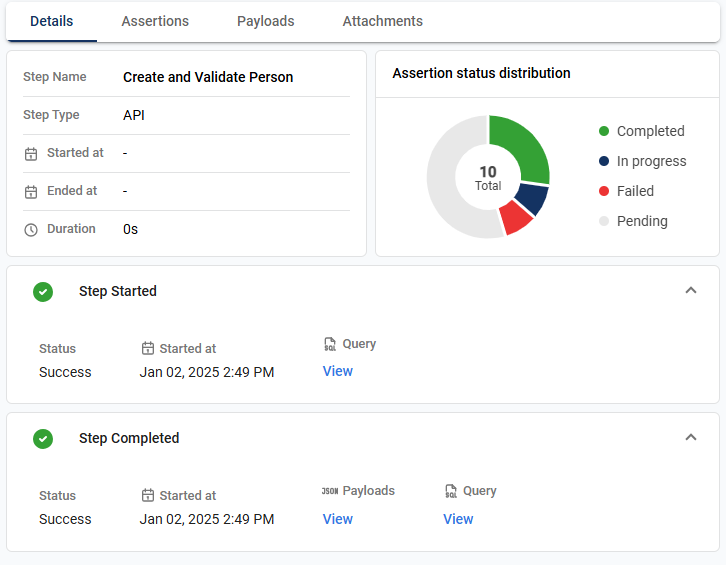
.png)
.png)