Scenarios
Overview
By clicking on Test Suites -> Scenarios, the user is taken to the Scenarios screen.
Create a scenario
The following are the different ways to create a new scenario:
- In the Projects view, if your project has no scenarios configured, click
 on the card view or on the
 0Scenarios Count column value in the list view. This option will automatically connect the scenario to your project.
- In the Features view, if your feature has no scenarios configured, click on the card view or on the
0feature count column value in the list view. This option will automatically connect the scenario to your feature and to the project associated with the selected feature.
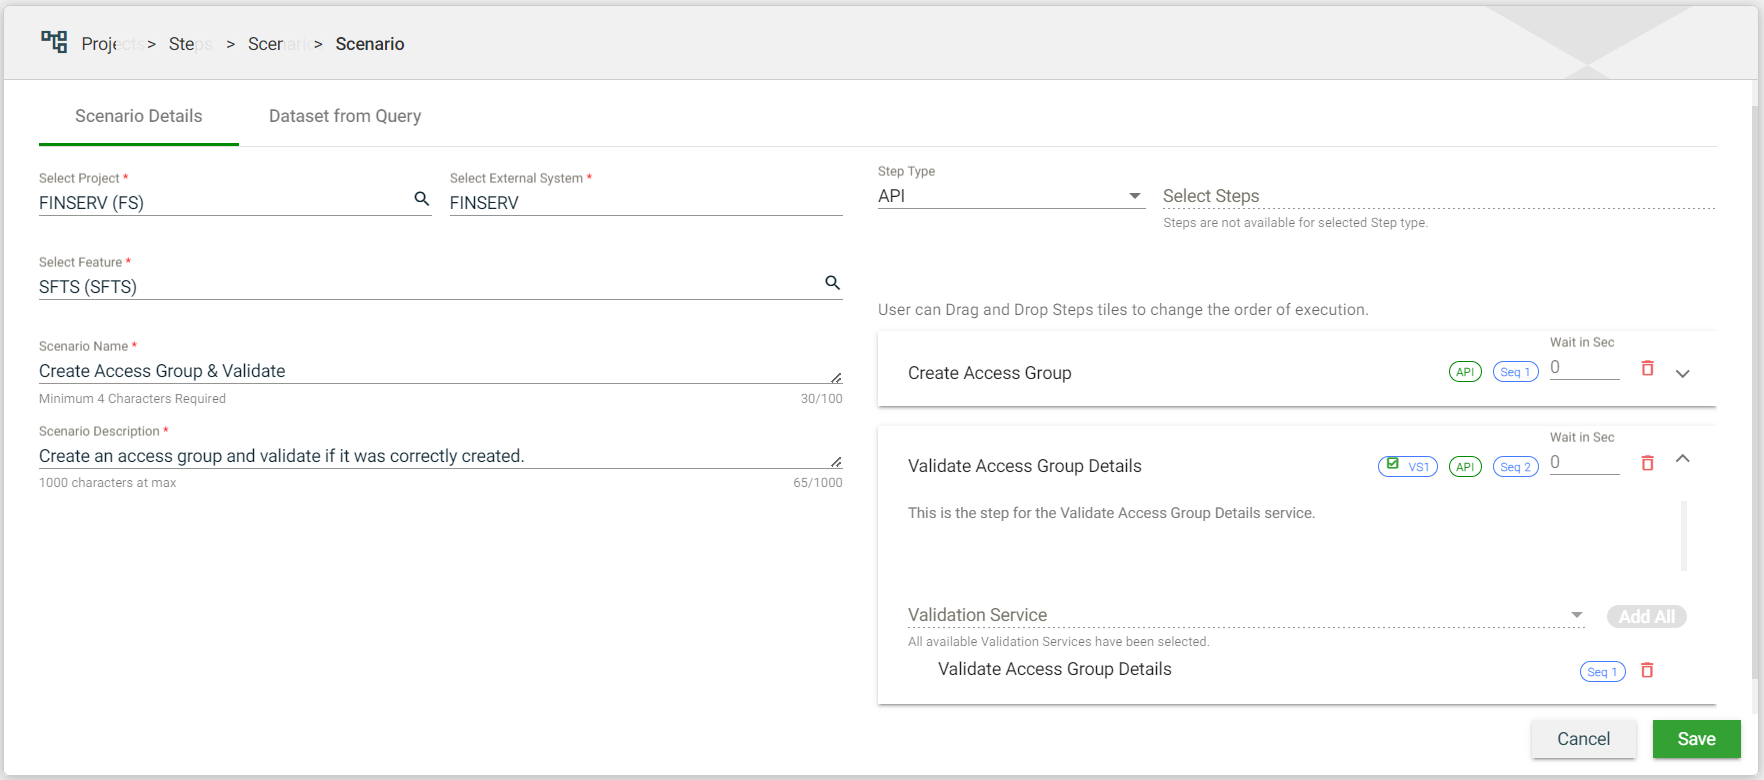
- In Test Suites > Scenarios, click Create. This option will have a Select Project dropdown list that requires you to select an existing project.
| Field Name | Description |
|---|---|
| Select Project | Name of the project that will use the scenario. Ensure that your project has a configured feature. Otherwise, an error message is displayed. When creating a scenario from a project, this field is automatically populated with the initially selected project. Otherwise, a dropdown list of all available projects is displayed.
|
| Select External System | Name of the external system where the scenario will be executed. Displays a dropdown list of all the external systems associated with the project.
|
| Select Feature | Name of the feature that will use the scenario. When creating a scenario from a feature, the Select Feature and Select Project fields are automatically populated with the initially selected feature and its associated project. Otherwise, a dropdown list of all available features associated with the initially selected project is displayed.
|
| Scenario Name | Name of the scenario. Mandatory: Yes |
| Scenario Description | Description of the scenario. Mandatory: Yes |
| Step Type | Specifies the type of step. The following are the possible values:
Ensure that you have configured the steps that match your selected types. |
| Select Steps | Displays a dropdown list of steps configured for the selected external system and matching the selected type. |
| Steps | Lists all the selected steps for the scenario. Each step is displayed as a tile with the Step Name, Step Description, Validation Service, Step typ. You can drag and drop the step tiles to change the order of execution. |
| Step > Wait in Sec | Number of seconds before proceeding to the next configured step or ending the scenario execution. |
| Step > | Deletes the step. |
| Step > Validation Service | Displays a dropdown list of all validation services configured with the step. |
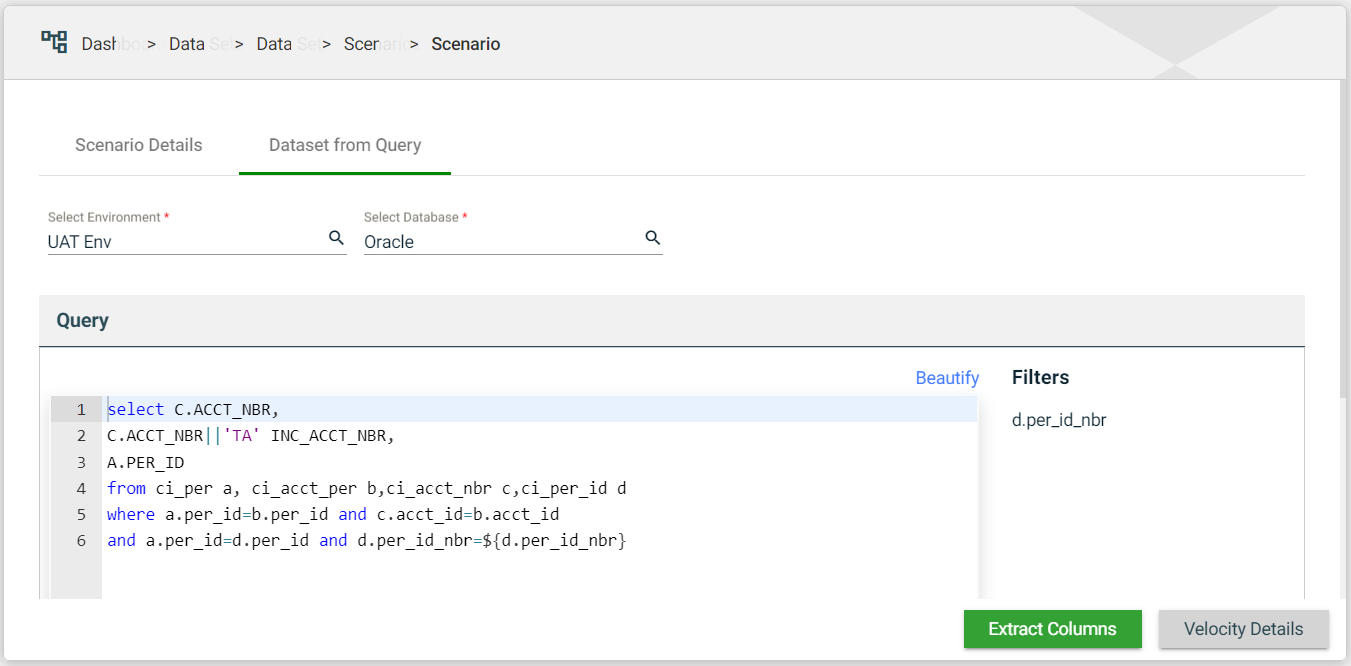
Dataset from Query
If you plan to use a dataset from a query for a scenario, you have to configure this tab.
| Field | Description |
|---|---|
| Select Environment | Dropdown list displaying all the available environments for the selected external system in the Scenario Details tab. |
| Select Database | Dropdown list displaying all the available databases for the selected environment. |
| Query | Defines the query to be executed in the database to generate a dataset. |
| Filters | Automatically list all dynamic parameters written in ${parameterName} format from the Query. |
| Extract Columns | Extracts the output columns from the Query. |
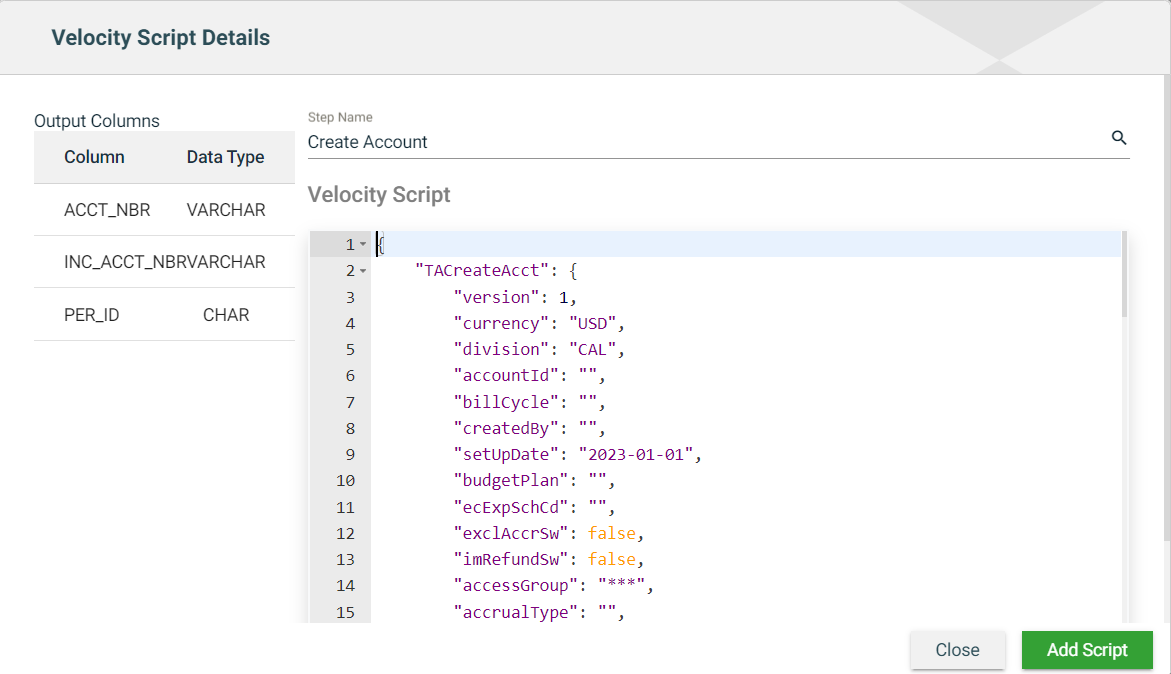
| Velocity Details | Displays the Output Columns generated after clicking the Extract Columns. It also displays the templates of the steps selected in the Scenario Details tab. See below for a sample Velocity Script Details. |
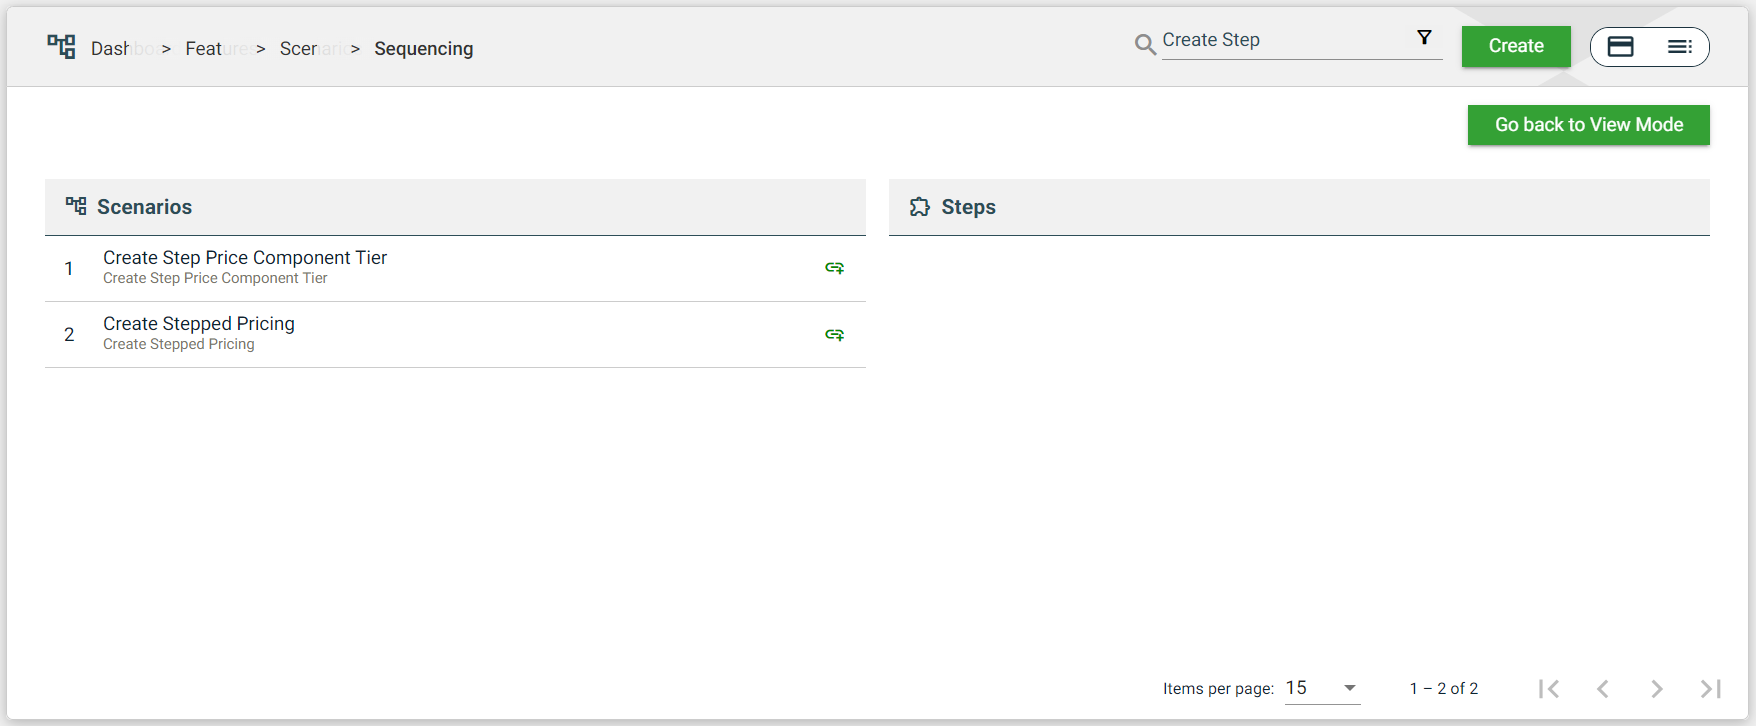
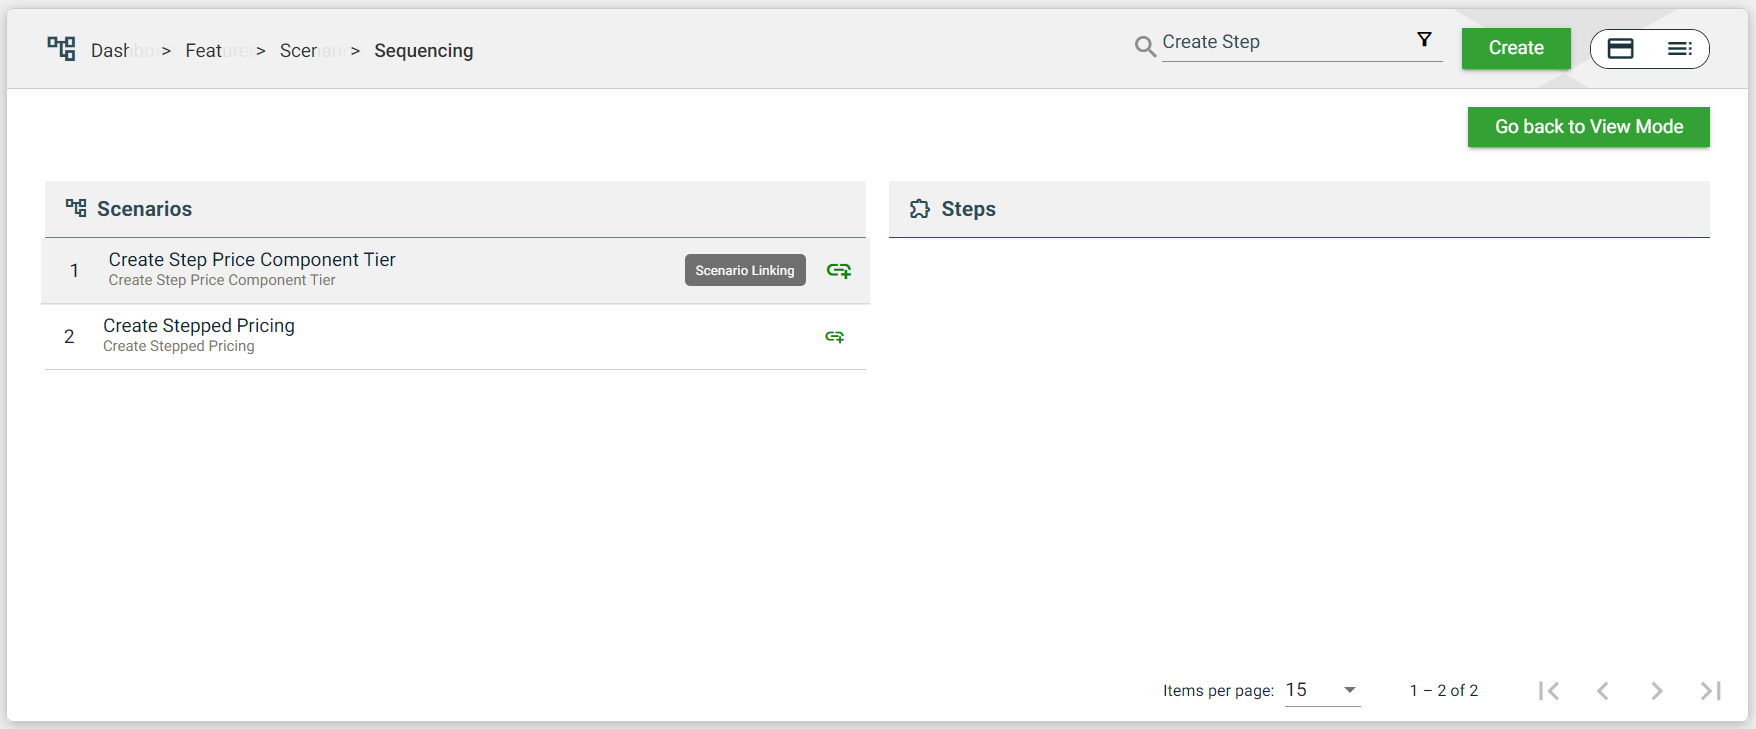
Sequence and Linking
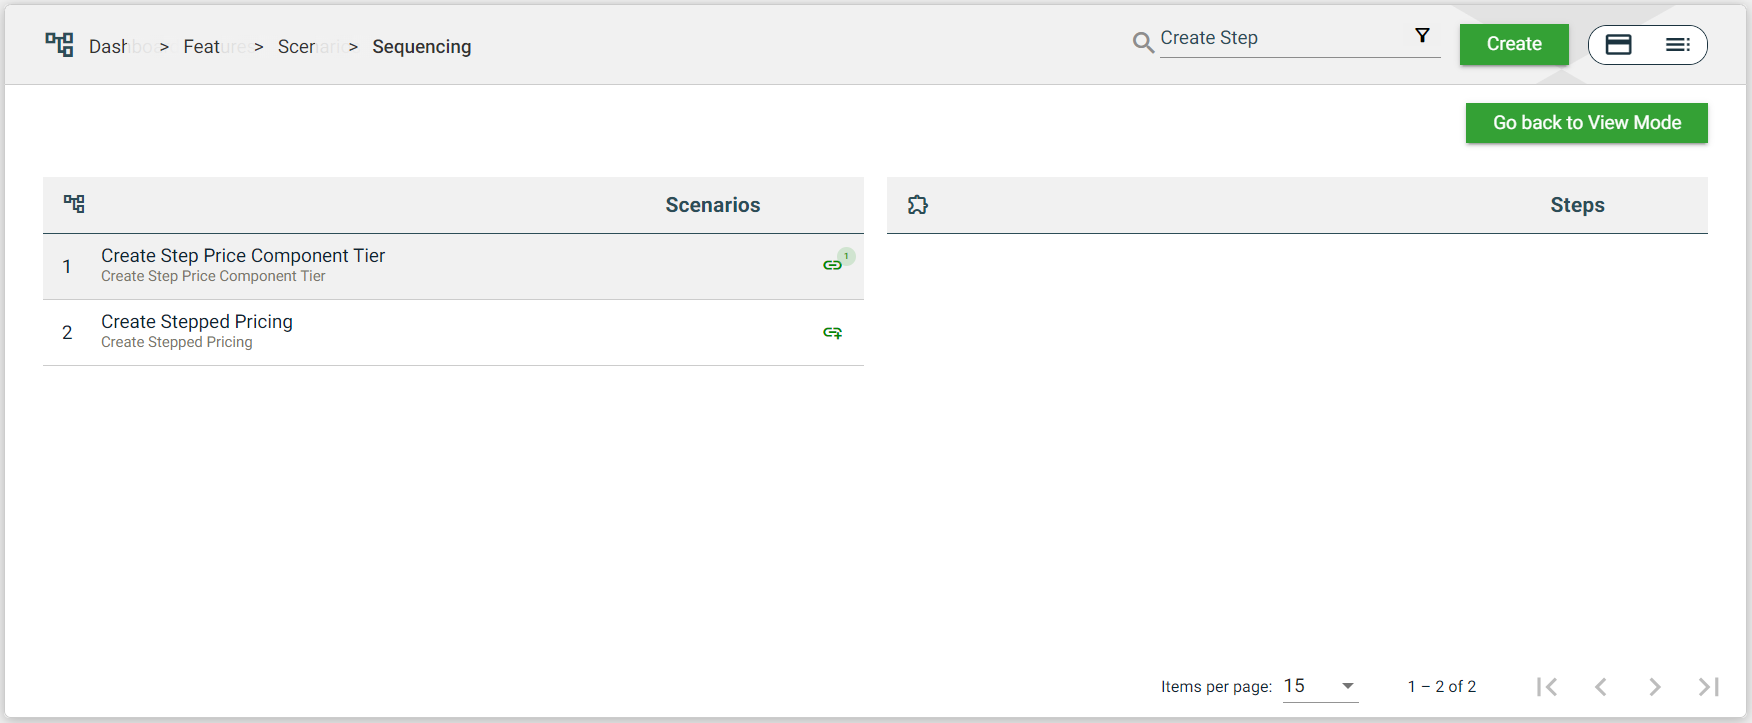
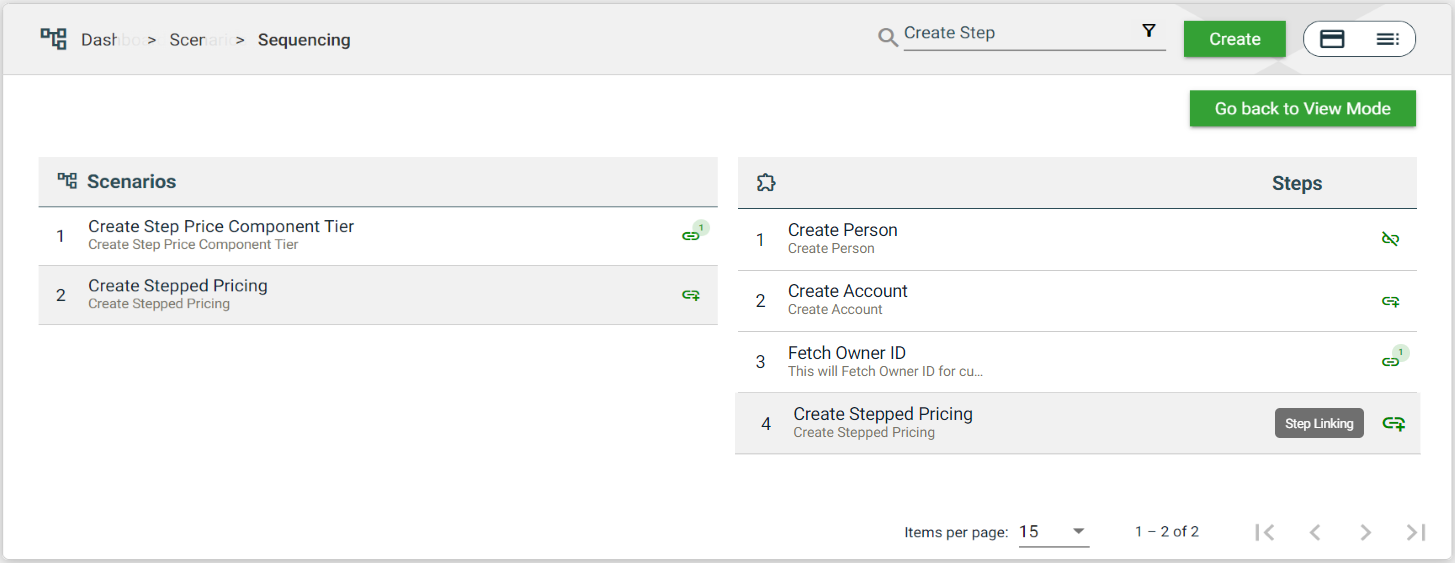
Sequencing
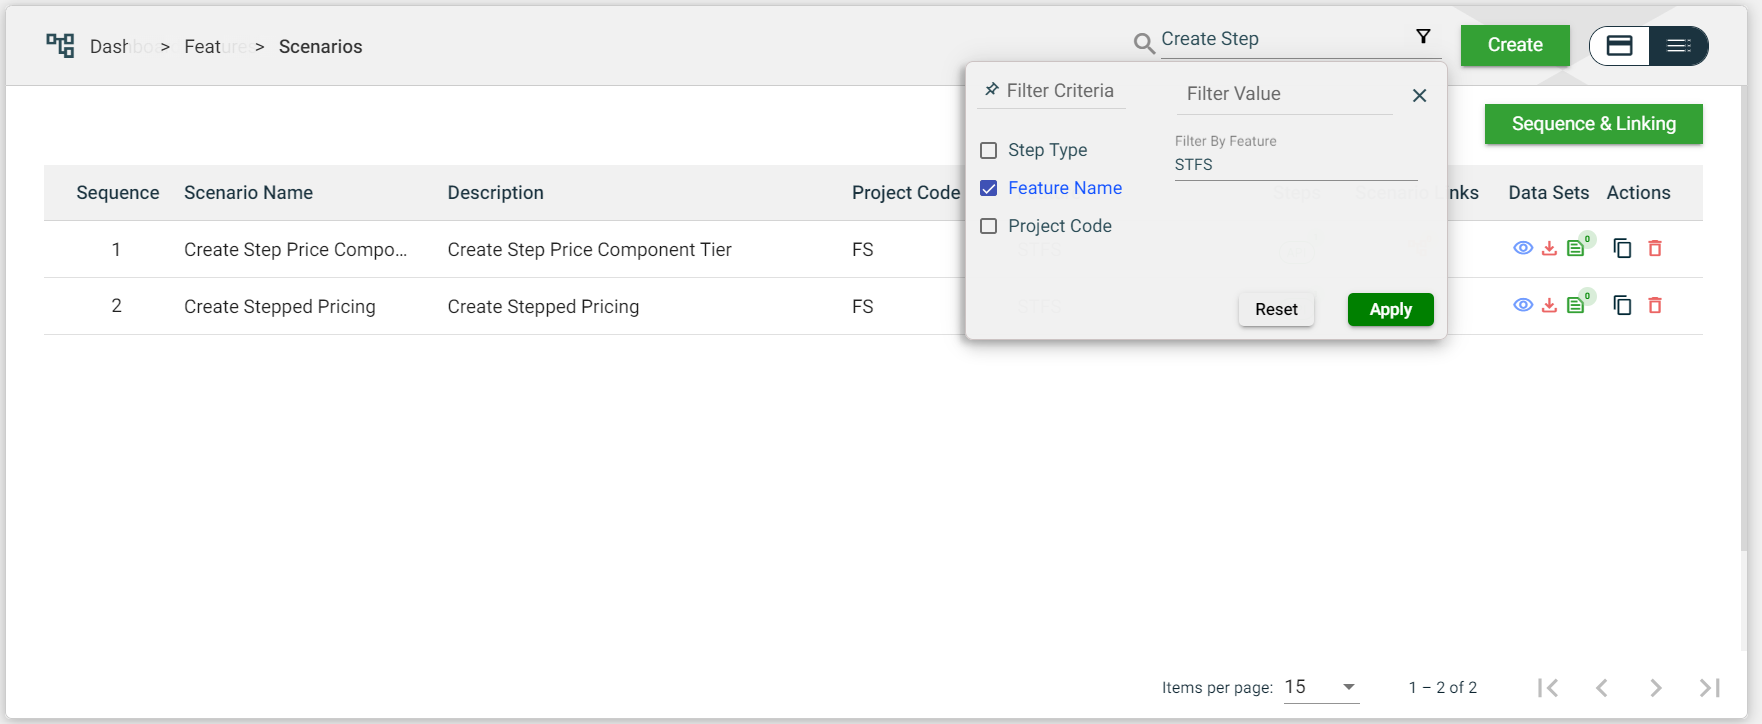
To organize the order in which your scenarios are executed, you can filter the list of scenarios by the feature name and rearrange their sequence by dragging and dropping. The sequence in which the scenarios are executed is indicated by the number in the Sequence column. Similarly, you can also arrange the order of steps within a scenario by dragging and dropping them into the desired sequence.
Scenarios Linking
You can link scenarios to pass parameters from one scenario to another. However, you can only link scenarios associated with the same feature.
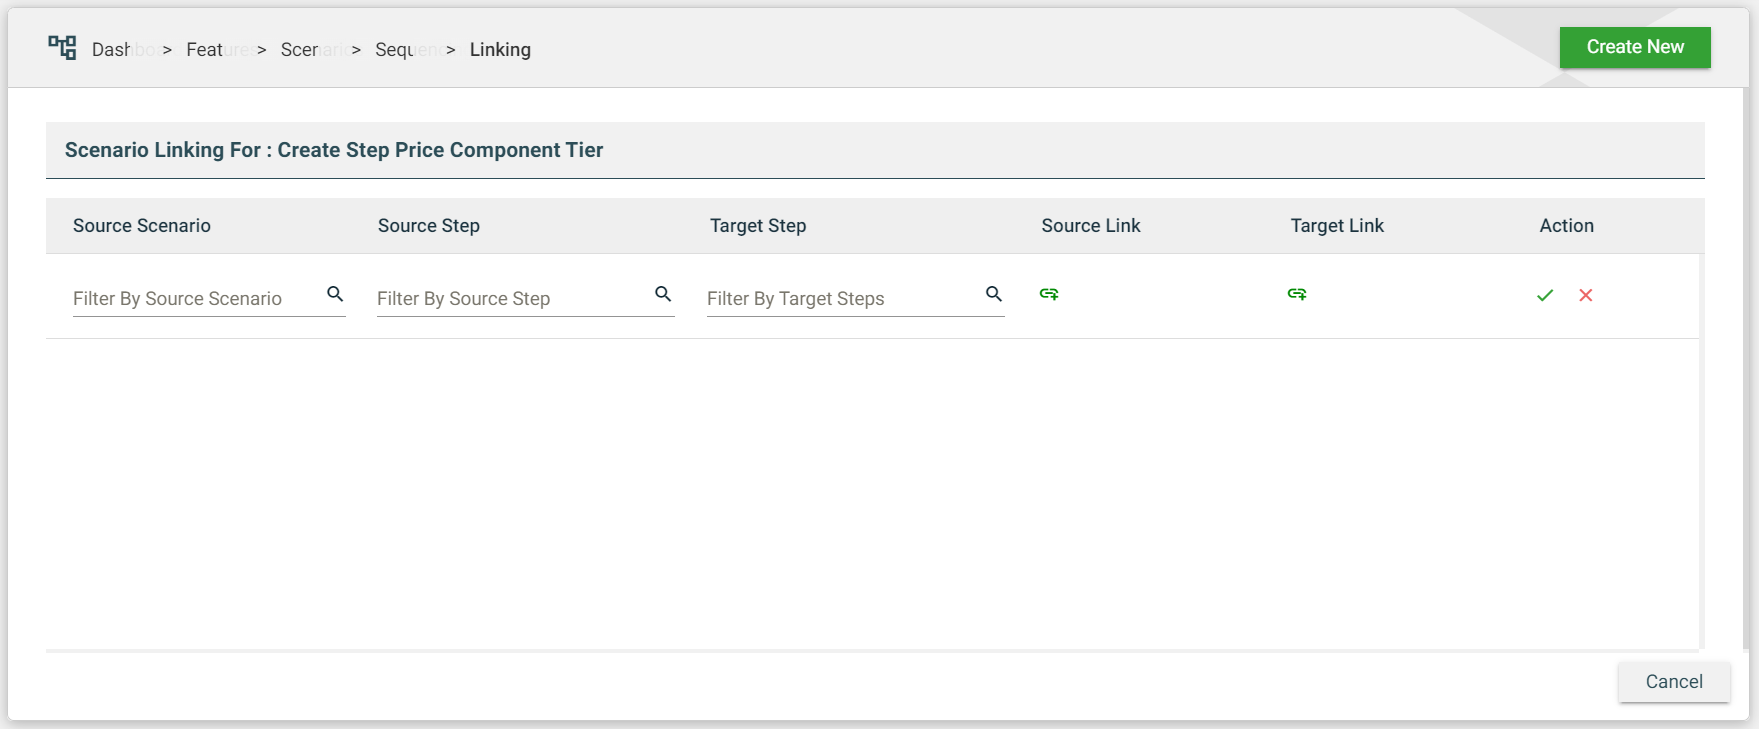
To link scenarios, follow these steps:
-
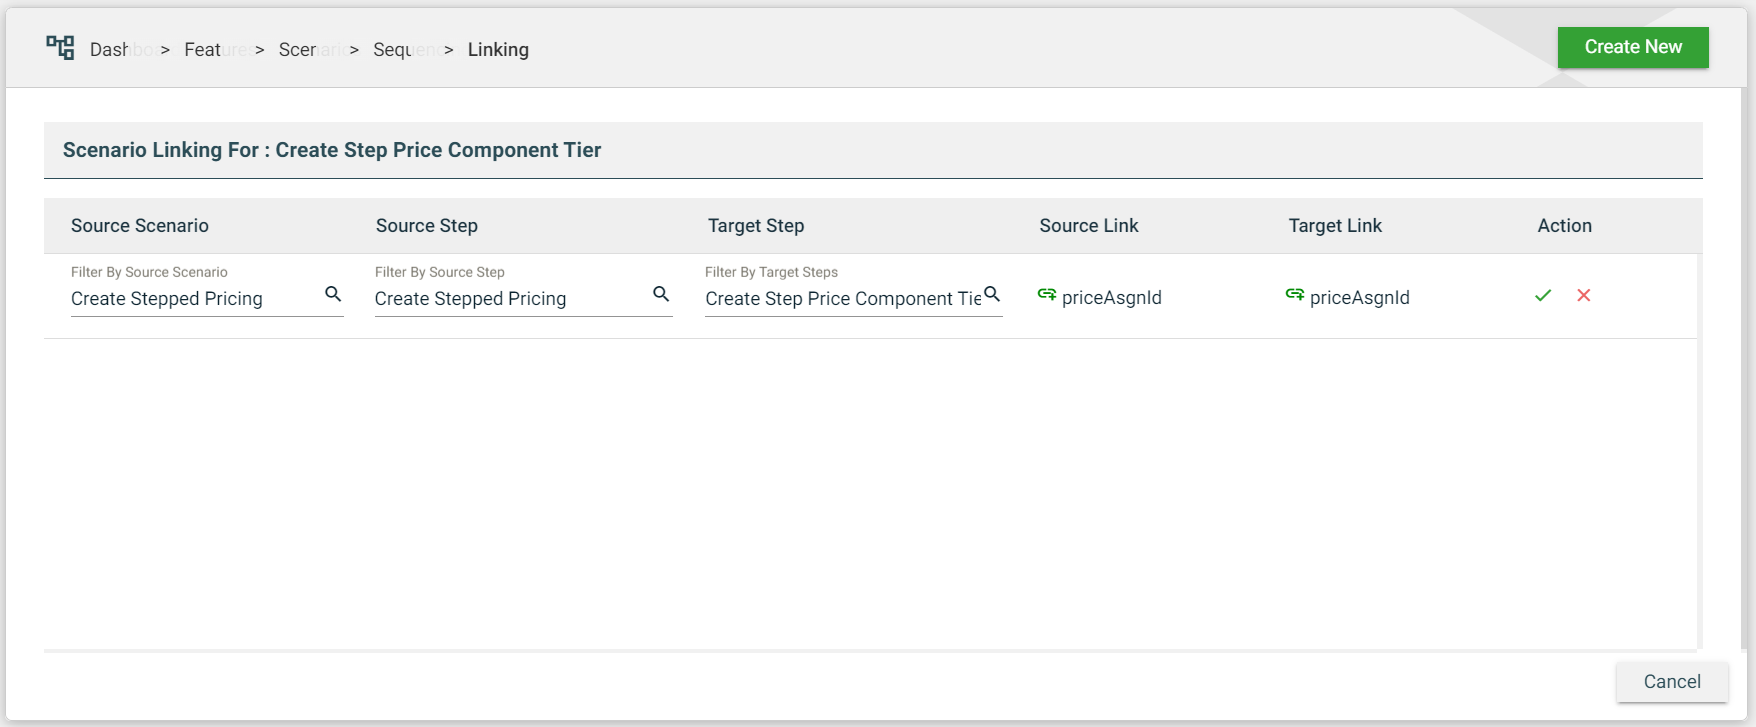
Filter your scenarios by feature name. This will display all scenarios associated with a feature. You can also filter the list more by adding another filter by scenario name. For more information on filters, see Filter.
-
Click on Sequence and Linking.
-
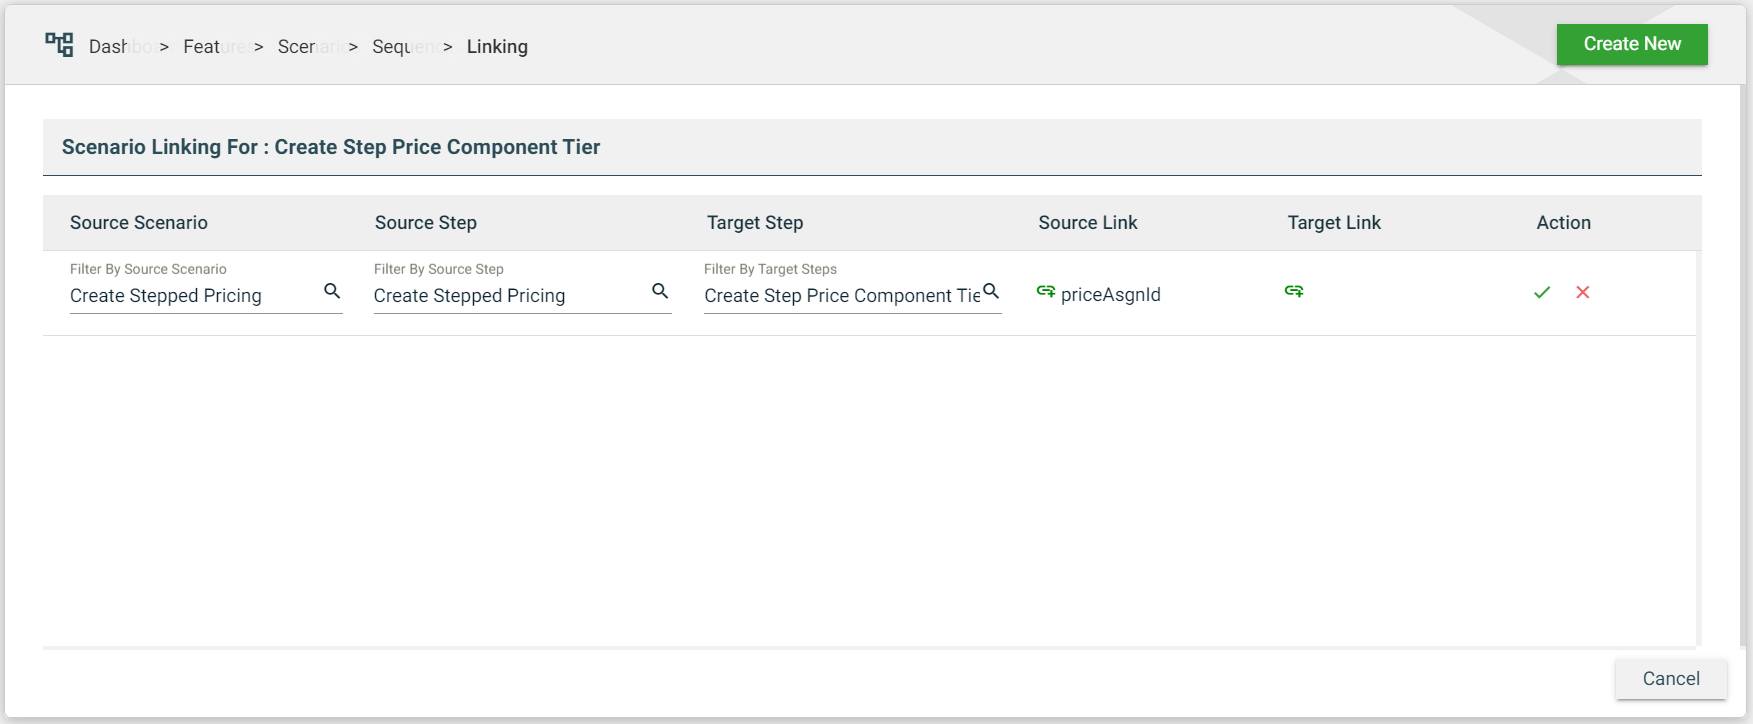
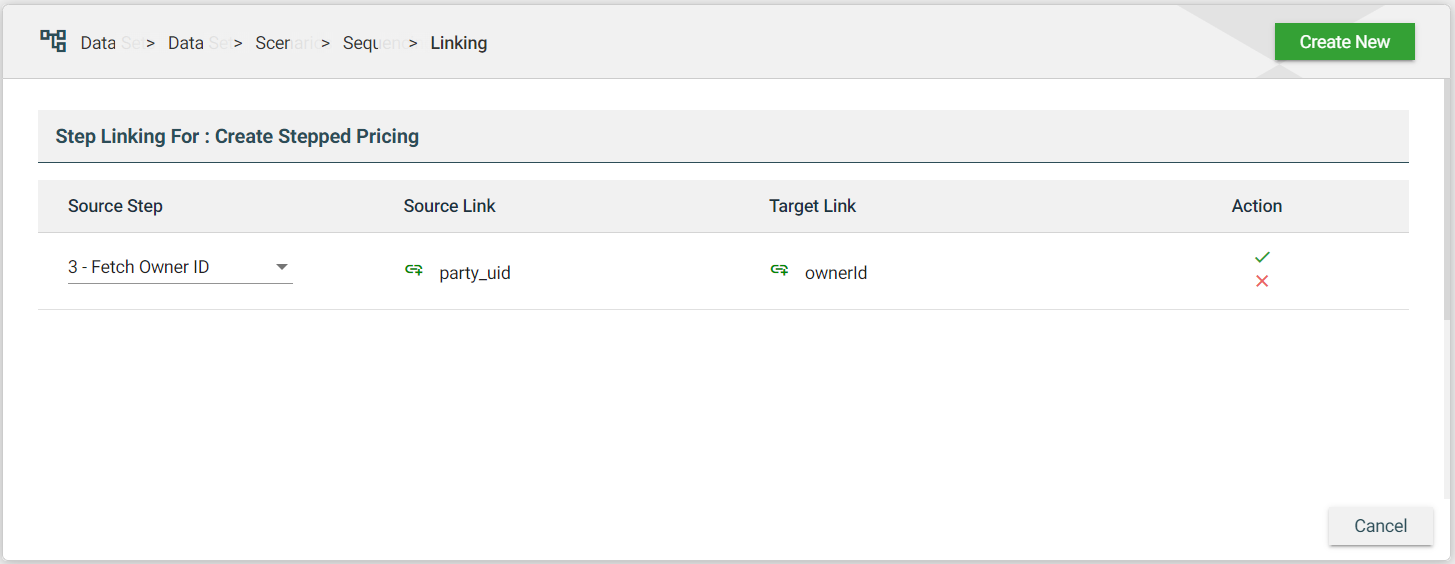
Click on the Scenario Linking icon of the scenario you wish to receive a parameter.
-
A popup window is displayed. Click Create New to add a row.\
-
Choose a Source Scenario. All scenarios under the specified feature are displayed.
-
Choose a Source Step. All steps associated with the selected scenario in the previous step are displayed.
-
Choose a Target Step. All steps associated with the selected scenario in Step 3 are displayed.
-
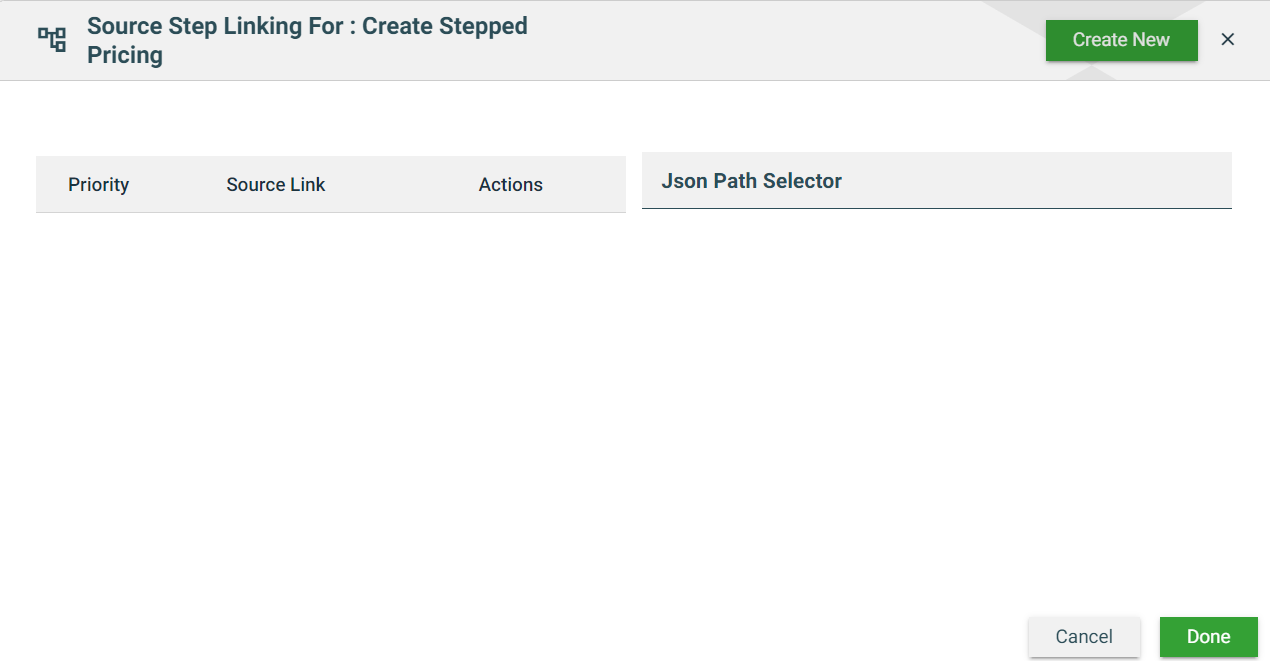
Click the icon in the Source Link column.
-
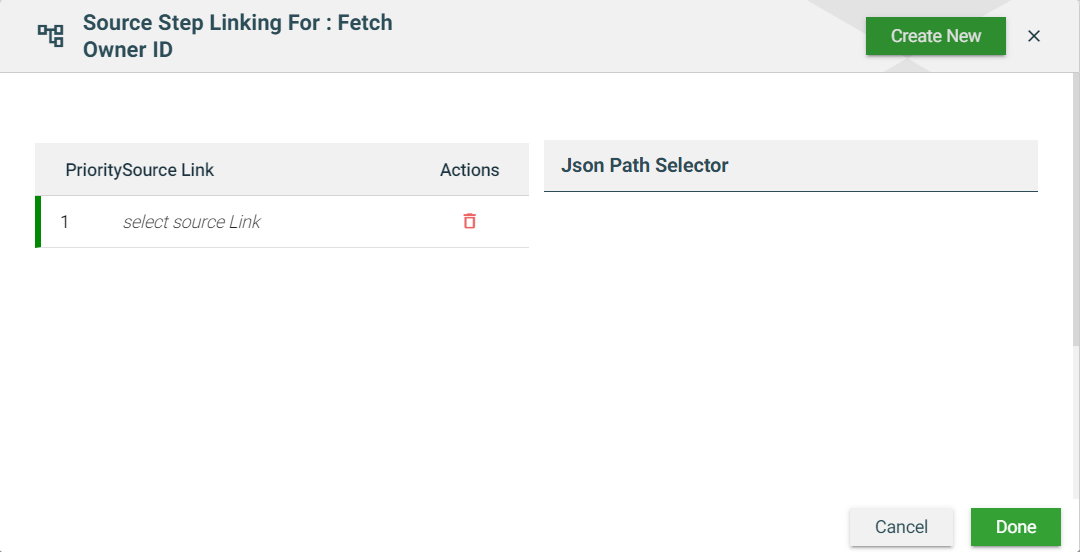
Click Create New.
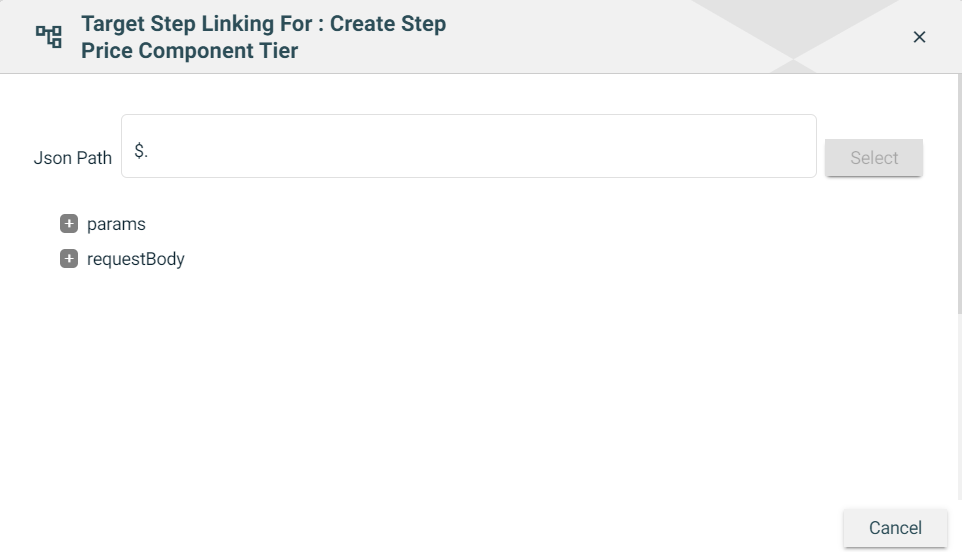
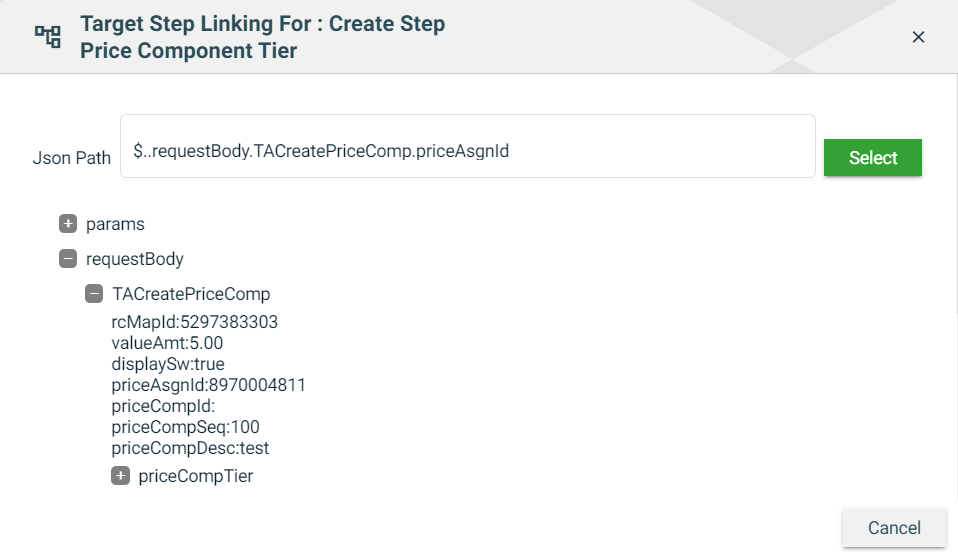
-
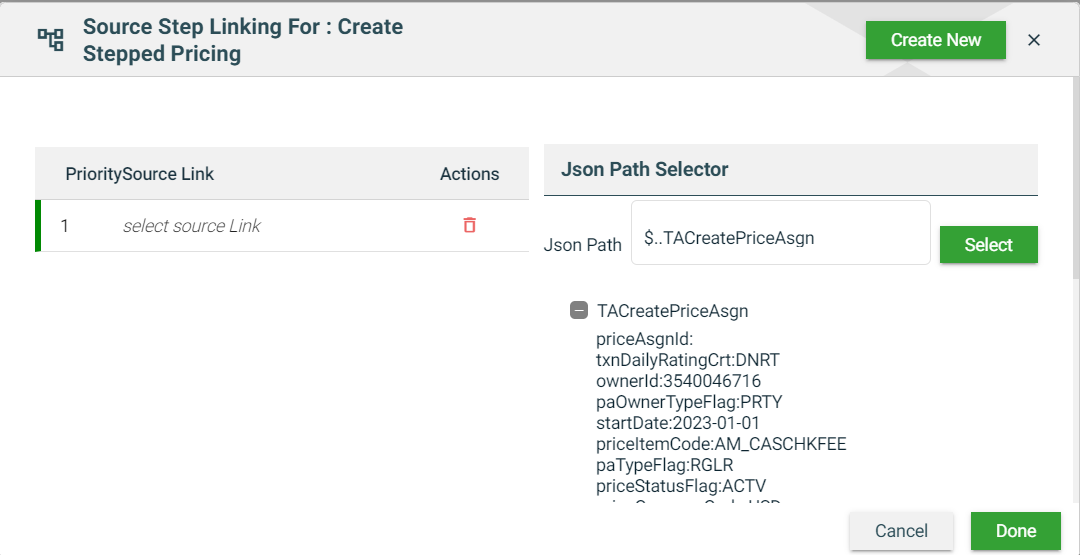
Click select source Link. The Json Path Selector is automatically populated with available parameters.
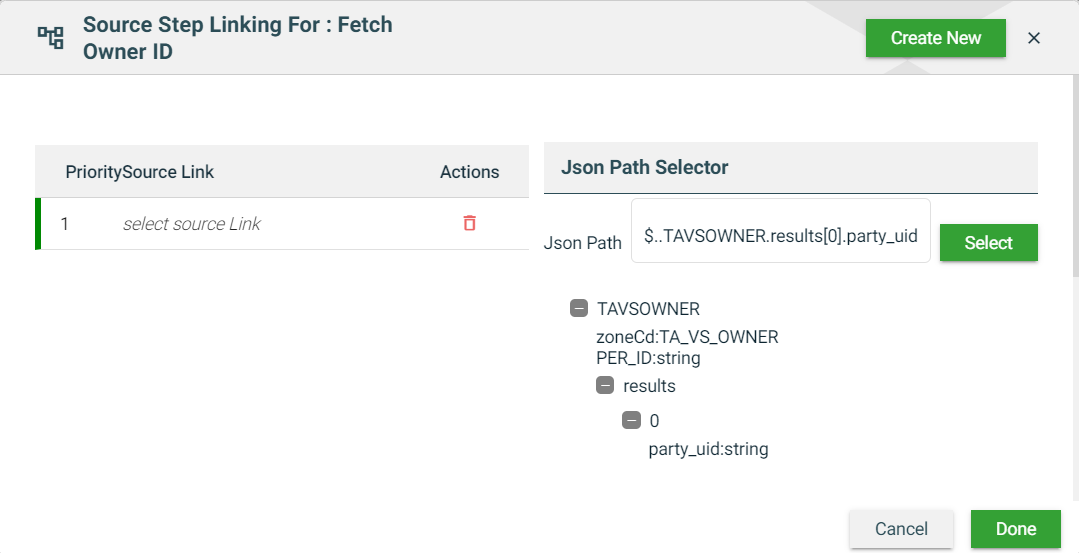
-
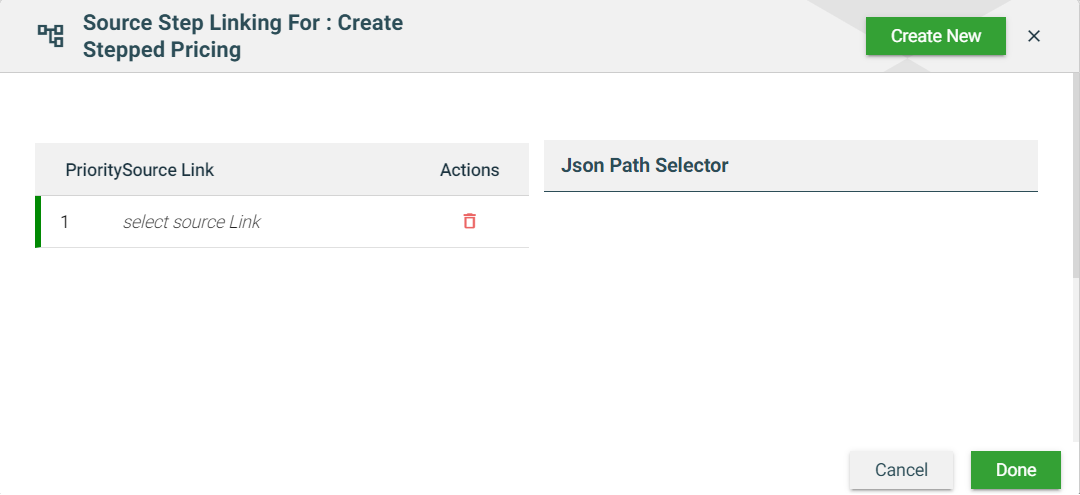
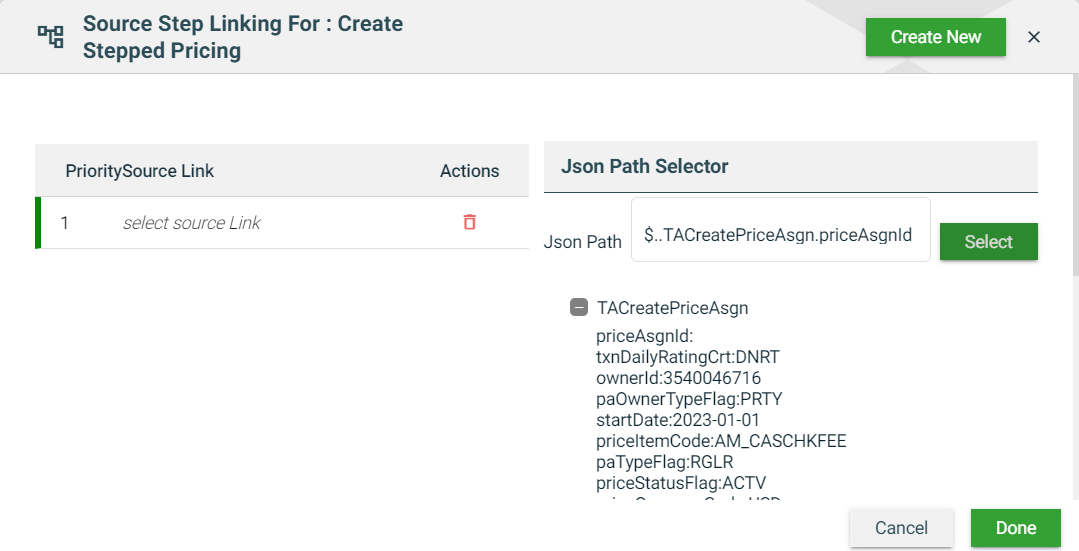
Click on the parameter that you want to set as the source. The Json Path textbox is automatically updated. Click on the parameter that you want to set as the source. The Json Path textbox is automatically updated.
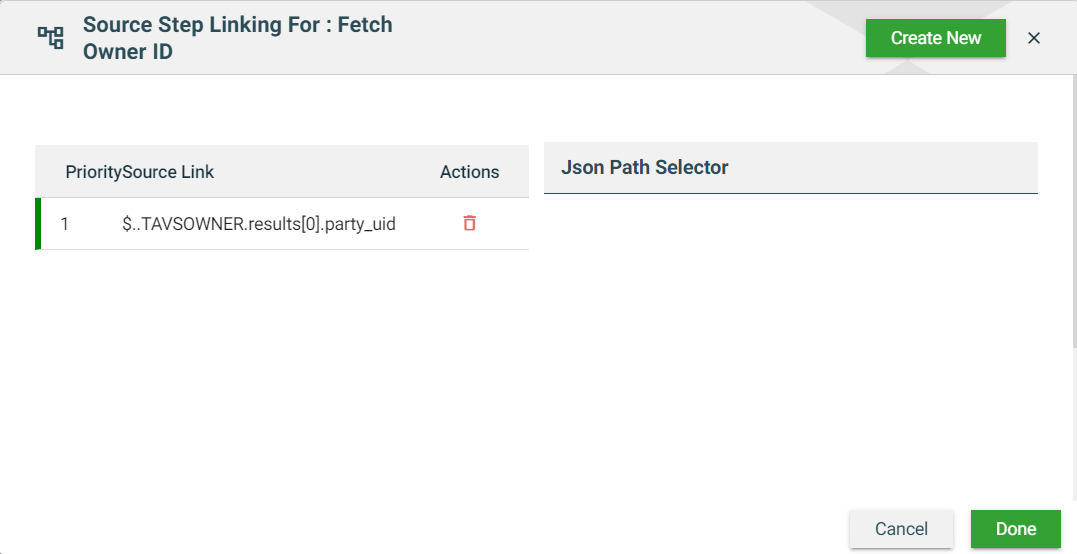
-
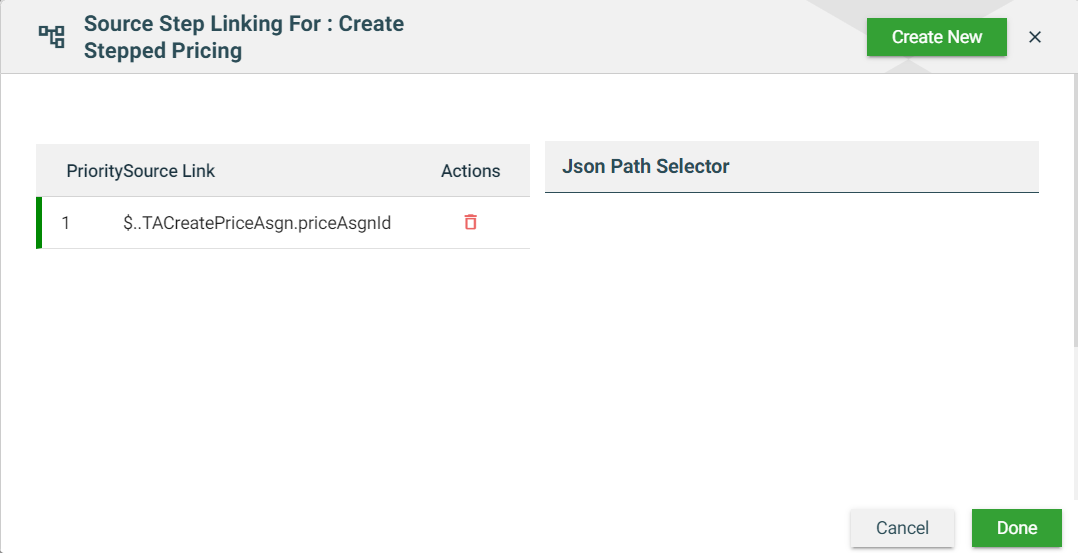
Click Select. The chosen parameter is added to the PrioritySource Link list.
-
Click Done. The chosen parameter is displayed in the Source Link column.
-
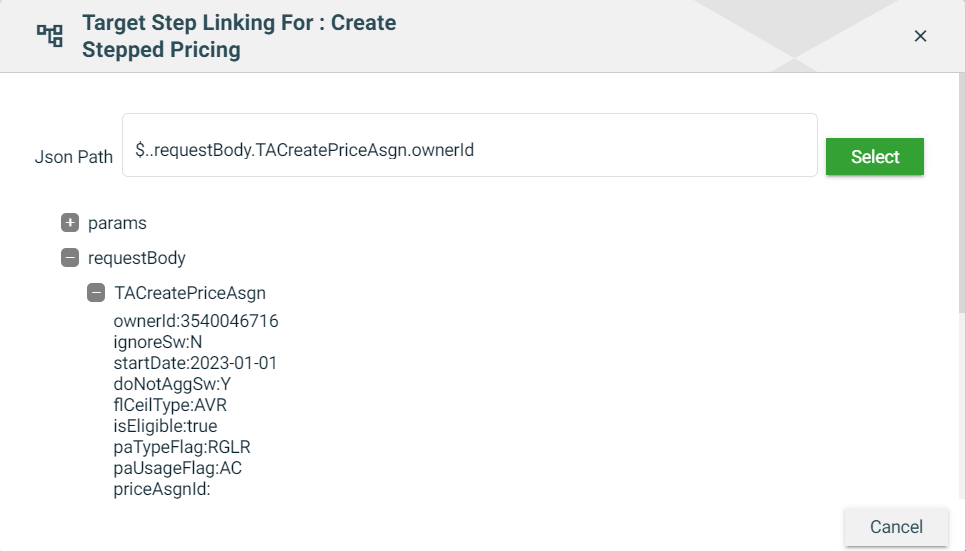
Click the icon in the Target Link column.
-
Choose the target parameter from the list of available parameters.
-
Click Select. The chosen parameter is displayed in the Target Link column.
-
Click
 to save.
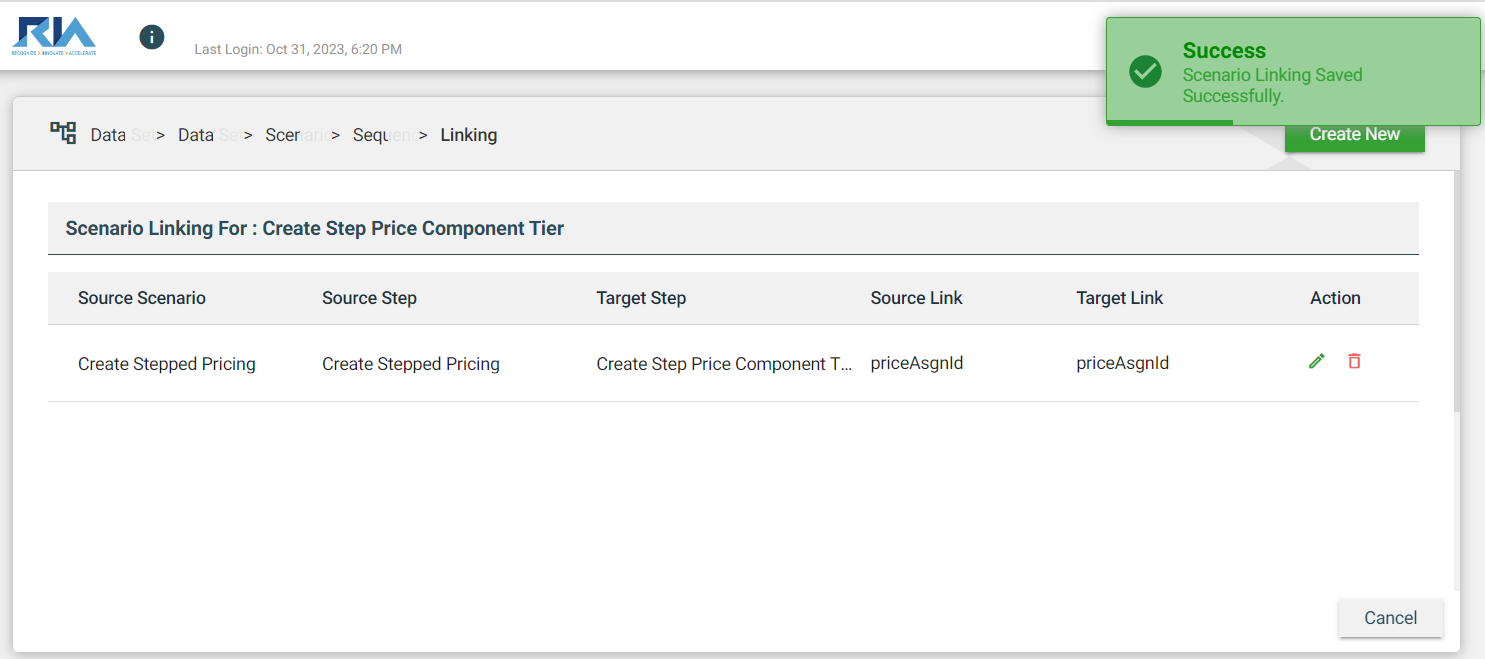
-
The scenario linking count is updated.
Steps Linking
You can link steps to pass parameters from one step to another. However, you can only link steps associated with the same scenario.
To link scenarios, follow these steps:
-
Filter your scenarios by feature name. This will display all scenarios associated with a feature. You can also filter the list more by adding another filter by scenario name. For more information on filters, see Filter.
-
Select a scenario. The steps associated with the selected scenario are displayed in the right table.
-
Click the Step Linking icon.
-
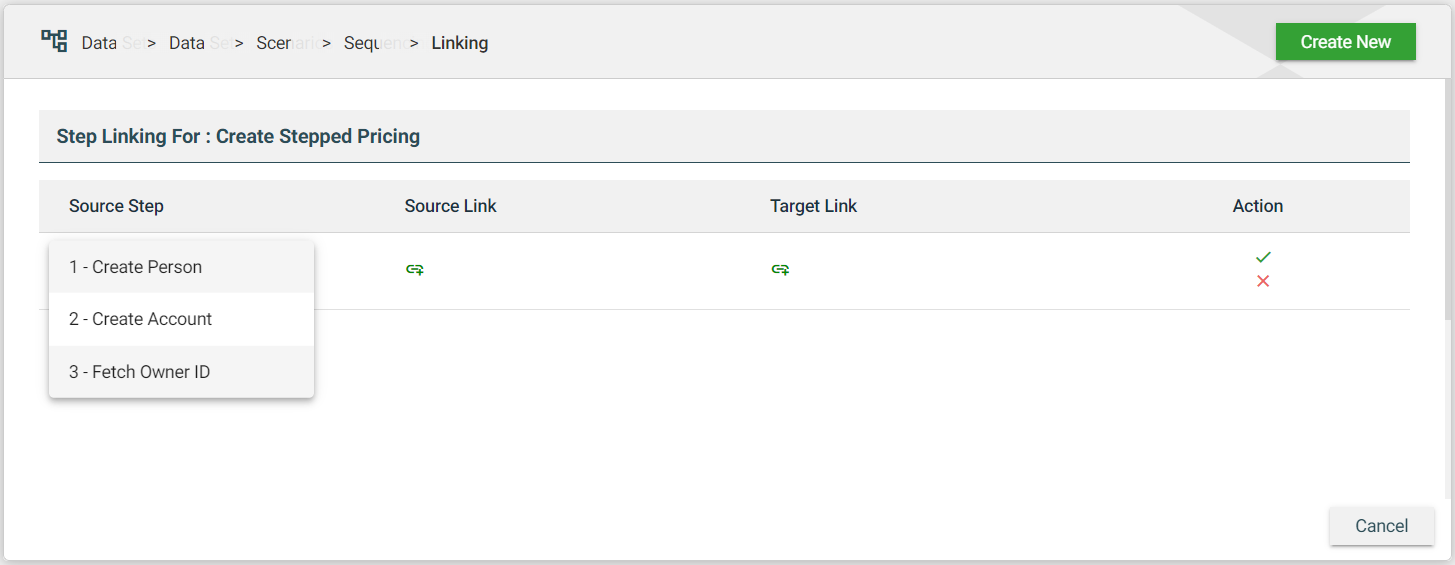
A popup window is displayed. Click Create New to add a row.

-
Select a Source Step. Only the steps associated with the selected scenario are displayed.
-
Click the icon in the Source Link column.
-
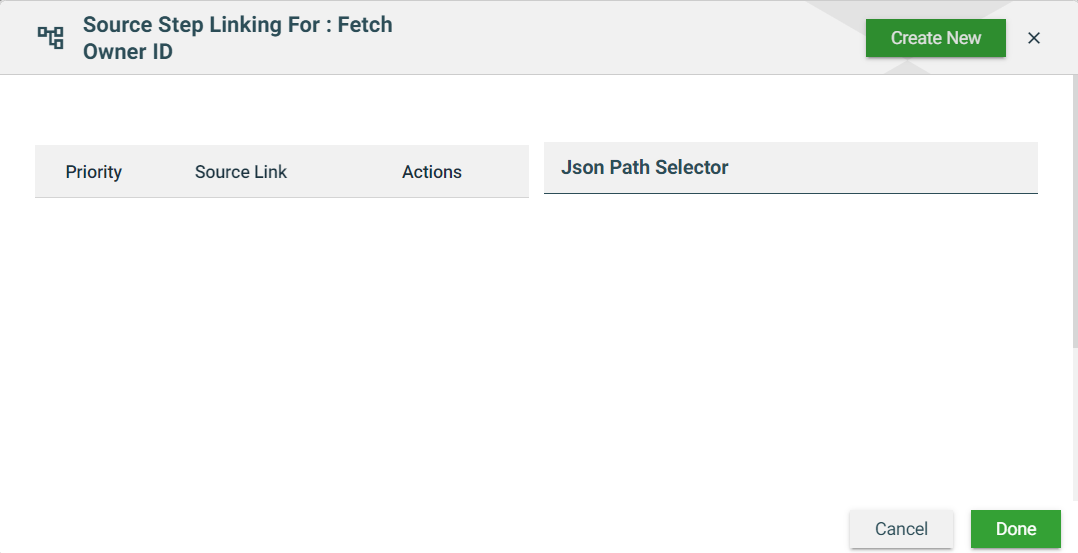
Click Create New.
-
Click select source Link. The Json Path Selector is automatically populated with available parameters.
-
Click on the parameter that you want to set as the source. The Json Path textbox is automatically updated. Click on the parameter that you want to set as the source. The Json Path textbox is automatically updated.\
-
Click Select. The chosen parameter is added to the PrioritySource Link list.\
-
Click Done. The chosen parameter is displayed in the Source Link column.
-
Click the icon in the Target Link column.
-
Choose the target parameter from the list of available parameters.
-
Click Select. The chosen parameter is added to the Target Link column.
-
Click
to save.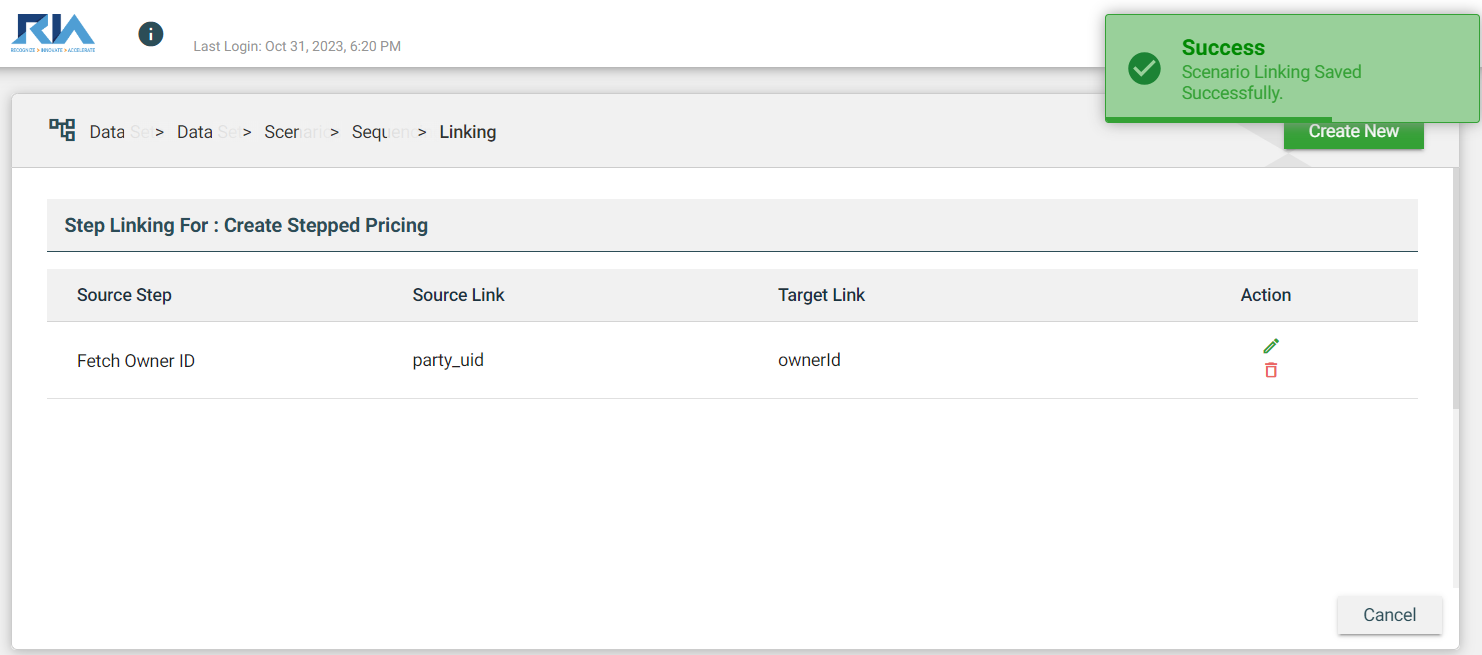
-
The step linking count is updated.

Views
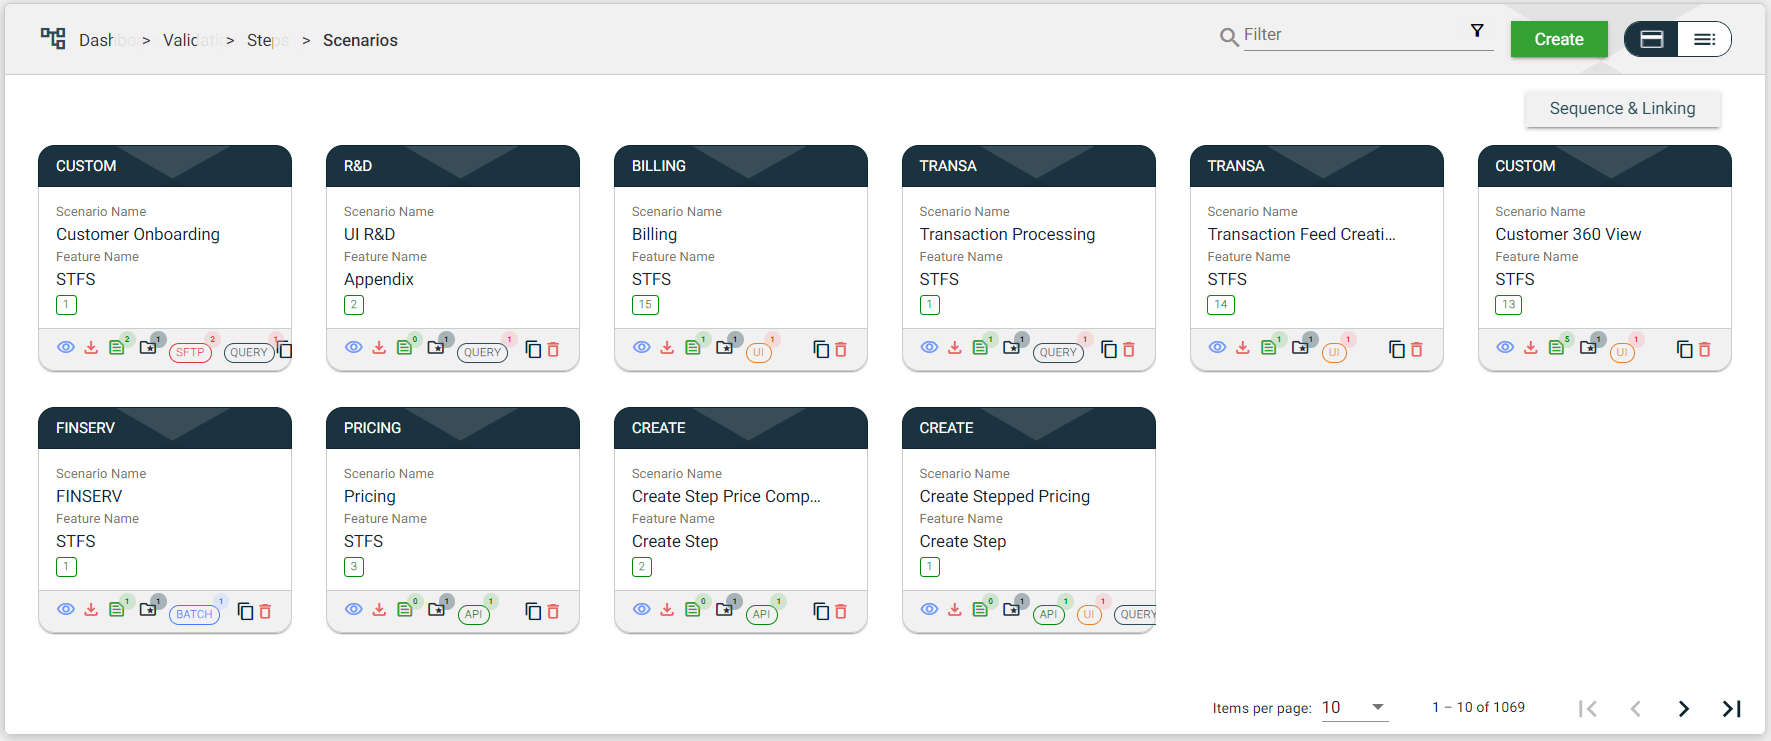
Card view
The card view presents all scenarios in the form of cards.
| Card Element | Description |
|---|---|
| Scenario Name | Name of the scenario. |
| Feature Name | Name of the feature associated with the scenario. |
| Sequence | Displays the sequence number of the scenario.
|
| Displays the combined request body templates of all the added steps. You can view the template in JSON or Excel format. | |
| Downloads the combined request body templates of all the added steps. You can download the template in JSON or CSV format. | |
Displays the total number of datasets associated with the scenario. |
|
| Displays the project details. | |
| Steps | Displays all the step types and the number of steps of each type configured in the scenario. |
| Clone icon that allows you to clone the selected scenario. When clicked, a popup window is displayed asking you to provide a new Scenario Name. All other components of the selected scenario are copied. | |
| Delete icon that allows you to delete the selected scenario. |
List view
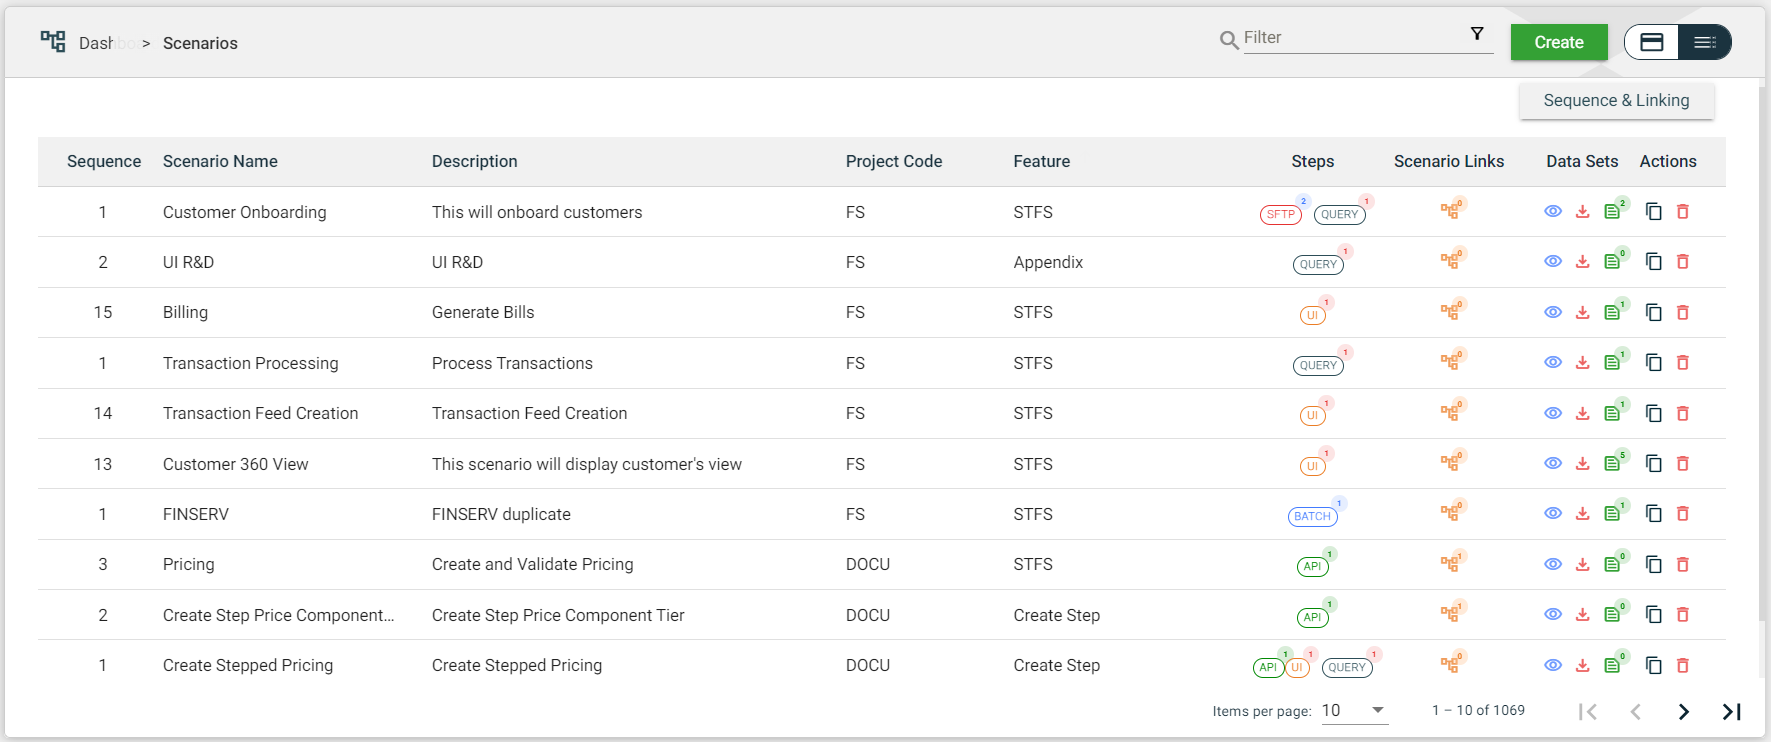
The list view displays all scenarios in a tabular format.
| Column Name | Description |
|---|---|
| Sequence | Displays the sequence number of the scenario.
|
| Scenario Name | Name of the scenario. |
| Description | Description of the scenario. |
| Project Code | Code of the project associated with the scenario. |
| Feature | Name of the feature associated with the scenario. |
| Steps | Displays all the step types and the number of steps of each type configured in the scenario. |
| Scenario Links | Number of scenarios linked to the selected scenario. |
| Data Sets | Displays the following icons:
|
| Actions | Displays the following icons:
|
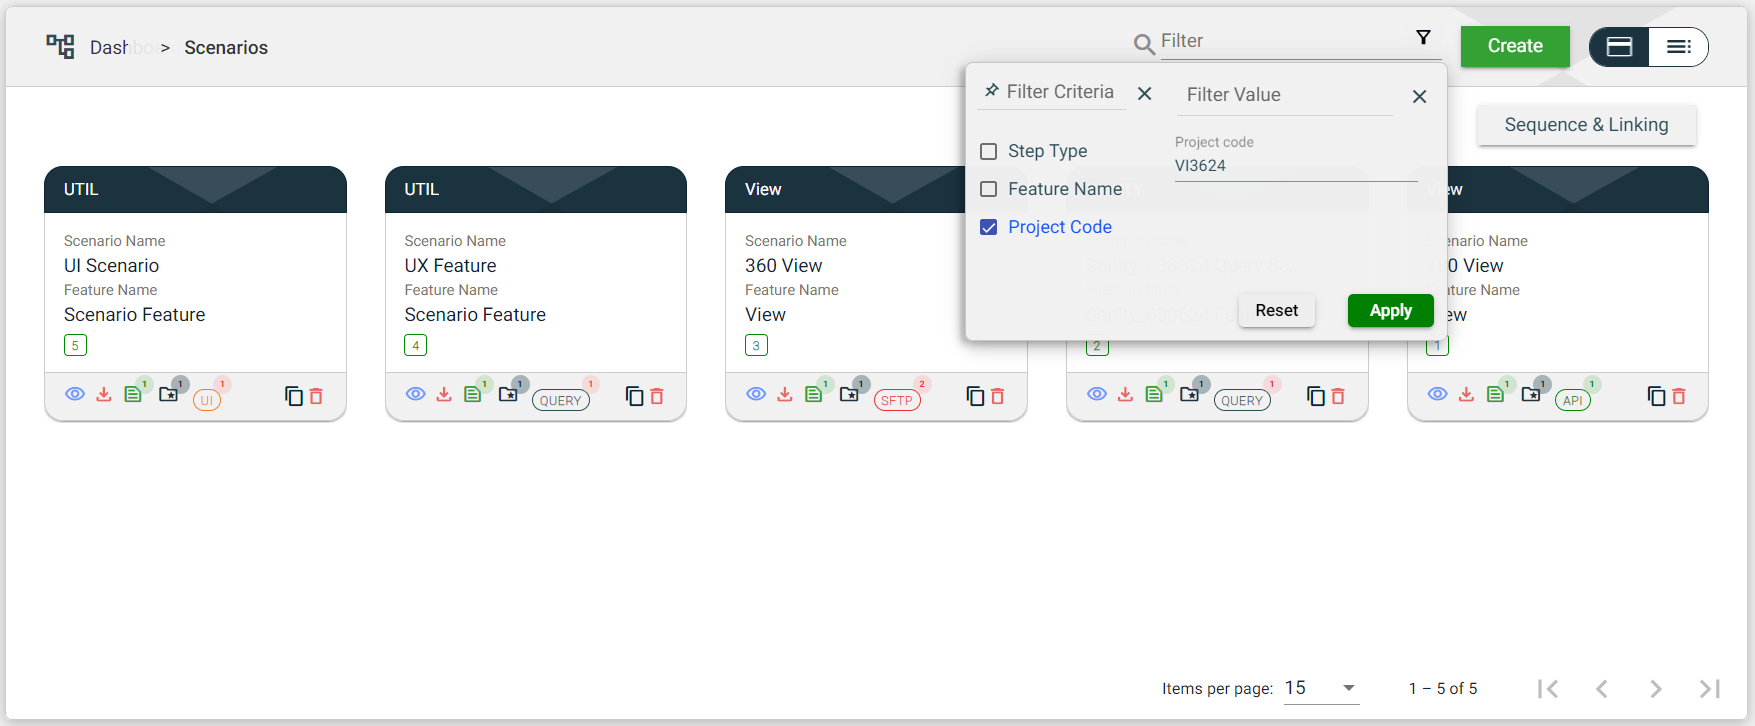
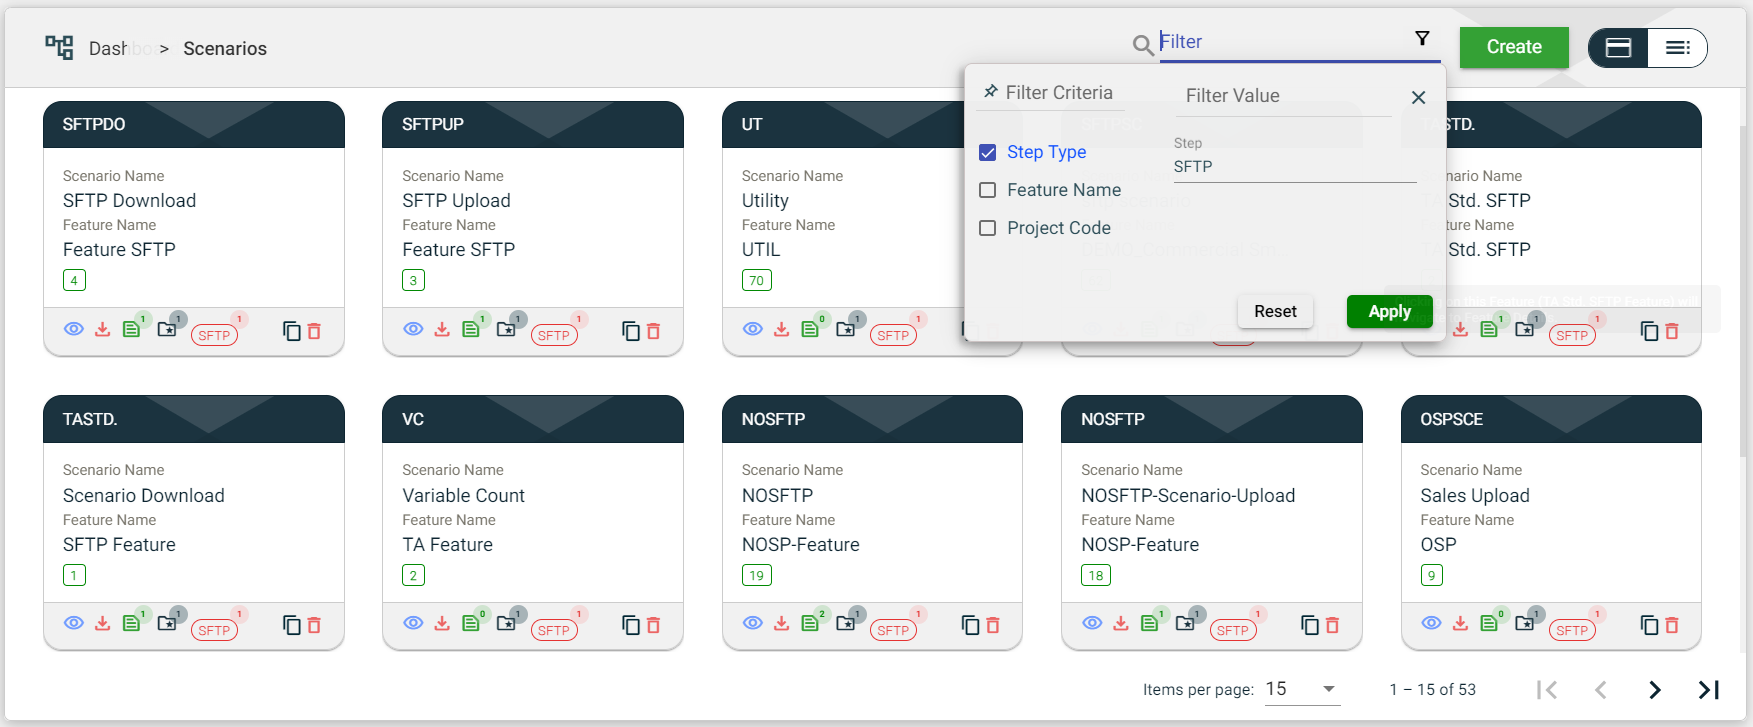
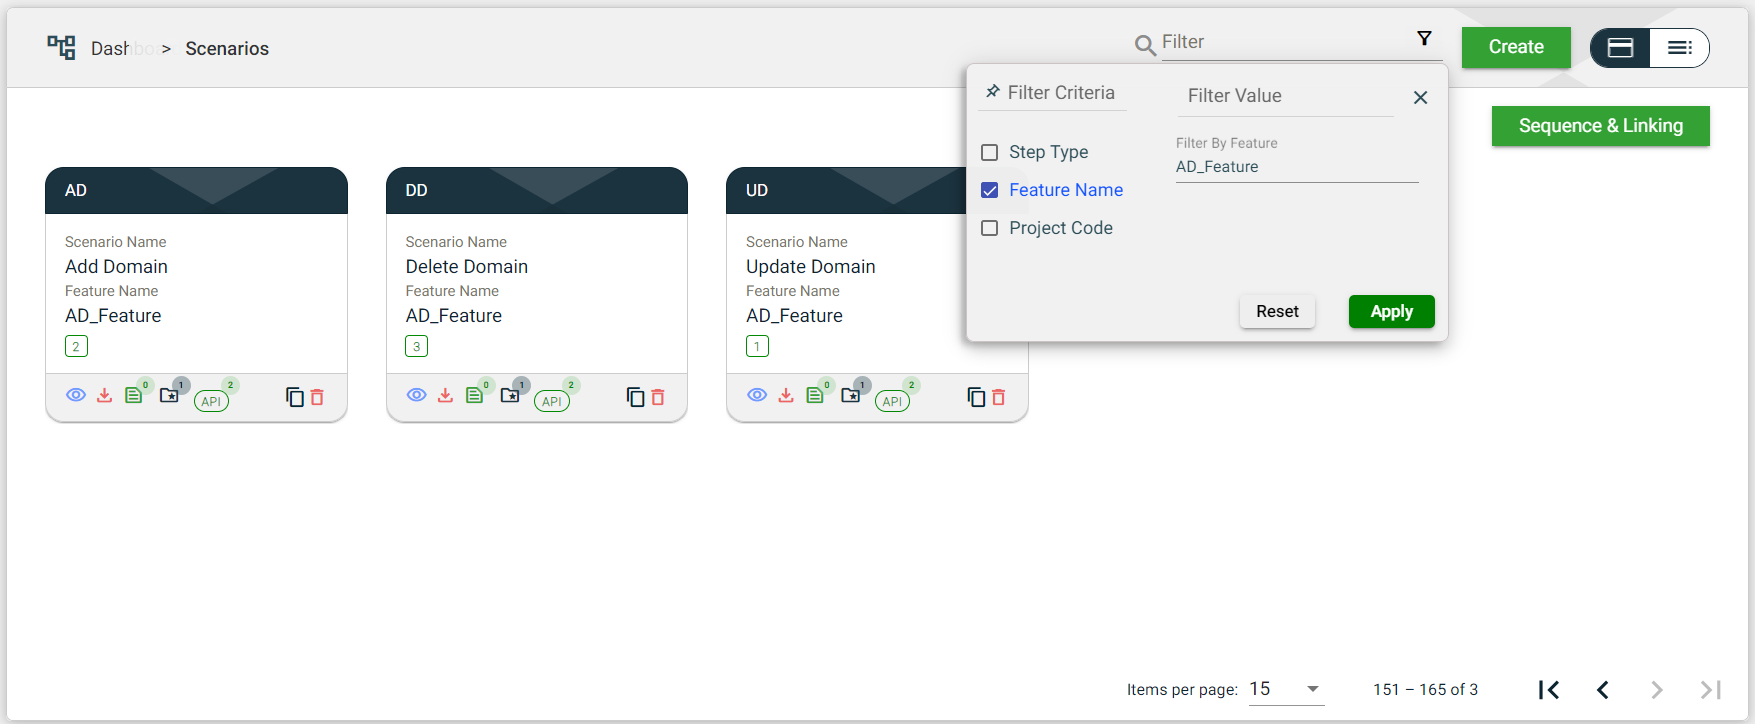
Filter
Multiple of the following filters can be selected on both card and list views:
- Filter By Scenario Name — allows you to filter the list of scenarios with the configured project by providing a keyword or the full name of the scenario. Only the scenarios that match the provided keyword or name will be displayed in the view. The filter value can be added in the initial search box which comes up. No filter criteria has to be selected.
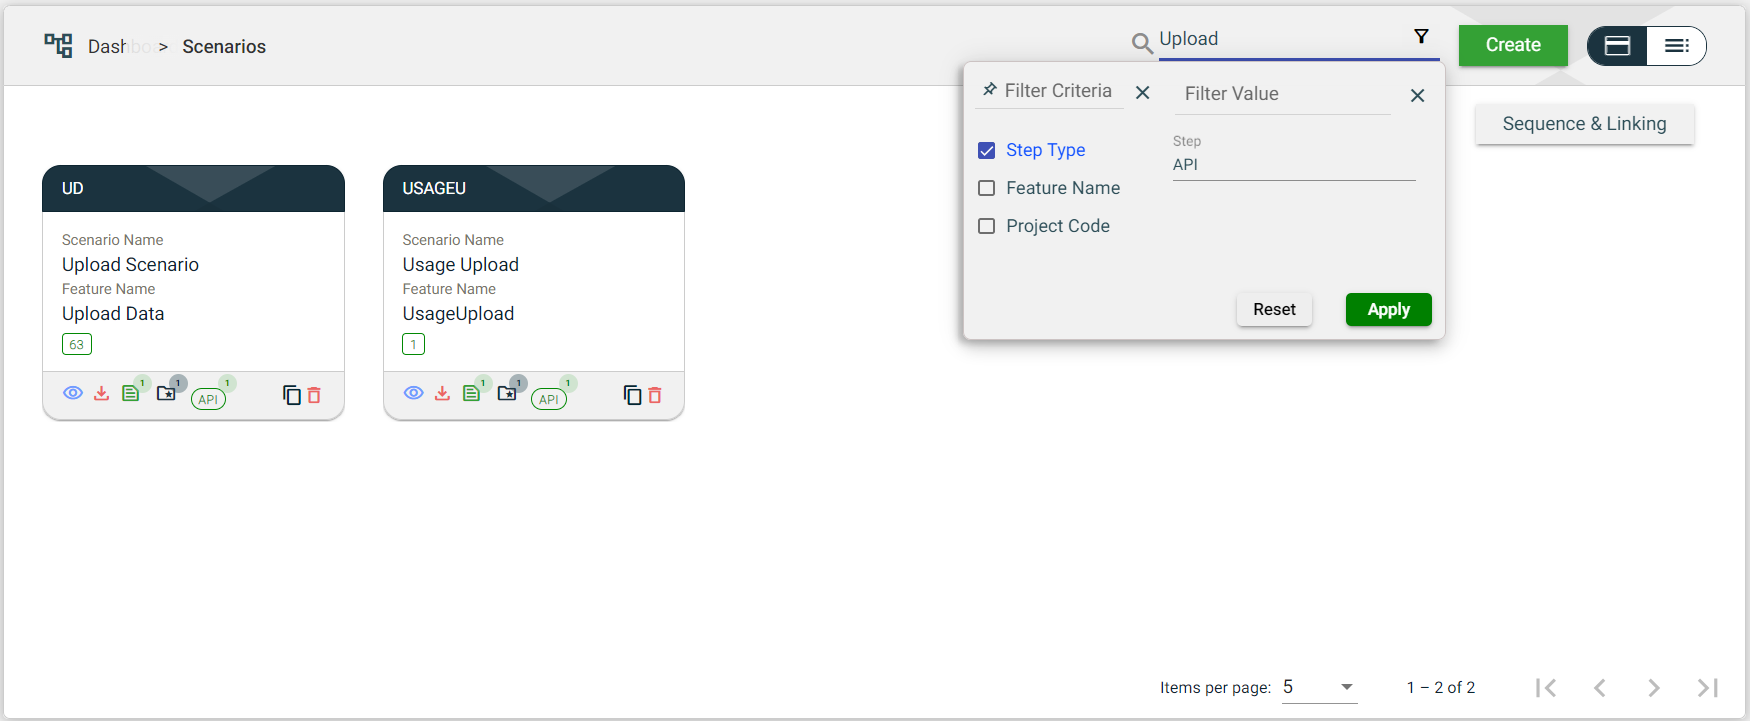
- Filter By Step Type— allows you to filter the list of scenarios with the configured step type by providing the full name of the step type. Only the scenarios with a configured step that matches the provided name will be displayed in the view. Step Type filter criteria has to be selected.
- Filter By Feature Name — allows you to filter the list of scenarios with the configured feature by providing a keyword or the full name of the feature. Only the scenarios with a configured feature that matches the provided keyword or name will be displayed in the view. Feature Name filter criteria has to be selected.
- Filter By Project Code — allows you to filter the list of scenarios with the configured project code by providing a keyword or the full name of the code. Only the scenarios that match the provided keyword or name will be displayed in the view. Project Code filter criteria has to be selected.